Teensyduino 1.60 Released

Teensy software 1.60 has been released. Arduino IDE 2 should automatically detect the new version and give a single click update.

For Arduino IDE 1.8.x, you must download and run the special installer.

In this article we’ll take a quick look at the new features and many bug fixes and small improvements 1.60 brings.

16MB PSRAM Chip

The new 16MB PSRAM chip available from ProtoSupplies (full part number IS66WVS16M8FBLL-104NLI) is now officially supported. Previously only an 8MB chip was supported.

You can solder 1 or 2 of these 16MB chips to the bottom side of Teensy 4.1 to expand its memory. ProtoSupplies also sells Teensy 4.1 with these chips soldered.

Larger PSRAM memory is particularly useful for polyphonic sample-based musical synthesis (demo video) and fast data logging applications which need a large buffer to deal with ongoing data collection while experiencing SD card or network latency.

The default clock speed for external memory is also increased by 1.60, so either 8MB or 16MB chips will perform faster than with prior versions.

Jonathan Oakley deserves credit for much of the work to support this new chip.

Lockable Teensy in Arduino IDE 2

Using Lockable Teensy involves running 3 programs to initialize the hardware with your encryption key. Once initialized, it can be used as normal where all programming is done with encrypted .ehex rather than a normal .hex file.

Generating the initialization programs previously required using Arduino 1.8.19, or command line utilities, because Arduino 2.x.x doesn’t support the Java-based plugins from older Arduino IDE.

Version 1.60 brings this plugin to Arduino IDE 2.x.x using the Typescript plugin system.

One unfortunate side effect is an empty “Teensy 4 Security” menu appears. This is a bug Arduino IDE 2 inherits from Theia IDE. It has been assigned Arduino IDE issue #2848. Hopefully future Arduino IDE will fix this issue.

Wire Slave Mode on Teensy 4

Wire slave mode, where Teensy acts as a I2C peripheral, has been improved.

A common I2C usage is a write transaction followed by a read transaction which uses repeated start, so the entire write-then-read operation is a single usage of the I2C bus. Previously the onReceive() and onRequest() functions would be called in the wrong order. 1.60 fixes handling of repeated start, so onReceive() is called first, which allows your program to make use of the info received when onRequest() is called.

Slave mode now uses a glitch filter which prevents noise coupled to the SDA and SCL lines from disrupting communication. This problem was discovered by an application transmitting digital audio data and I2C control between boards, where the audio clock signal could interfere.

Use of Teensy 4.x in as an I2C slave device should be more reliable with version 1.60.

SoftwareSerial on Teensy 4 and Teensy 3

SoftwareSerial is finally fully supported on all Teensy boards.

For new projects on Teensy 4, you can achieve many more serial ports with FlexIO_t4 FlexSerial which creates more ports with hardware-based FlexIO. SoftwareSerial support is mainly meant for compatibility with Arduino sketches written for Arduino Uno.

Previously on Teensy 3 and Teensy 4, SoftwareSerial was just a thin abstraction which used real hardware serial ports. It only worked if you chose the pins of an actual serial port. This allowed programs written for Arduino Uno to work with only minor edit and choosing different pins. Now those program can work “out of the box”.

The new implementation on Teensy 3 and Teensy 4 uses pin and timer interrupts to receive, so it doesn’t block the CPU for other interrupts like SoftwareSerial on most other boards. 10 interrupts per received byte is less efficient than only 1 with FlexSerial or less with regular serial which uses a hardware FIFO, but a huge improvement compared to blocking all interrupts for the duration of the incoming byte.

USB Keyboard NKRO

Teensy USB Keyboard mode can now support all-keys NKRO communication to your PC.

Traditional 6 key mode is still the default, for maximum compatibility with PC bios and KVM switches. To enable NKRO mode, you must edit usb_desc.h within the core library. Simply change KEYBOARD_SIZE to 16 for all-keys NKRO.

NKRO mode uses 1 bit for every key, so any combination of any number of keys may be pressed simultaneously. This can be useful for controlling music synthesis software and video games.

Bug Fixes and Updates

  • HardwareSerial XBAR pins 7, 8, 36 on Teensy 4 fixed thanks to KurtE
  • HardwareSerial receive with setRX fixed on Teensy 4 thanks to sndsgd
  • HardwareSerial serialEvent fixed on Teensy 3
  • digitalWriteFast() now check for valid pin number in non-const pin case
  • Fix extmem_realloc with NULL on Teensy 4.1
  • Fix __SSAT return type
  • FS class now has virtual destructor
  • Audio fix TDM2 input and output thanks to Jonathan Oakley
  • Audio fix stuck AudioEffectFade with no input thanks to Jonathan Oakley
  • Audio fix AudioEffectFreeverbStereo thanks to Synvox
  • Audio fix AudioSynthToneSweep buffer overflow thanks to Steven Hazel
  • Audio improve AudioEffectReverb thanks to Eric Brombaugh
  • Audio fix for Teensy LC code thanks to Mark Tillotson
  • Teensy Loader waits longer for large flash erase
  • Suppress pointless C++ ABI warnings
  • Fix erroneous “Teensy should be selected from teensy ports” message
  • Audio effect envelope: don’t re-start release if noteOff() called, thanks to Jonathan Oakley
  • Audio effect granular: add guard macros, thanks to Jonathan Oakley
  • Audio effect reverb: fix reverb cut off when incoming data stops, thanks to Jonathan Oakley
  • Improve Teensy Loader toolbar icons on Windows
  • Fix Teensy Loader toolbar on MacOS
  • SD Improve SDIO media presence detection
  • SdFat SPI driver avoid 512 byte stack usage, thanks to KurtE
  • LittleFS update Fujitsu FRAM, thanks to mjs513
  • SerialFlash fix use of alternate SPI ports, thanks to KurtE
  • ST7735_t3 support 320×480, thanks to KurtE
  • ST7735_t3 fix colors with setRotation(2), thanks to Jonathan Oakley
  • USBHost_t36 KeyboardController delete debug messages, thanks to Tristan Rowley
  • Fix DMA TCD copy out of order by compiler optimization, thanks to jmarsh
  • FS class and LittleFS use constexpr constructor
  • Improve PLL PFD setup, hopefully fixes weird crashes, removes need for startup hacks
  • Fix AudioMemory with optimize Smallest Code with LTO
  • DMAChannel default channel preemption settings
  • SdFat examples recommend at most 25 MHz for SPI
  • CrashReport minor changes to printed message, thanks to Shawn Silverman
  • USB Keyboard define GUI key names
  • USB MIDI receive return channel=0 for system messages
  • USBHost_t36: recover from device errors during enumeration
  • Libraries updated: ST7735_t3, FlexIO_t4, ILI9488_t3, LittleFS, QuadEncoder, ShiftPWM

Build Process and MacOS Support

The systems used to build Teensy software have been updated. Teensy Loader is now built with wxWidgets 3.2.6, rather than a variety of very old versions different to each operating system.

Much of this change was needed because of changes in application signing practices for Windows and MacOS. For Windows, code signing certificates are now issued only by hardware keys. For MacOS, Apple discontinued notarization from older versions of X-code, effectively blocking older Macs.

One unfortunate side effect is we had to discontinue supporting old Arduino IDE 1.8.x on MacOS. Teensyduino still full supports use of Arduino IDE 2.x.x on MacOS.

Support for Linux i686 (32 bit Intel X86) was also dropped.

While these changes drop support for old systems, the updated build process uses newer toolchains which should give better long-term support than the older software used to build all prior Teensy software.

SparkFun To Manufacture Teensy

We are excited to announce the expansion of our partnership with SparkFun Electronics to include the manufacturing of all Teensy products. Teensy 4.0, Teensy 4.1 and related accessories will now be manufactured by SparkFun in Colorado, USA.

SparkFun will also fulfill direct sales and also sell to other distributors, so you can continue to buy from stores which currently carry Teensy.

We’re taking this bold step with 2 main goals.

1: Reliable long-term supply of Teensy. SparkFun is among the largest and best maker-focused electronics companies. As Teensy continues to grow, SparkFun has the manufacturing capability and sales teams needed to support that growth.

2: Allow PJRC to renew focus on software development and the electronics community.

Ordering pages at PJRC will soon update with links to buy from SparkFun as we ship the last Teensy stock made in Oregon, USA. However, PJRC will continue selling chips for DIY projects based on Teensy design.

We will continue to host the Teensy Forum. With SparkFun taking the role of manufacturing Teensy and shipping orders, we’re anticipating being able to participate in more community and project-focused forum conversations.

PJRC and SparkFun have enjoyed a relationship for several years and we are looking forward to continuing to work together. We believe this partnership will secure a bright future for Teensy.

Teensy 3.2 End Of Life

With great sadness, we’re discontinuing Teensy 3.2.

Teensy 4.0 and 4.1 will continue.  We’re able to get the new 600 MHz chips in sufficient quantity.

But the sad reality is we simply can’t get enough of the old 72 MHz chips.  The ongoing problems with old chip supply has become a huge distraction which is impeding progress on Teensy 4.x development.

Teensy LC, 3.5, 3.6 were discontinued earlier this year.  When the small stock we have remaining for Teensy 3.2 runs out, it too will be gone.

Teensyduino 1.54 Released

Teensyduino 1.54 was released earlier last week.

This article is a detailed look at the new & improved features version 1.54 brings.

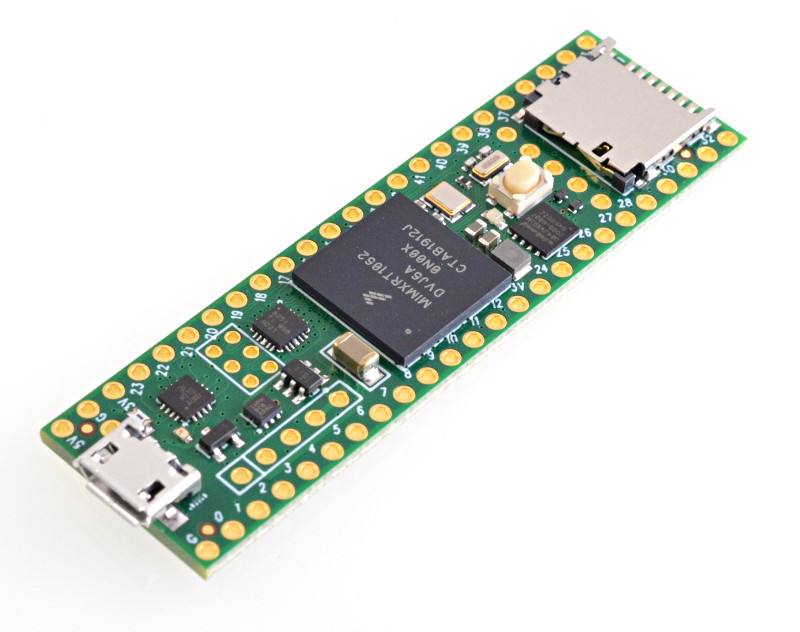
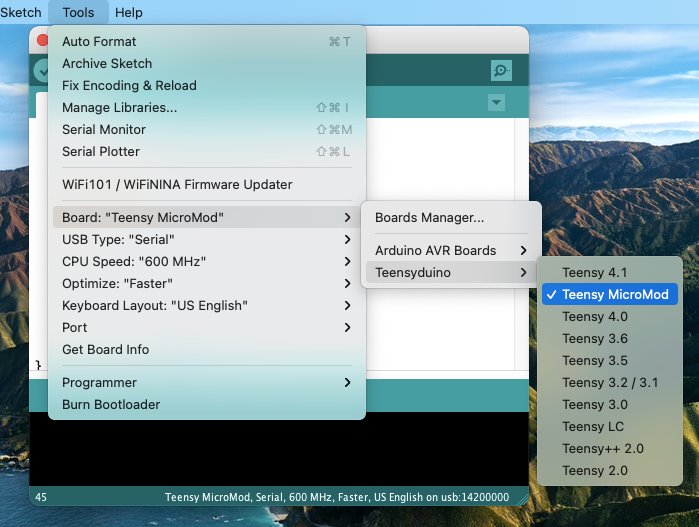
MicroMod Teensy Support

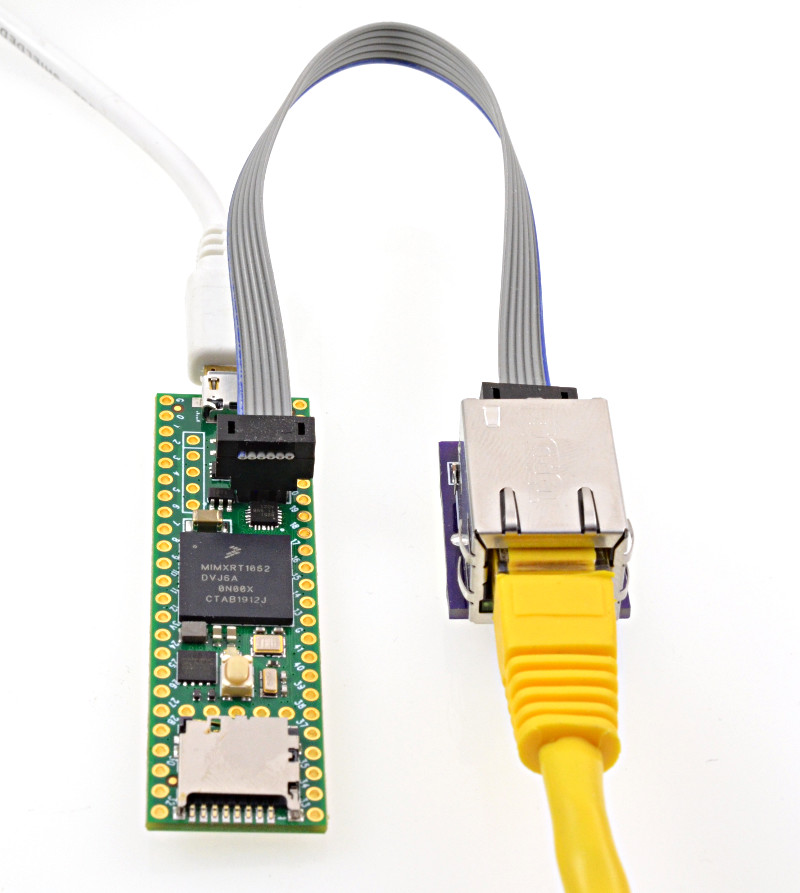
Sparkfun recently released MicroMod Teensy, which is a product of collaboration between PJRC and Sparkfun.

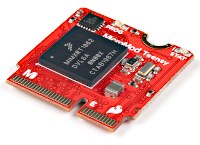
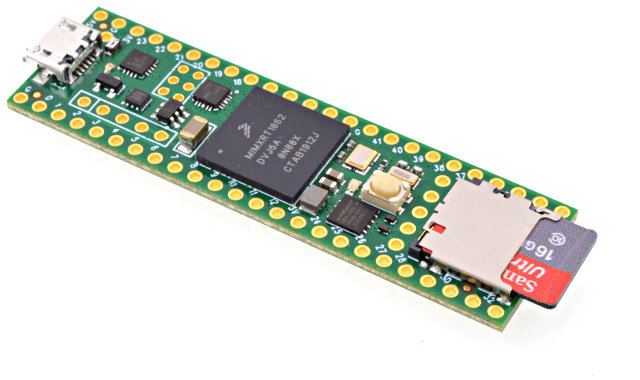
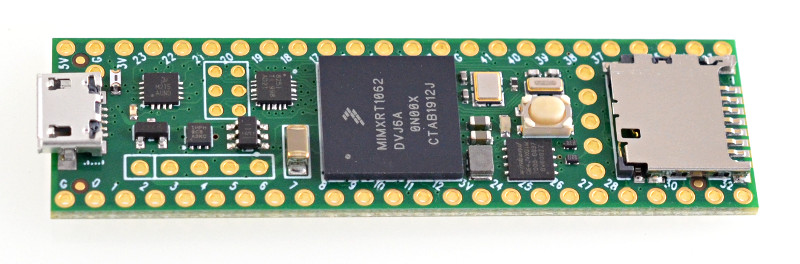
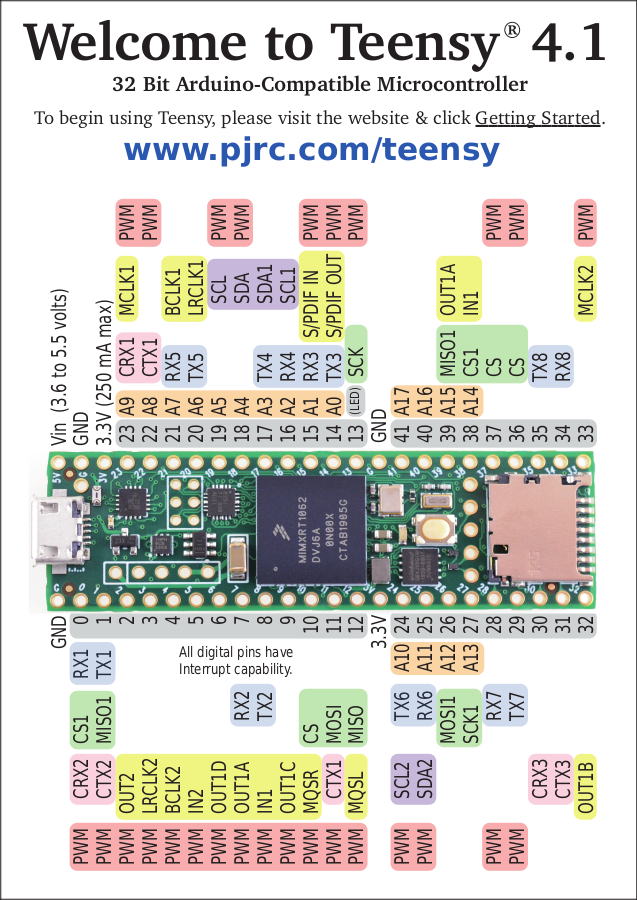
MicroMod Teensy has hardware similar to Teensy 4.0 (600 MHz ARM Cortex-M7, 1MB RAM), but with larger 16MB flash memory.

Teensyduino 1.54 brings full support for MicroMod Teensy.  Simply select it from Arduino’s Tools > Boards menu.

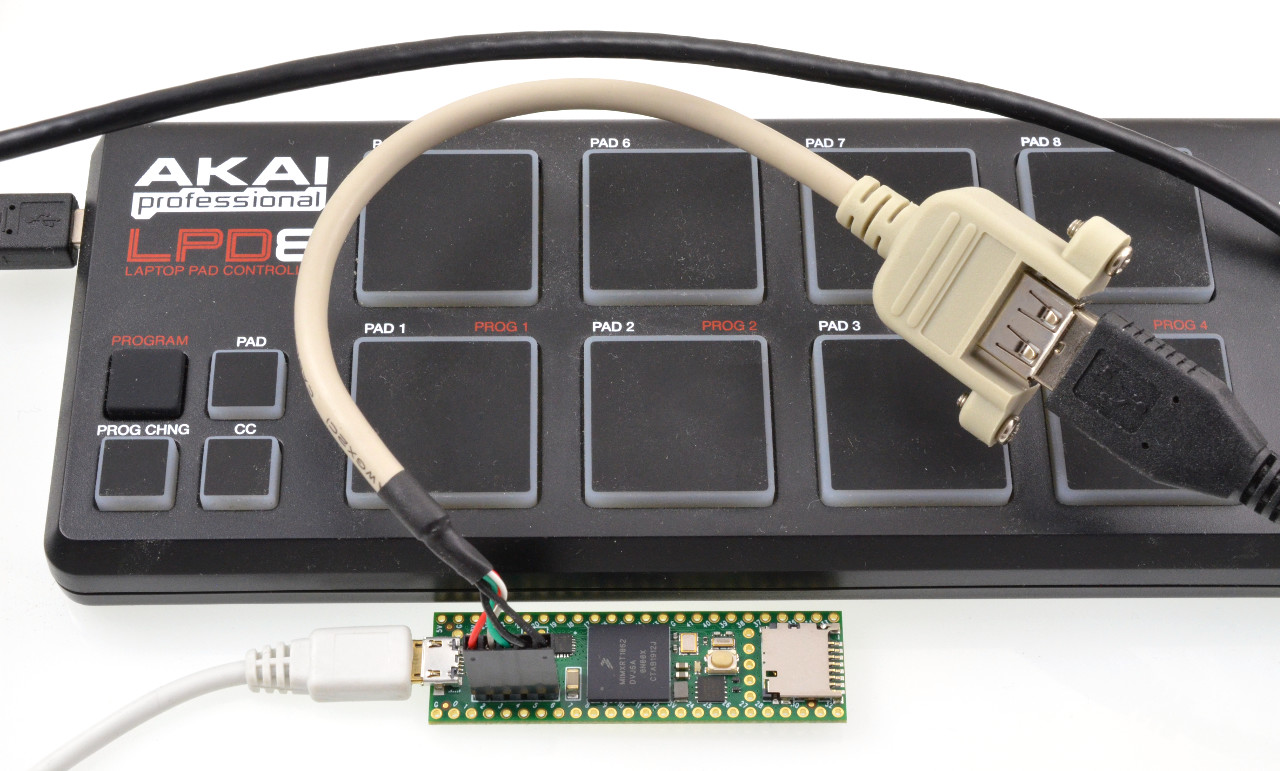
Teensy has traditionally focused on DIY electronics experimentation & building, particularly with solderless breadboards.  While a few shields exist, like the Audio board, PJRC doesn’t have the resources to create a large ecosystem of shields & accessories.  Almost all projects involve DIY building.

Sparkfun’s MicroMod form factor aims to give you an ecosystem of “just plug parts together” carrier boards and Qwiic I2C modules for a wide variety of projects.  If any of Sparkfun’s growing collection of carrier boards is a close fit to your project’s needs, and you’d rather buy something than experience the joy and learning (but also frustration) of DIY building, MicroMod carrier boards may save you a lot of time.

MicroMod can also be useful for low volume production.  Obviously at high volume you would create a fully custom design from the ground up, and at medium volume a custom PCB using the Teensy 4 bootloader chip can make good sense.  But for low volume production, keeping up-front costs low and minimizing money tied up in inventory is often the best path to success.  In those cases, you would manufacture a simple 2-layer PCB with as few expensive parts as possible, then populate it with Teensy and other complex modules at the time you actually sell.

Traditional Teensy requires through-hole header pins, which are simple but labor intensive to solder.  MicroMod form factor allows you to build your PCB using an inexpensive M.2 socket.  Then when you’re ready to sell a product, just buy the MicroMod board and plug it in.

Like all Teensy models, MicroMod Teensy is supported by Teensy Loader.

Teensy Loader is a stand alone program which can be used without the rest of Teensyduino and the Arduino IDE.  When you need to program a large number of boards with the same firmware, load the HEX file and turn on Teensy Loader’s “Auto” mode.  Then plug each board into a USB cable and press its Program / Boot button, or momentarily touch pads together if your custom PCB is made without a pushbutton.  Auto mode immediately uploads your firmware without requiring any keystrokes or mouse clicks!


Arduino 1.8.15 Support

Arduino released Arduino IDE 1.8.15 on May 15, 2021, and also version 1.8.14 several days earlier.

Teensyduino 1.54 brings full support for these 2 latest (non-beta) versions of the Arduino software.

If you are unsure which version you have, click Help > About to check.  On Macintosh, the About menu item is found under the program name rather than Help.


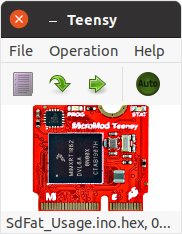
SD Cards Using SdFat with SD Library Compatibility

Until now, 2 different libraries were used to access SD cards.  The old Arduino SD library is used by most programs.  Bill Greiman’s SdFat library offers higher performance, support for large cards, and use of long filename rather than limited to 8.3 DOS filename format.

Teensyduino 1.54 has completely removed the very old Arduino SD library, which internally included an ancient version of SdFat.

SD.h has been replaced by a thin compatibility layer to allow all programs written to use the old SD library to still compile and function properly, but all SD card access is now actually performed with the SdFat library.

You can even mix usage of the traditional SD library and SdFat’s more capable API in the same program.  To do this, use “SD.sdfs” to access the SdFat instance within the SD compatibility layer.

One of the most useful ways to mix APIs is calling SdFat’s begin(), with SD.sdfs.begin() rather than the simple SD.begin() which offers only a choice of which pin to use for CS.  SdFat’s begin() lets you configure several hardware access optimizations.

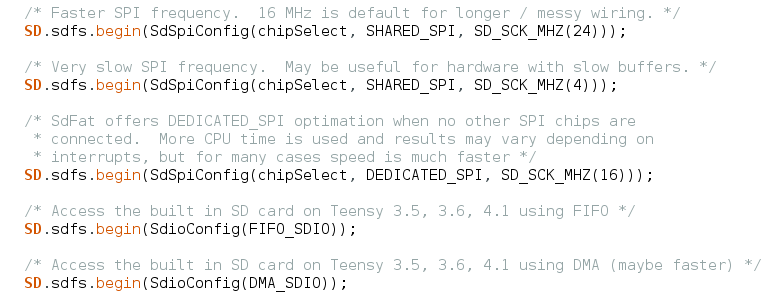
After using any of these, the SD card can be accessed using either SD library functions, or SdFat functions, or a mix of both.  For more detail, open File > Examples > SD > SdFat_Usage.


LittleFS for Files on Flash Chips

A LittleFS library is now included, providing littlefs published by ARM with a set of drivers for common memory chips and a high-level API compatible with the Arduino SD library.

Before 1.54, only the SerialFlash library was used for flash memory chips on Teensy.  SerialFlash provides essentially raw access to the underlying flash memory, which gives best performance, but comes with many limitations.  In particular, files must be created with a fixed size and can not grow in size beyond their original allocation.

LittleFS provides a traditional filesystem.  Files may be written as you would with the Arduino SD library.  LittleFS has flash memory wear leveling and copy-on-write behavior to protect against filesystem corruption if power is lost while writing, so LittleFS is a good choice for data logging or other applications which regularly write.  However, the copy-on-write behavior does impose overhead, making LittleFS slower than SerialFlash.

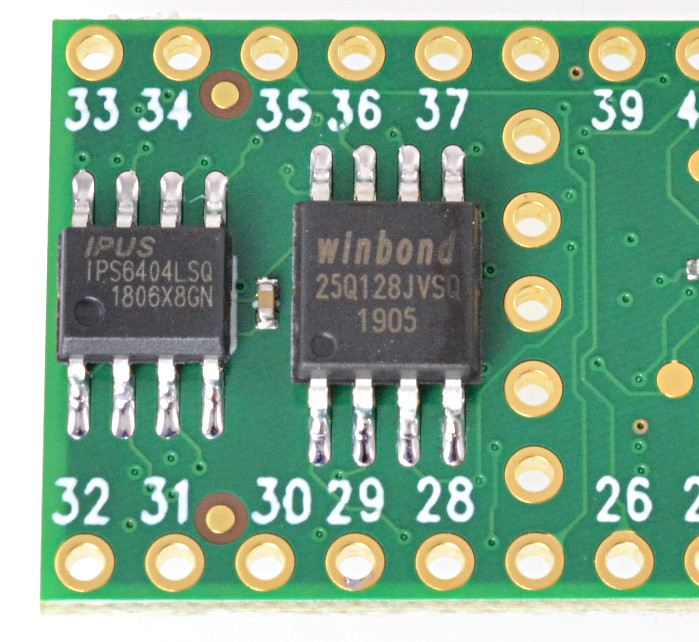
LittleFS supports flash memory chips on both the QSPI memory area of Teensy 4.1 and connected to the SPI ports.  FRAM memory chips are only supported on SPI ports.  Teensy’s built in memory can also be used.

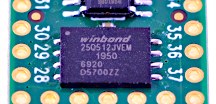
These are the supported memory types with LittleFS in Teensyduino 1.54.

  • Winbond W25Q16JV*IQ / W25Q16FV
  • Winbond W25Q32JV*IQ / W25Q32FV
  • Winbond W25Q64JV*IQ / W25Q64FV
  • Winbond W25Q128JV*IQ / W25Q128FV
  • Winbond W25Q256JV*IQ
  • Winbond W25Q512JV*IQ
  • Winbond W25Q64JV*IM (DTR)
  • Winbond W25Q128JV*IM (DTR)
  • Winbond W25Q256JV*IM (DTR)
  • Winbond W25Q512JV*IM (DTR)
  • Adesto/Atmel AT25SF041
  • Spansion S25FL208K
  • Winbond W25N01G
  • Winbond W25N02G
  • Winbond W25M02
  • Cypress CY15B108QN-40SXI
  • Cypress FM25V10-G
  • Cypress FM25V10-G rev1
  • Cypress CY15B104Q-SXI
  • ROHM MR45V100A
  • Teensy 4.0, 4.1, MicroMod Program Flash
  • RAM Disk, internal RAM or PSRAM on Teensy 4.1

Use of program memory comes with some caveats.  While writing, your program may briefly stall when the flash memory is busy with an erase or write operation.  Uploading new programs fully erases the flash memory, destroying any saved files.  Future Teensyduino may provide a way to preserve the files across code uploading, but in 1.54 all files are lost.  Of course, this applies only to program flash.  Uploading code doesn’t alter data stored in other flash memory connected to the SPI ports or QSPI memory expansion.

To get started using LittleFS, check out the examples in File > Examples > LittleFS.  Documentation and more example code can be found in the LittleFS README file.


Audio Bandwidth Limited Waveforms

Audio waveform synthesis now supports bandwidth limited sawtooth, square, triangle and pulse waveforms, thanks to a contribution from Mark T.

These are the waveform types now supported by the waveform synthesis object.

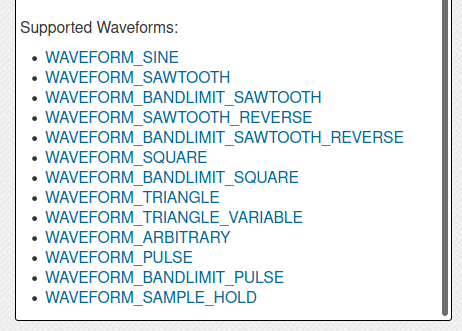
Bandwidth limited waveforms are useful when another waveform rapidly modulates frequency, phase or amplitude.  Modulation creates additional spectral content.  With standard full bandwidth waveforms, this new sound content can suffer from Nyquist aliasing.  Using bandwidth limited waveforms can avoid those aliasing problems.

Some people also feel the bandwidth limited waveforms simply sound better, or “more musical”.

Now you can have either standard or bandwidth limited waveforms, simply by changing the waveform name.  However, the bandwidth limited versions do require more CPU time.  Teensy 4.0, 4.1 or MicroMod are best for polyphonic synthesis where many bandwidth limited waveforms may need to be synthesized simultaneously.


Audio Ladder Filter

The audio library now includes a low-pass ladder filter, thanks to a contribution by Richard van Hoesel, based on the Oscillator and Filter Algorithms for Virtual Analog Synthesis paper published by Vesa Välimäki and Antti Huovilainen in Computer Music Journal 2006.30.2.19.

This ladder filter attempts to provide classic Moog sound when used with subtractive synthesis, where complex waveforms are generated with rich sound spectrum and then filtered, often using other waveforms to dynamically alter the filter’s parameters.

The ladder filter has 3 inputs, for the signal to filter, a control signal which can modulate the filter’s corner frequency, and another control signal which can modulate the filter’s resonance.

Like the original analog Moog filter, resonance can be adjusted or modulated all the way to cause self oscillation.  Many classic synthesizer sounds make use of this self oscillation feature.

Internally, this ladder filter uses hyperbolic tangent approximation and 4X oversampling to simulate the non-linear behavior of the original analog Moog filters.  An inputDrive() function is available to adjust the response from a very “clean” sound to the “dirty” overdrive mode popular with the Minimoog Model D synthesizer.

To quickly hear the ladder filter, open File > Examples > Audio > Synthesis > LadderFilter.

The ladder filter is numerically intensive.  While it technically can run on Teensy 3.5 & 3.6, for practical usage Teensy 4.0 should be considered the minimum required hardware.


RGBW LEDs

Both WS2812Serial and OctoWS2811 now fully support WS2812,  WS2812B, SK6812 or “NeoPixel” RGBW addressable LEDs.  The additional white LED allows creation of pastel-like colors, and reliable white at greatly reduced power consumption.

These libraries use Direct Memory Access (DMA) to avoid blocking your program from running while the LED data is transmitted at 800 kbit/sec.  The non-blocking behavior gives your program more time to compute complex animations between LED updates.  It also prevents interference with audio, serial communication, or other libraries requiring interrupts.

On Teensy 4.0, 4.1, and MicroMod, OctoWS2811 can use any combination of digital pins, even while using RGBW LEDs, rather than only a fixed set of 8 pins as with older Teensy models.  For details, open File > Examples > OctoWS2811 > Teensy4_PinList.  Both libraries now include examples for RGBW.  If switching from RGB to RGBW, be sure to copy or update the buffer memory definition, as 4 bytes are needed for each LED rather than only 3.


FlexIO_t4 Library

FlexIO provides a sort of construction kit for building custom communication peripherals, using 32 bit shift registers, 8 & 16 bit timers, special control logic, and configurable signal routing to I/O pins.

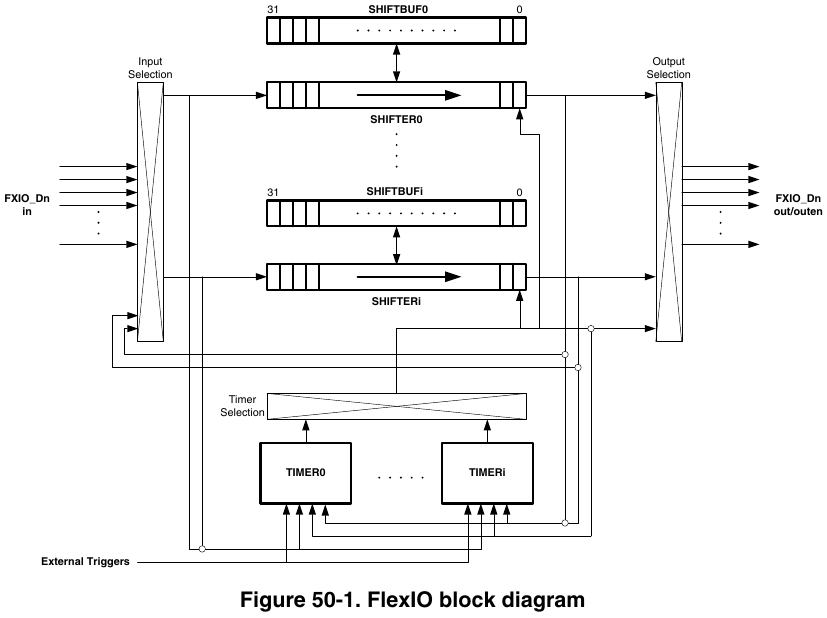
Each FlexIO port provides 8 shift registers and 8 timers.  The IMXRT1062 chip on Teensy 4.0 has 3 of these FlexIO ports.

Teensyduino 1.54 now includes the FlexIO_t4 library written by Kurt E.

First, this library provides objects for FlexSerial and FlexIOSPI classes, so you can create even more SPI and Serial ports, beyond the regular 8 serial ports and 3 SPI ports!

Second, the library provides dynamic resource management for the shifter & timer resources within each FlexIO port.  The goal is for libraries using FlexIO, such as TMM-HM01B0-Camera and TriantaduoWS2811, and FlexSerial & FlexIOSPI, to coordinate their usage of the shifter & timer resources.  While this resource coordination is still a work-in-progress, ideally in future versions you use any combination of these and other FlexIO libraries, they will automatically resolve which library instances utilize each shifter & timer within FlexIO ports.


Additional Serial Buffer Memory

Each hardware serial object, Serial1 to Serial8, has buffers for storing data recently received or ready to transmit.  For certain applications, you might like to increase the size of these buffers.

For example, if your loop() function performs tasks which need to happen regularly for proper functioning of your project, but also needs to occasionally transmit a large message on a serial port, the fixed buffer size can become an issue.

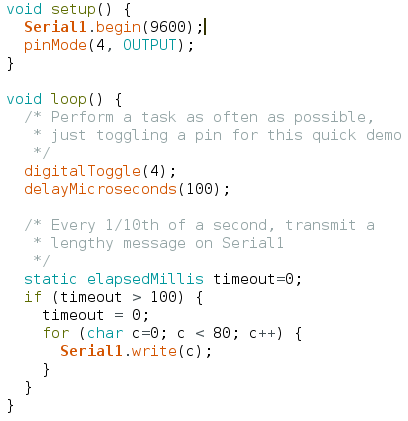
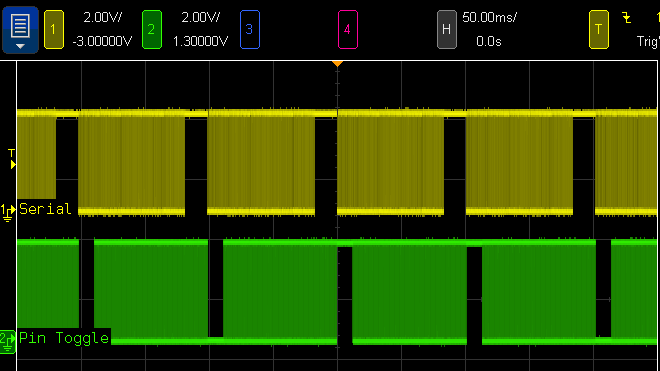
When this simple program is run, indeed the messages appear on the serial TX1 pin (yellow trace below) every 100ms.  But at the beginning of each message, pin 4 (the green trace below) stops changing for several milliseconds because Serial1.write() must wait for space in the transmit buffer.

The usual but complex solution to this problem is Serail1.availableForWrite(), which tells you how many bytes can be written without incurring extra delay.  However, this requires restructuring your program to write the outgoing message in multiple pieces.  If the message contains data which may change over time, perhaps you make a copy of all the data.  Doable, but complicated.  Everything would be so much simpler if you could increase the Serial1 buffer size.

Now you can increase the serial buffer sizes on all 32 bit Teensy boards, thanks to contributions from Kurt E.  To increase the Serial1 transmit buffer, you use Serial1.addMemoryForWrite().

You create an array of bytes to serve as the extra memory.  The array MUST be either static or global scope, because Serial1 will continue using it long after the current function ends.

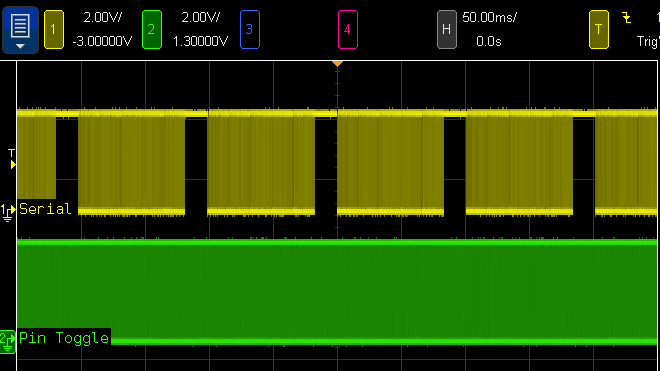
When this program is run with extra buffer memory, the green trace never stops.  The loop() function never stalls waiting on Serial1.write() because the buffer is now large enough to hold the entire outgoing message.

Of course, you can also increase the receive buffer with Serial1.addMemoryForRead().  If your program spends time doing lengthy computations or other work while serial data is arriving at a high baud rate, extra buffer memory can help avoid the loss of incoming bytes.


More Serial RX & CTS Pin Choices

Teensyduino 1.54 also brings more choices for which pins to use to receive serial data and flow control signals, on Teensy 4.0, 4.1, and MicroMod.  Thanks to another contribution from Kurt E, you can now use pins 0, 1, 2, 3, 4, 5, 7, 8, 30, 31, 32, 33 with any of the Serial1 to Serial8 setRX(pin) and attachCts(pin) functions.

Normally the serial signals connect to the pins through a multiplexer which allows 1 of 8-10 peripherals to control the pin.  This new feature automatically routes the serial receive and CTS receive signals through the “XBAR” (crossbar trigger network) peripheral to open up many more choices than could be configured using only the normal pin multiplexers.

This is particularly valuable for use of hardware RTS / CTS flow control, which allows fast baud rates up to 6 Mbit/sec to be used reliably with “normal” programs which may not always read incoming data rapidly.  Serial1 to Serial8 support transmitting RTS on any pin, but with prior software, only Serial3 and Serial5 on Teensy 4.x could receive CTS (and Serial5 only supported CTS on a SD card pin).  Now RTS / CTS flow control can be used easily with any of the 8 serial ports.

One caveat, however, is each serial port may only route one input signal through the XBAR peripheral.  For each serial port, you may use either setRX() or attachCts() with these special XBAR pins, but not both.
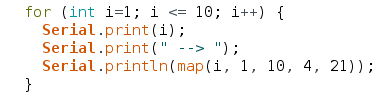
 

Improved map()

Arduino’s map() function provides a convenient way to scale a number from one range to another.  One common use is scaling the analog input pins, which give 0 to 1023 with default settings, to another range, such as 1 to 100.

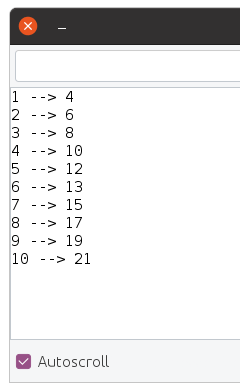
Traditionally, map() has worked only with integer numbers.  For example, mapping 1-10 to 4-21:

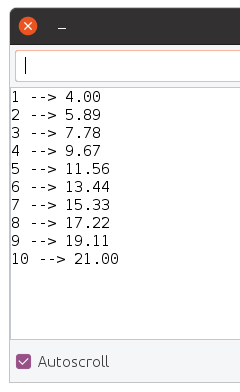
Sometimes you may want more precision.  With Teensyduino 1.54, map() now automatically uses floating point math, if the input variable is float or double type.  You can store your number into a float variable, or convert it to float right at the map input.

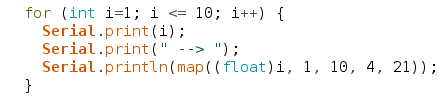
Of course, if you want the traditional integer-based map(), simply use an integer type for the input.  Internally, a little C++ template magic is used to automatically use the integer version when your input is an integer type, or the float version when your input is float or double.  If using 64 double, the math is done with full 64 bit precision.

Arduino map() has a long history of suffering integer round-off errors.  For most applications, these errors are small and never noticed.  But they are errors nonetheless.

Teensyduino 1.54 fixes the integer map() equation, so the integer results agree with the precise floating point results, when the float numbers are properly rounded to the nearest integer.


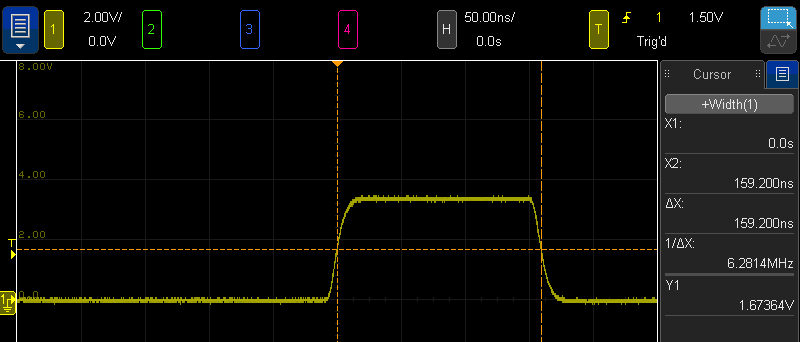
delayNanoseconds() on all Teensy Models

All Teensy models now have a delayNanoseconds() function, even on Teensy 2.0.  When you need a very short delay, this function is simple and easy to use.

Often the actual delay will often be slightly longer than requested.  Just like delayMicroseconds() and delay() for milliseconds, it will always delay for at least the time specified.

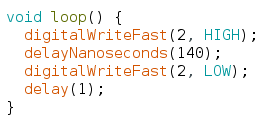
In this simple example, a 140ns delay is used between changing a pin.  The actual resulting pulse measures 159ns.

Internally, delayNanoseconds() is implemented differently on Teensy 2 & 3 than on Teensy 4.  The older boards use a simple busy loop with “nop” instructions.  This gives the best performance on those older & simpler architectures.  But if an interrupt occurs during the delay time, the delay continues after the interrupt without any awareness its total time was lengthened.

Teensy 4 has a very different delayNanoseconds() implementation.  Because Cortex-M7 relies on caching both data and instructions, and uses multiple types of memory with very different latency for cache misses, busy looping is not as predictable as with the older architectures.  Instead, the desired nanoseconds are converted to CPU cycles, and the a wait loop polls the ARM DWT cycle counter.  While this adds overhead before the delay begins, the result is highly predictable results regardless of memory & cache.  An added benefit is resilience to interrupts which may occur during the delay.

Normally delayNanoseconds() is used with a constant input for the nanosecond time.  Inline code is used, where the compiler is able to better optimize results when the input is a constant.  However, variables not known as constants at compile time may be used.  All 32 bit boards still give fairly good results.  On Teensy 2.0, use of variable input results in delay precision of about 1 microsecond.


Detailed Memory Usage Report

Prior Teensyduino versions used Arduino’s default memory usage summary after compiling.

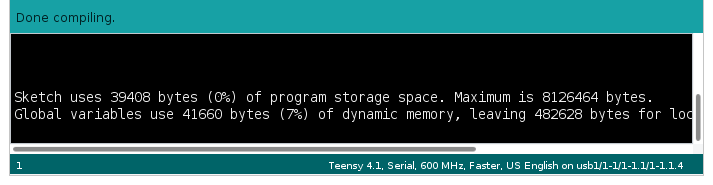
For Teensy 4, this simple memory report leaves much to be desired.

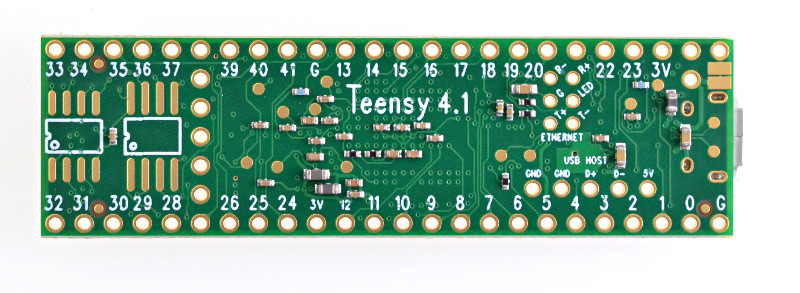
Teensy 4.0 & MicroMod have 3 distinct memories.  Teensy 4.1 has 4 distinct memory areas, if PSRAM chip(s) have been added.

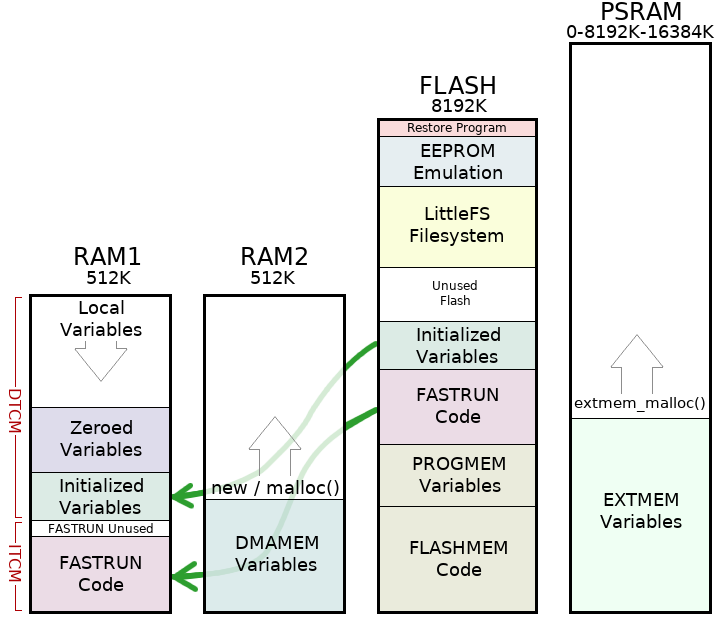
Arduino’s simple memory usage also assumes RAM is only used for variables and flash is only used for code.  On Teensy 4 boards, the RAM1 memory is partially used for code.  Because the hardware supports partitioning RAM between Instruction Tightly Couple Memory (ITCM) and Data TCM in 32K blocks, a portion of the last 32K block of ITCM is unused padding.

Teensyduino 1.54 brings a more detailed memory usage summary which shows how each of the 3 or 4 memory regions are actually used.

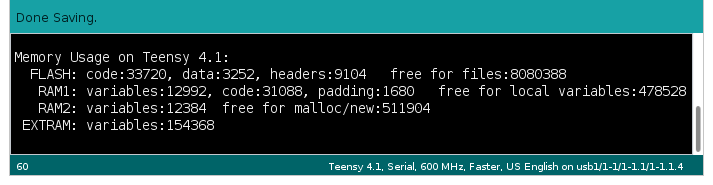
Flash memory usage is given in more detail.  One common issue is large arrays of constant data, such as lookup tables to speed computations or digital media like sound clips & fonts, can be mistakenly allocated to RAM.  The report now shows how much is data versus code, so you can easily see the change in data stored in flash while working with such const data arrays.

A portion of flash memory usage is reported as “headers”.  Slightly over 4K at the beginning of flash memory is reserved for data used by the IMXRT startup process.  3K at the end of your program is reserved for a digital signature.  Up to 2K of padding may be used to align these areas to 1K boundaries.  By reporting these as “headers”, they’re not mixed in with the code and data your program uses, giving you a more accurate view of how your program is really using the flash memory.


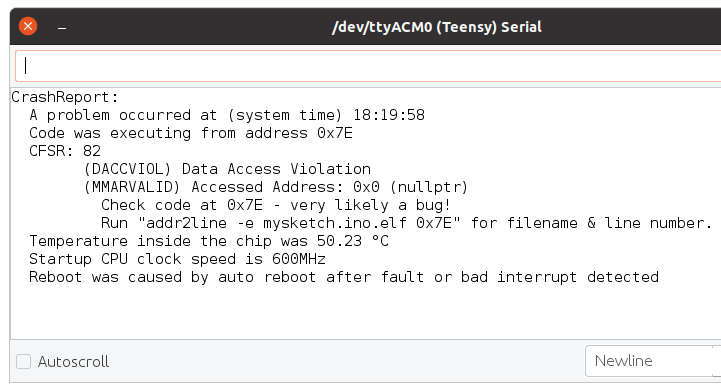
Fault Recovery & CrashReport

Teensy 4.0, 4.1 & MicroMod have a Memory Protection Unit (MPU) built into the ARM Cortex-M7 processor.  The MPU allows permissions and caching configuration to be established on up to 16 memory regions.  This is much simpler than a Memory Management Unit (MMU) found in PCs, which translates addresses to implement virtual memory.  The MPU only enforces permissions, such as whether reading, writing or code execution is allowed in each memory region.

Since the earliest Teensy 4.0 beta tests, the MPU has been configured with security conscious settings, such as only allowing code to execute from flash and ITCM memory regions and disallowing any access from a NULL pointer.  But if your program “crashed” by violating any MPU permissions or otherwise caused a fault exception, the default fault handler was essentially empty.  Teensy 4.0 & 4.1 would stop responding and a press of the pushbutton was needed to recover.

Teensyduino 1.54 includes an improved default fault handler to recover from problems and give you information to help diagnose what went wrong.  The new fault handler performs these actions.

  1. Log processor state & other useful info to RAM
  2. Reduce CPU speed to 198 MHz
  3. Complete USB transmission, so all Serial.print() data buffered before the fault (hopefully) arrives at the Arduino Serial Monitor
  4. Try to remain USB responsive to Arduino’s Upload button
  5. Automatically reboot after 8 seconds

Because this fault handler is built into all programs, and because it runs when something has gone very wrong, its code is meant to be kept simple & small.  Diagnostic info is written to a fixed location in RAM (which is preserved when restarting), rather than communicated at the time of the fault.

The automatic reboot may controversial.  Rebooting tends to hide the fact a problem occurred.  For most applications where Teensy always runs an application specific program, automatically restarting to recover from a problem is probably better than remaining forever unresponsive.

The 8 second delay was chosen for 2 reasons.  Traditionally watchdog timers are used for automatic rebooting.  If any of the 3 watchdogs are in use, they can function normally if configured for less than 8 seconds.  The 8 second delay is also meant to prevent a rapid infinite rebooting loop in the case where the program quickly causes another fault.  Hopefully 8 seconds is a good balance between promptly recovering, avoiding difficult to understand reboot-loop behavior, and allowing normal watchdog usage.

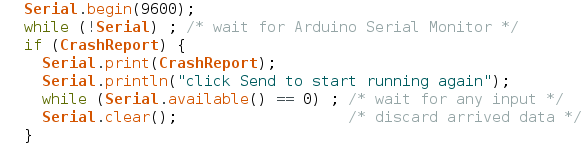
After Teensy reboots, your program can access the logged information with CrashReport.  The CrashReport code is only built into your program if you actually use it.  While your program can use CrashReport at any time, it is meant to be used early in your program’s startup, hopefully before anything has gone wrong, so you have fully access to a freshly rebooted system.

The simplest CrashReport usage is with a single Serial.print() line.

If your program previously crashed with a fault or unused interrupt which logged information, CrashReport shows you a summary.

CrashReport can be tested as true/false, to tell you whether information was logged.  You might use this with a program that rapidly prints to the serial monitor, to show the info and wait for input before continuing on to run the program which quickly scrolls the CrashReport info off your screen.

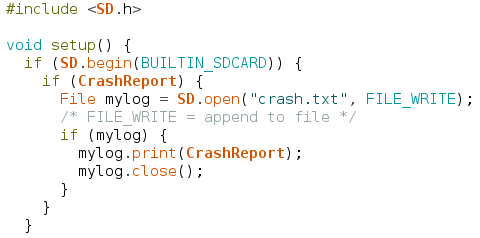
CrashReport is not limited to use with only the Arduino Serial Monitor.  It can be used with any interface inheriting the Arduino Print class.  For example, you can store CrashReport to a file on a SD card or a flash chip with LittleFS, to keep a record of every time a fault was detected.

The default fault handler and CrashReport can not handle every possible error.  The MyFault library was created as a collection of test cases for fault recovery and CrashReport, and also has a typical usage example.

Bug Fixes and Minor Improvements

Teensyduino 1.54 also includes many bug fixes, minor features & improvements, and updated libraries.  A detailed list of all changes can be found on this forum announcement thread.

Teensy 4.1 Released

Teensy 4.1 is now available with access more I/O and memory expansion.

Teensy 4.1 features a 10/100 Mbit Ethernet PHY.

The Ethernet port also has IEEE1588 precision packet timestamping.

Fast Ethernet opens up possibility for low latency & high bandwidth Artnet LED projects, streaming audio, open sound control and other Ethernet-based protocols that were difficult to accomplish with a traditional SPI-based Ethernet shield.  Traditionally use of Ethernet in a project has involved a choice of single board computers with high bandwidth Ethernet using systems not designed for low latency tasks, versus microcontrollers designed for real-time tasks but with slow Ethernet or lacking performance to handle Ethernet’s speed.  Teensy 4.1 with a Cortex-M7 processor at 600 MHz opens up the possibility to use the high bandwidth and low latency of Ethernet on a microcontroller designed for real-time tasks.

Teensy 4.1 includes a USB host port, supporting 480 Mbit/sec high speed USB.  While Teensy 4.0 has those USB host data signals on surface mount pads, Teensy 4.1 adds the hot-plugging power management needed to simply connect a USB host cable and be able to plug in a USB device.  Or a USB hubs can be used to connect many USB devices.

USB devices are supported by the USBHost_t36 library, which is installed into the Arduino IDE automatically by the Teensyduino installer.

Another feature technically present on Teensy 4.0, but difficult to use, is native SDIO for fast data transfer to a SD card.  Teensy 4.1 includes the SD socket, so you can easily use a micro SD card with the card’s native SDIO protocol rather than slow SPI access.

Teensy 4.1 also includes locations to solder additional memory chips.  The larger space is meant for a QSPI flash memory and the smaller space is intended for a 8MB PSRAM chip.

The IMXRT1062 microcontroller on Teensy 4.0 and 4.1 has 1MB of RAM built in.  For many real-time control projects, the internal RAM is plenty.  But some projects can greatly benefit from the added memory.  Frame buffers for high resolution TFT displays are the most common use, allowing advanced graphics rendering.  Large memory is also very useful for special audio effects like advanced reverb, buffering fast incoming data before logging to a SD card, and for emulation of retro computer systems like classic arcade games.


These extra memory chips have a dedicated QSPI bus, which is independent from Teensy 4.1’s main program memory.  When a flash memory chip added for storage of files or other data, this dedicated bus means it does not interfere with normal program memory access.  This is especially valuable while writing data or erasing sectors in the extra flash memory.  For real time projects controller motors, synthesizing or processing real-time audio, communicating high speed data or other tasks requiring low latency, flash writing can be done to the extra flash chip without blocking access to the normal program memory.

Teensy 4.1’s larger form factor also bring more I/O pins, and makes the difficult-to-access bottom pads from Teensy 4.0 very easy to access, breadboard-friendly pins.  The new I/O pins bring an 8th serial port, more analog inputs and PWM outputs, and access to 16 contiguous native port pins, useful for projects needing fast parallel I/O.

Not every project requires so much I/O or extra memory.  Teensy 4.0 fills those needs.  But when you do need more I/O, more memory, fast Ethernet, or connecting USB devices or fast SD card access, the larger Teensy 4.1 brings this extra I/O capability to a platform designed for real-time use with fast 600 MHz M7 performance.

Teensyduino 1.44 Released

Teensyduino version 1.44 has been released.

The 1.44 installers are available at the downloads page.

Arduino 1.8.7 Support

Only a few weeks after 1.8.6, Arduino released 1.8.7.  With a new Arduino comes a new Teensyduino release to support it.

Arduino 1.8.7 fixes several rare but serious bugs, including issues with the IDE being able to start up.  1.8.7 adds no new features, so there’s no need to upgrade from 1.8.6, unless you’ve encountered issues.

Wavetable Synthesis

A little over 1 year ago, a group of students at Portland State University (Ryan Mellmer, Nicholas Craig, Joshua Bucklin, Aida Keifer, Jonathan Jensen, Yu Tang, Connor Delaplane) completed their capstone project to perform wavetable sound synthesis, for playing of musical notes from sound samples.  PJRC provided hardware and Paul “sponsored” the group.  Dr. Bart Massey advised.

The complete code was published on github.  Now with 1.44, this project has been integrated into the Audio library.  It’s now available in the design tool, and the examples can be accessed in Arduino by clicking File > Examples > Audio > Synthesis > Wavetable.

Wavetable data is stored in Teensy’s internal flash memory.  To create the data, Ryan’s team create a Python utility to import and convert Soundfont format files.

A version of their SoundfontDecoder updated for the Audio library is also available on github.

Faster Ports Menu

Teensyduino 1.42 greatly improved how Teensy is shown in Arduino’s Tools > Ports menu.  But under some circumstances on Macintosh and Windows, a noticeable lag could occur when clicking the Tools menu.  1.44 eliminates this interactive delay, so the Tools menu responds quickly.

The Teensy specific Ports menu is implemented by a native helper program called “teensy_ports”, which Arduino automatically runs at startup.  Because this is a native program, it can gain detailed info about USB devices which isn’t available to Java code in the Arduino IDE.  In 1.42 & 1.43, when you clicked the Ports menu, a query was sent to this program.  When it responded, the info would be put into the Ports menu.  But if anything caused a delay in the response, you would see that delay in the appearance of the Tools menu.

Version 1.44 changes teensy_ports to always send USB device changes as they occur.  A dedicated Java thread listens for the incoming USB info and keeps a list of devices in the IDE updated.  When you click the Tools menu, rather than requiring communication back-and-forth, the list already in the IDE’s memory is copied for use by the menu.

This improvement was partially motivated by a conversation with the Arduino developers.  They intend to eventually allow boards like Teensy to provide their own port “discovery” tools, using a JSON-based format.  This is one of the major missing features which requires Teensy to have a special installer, rather than using Arduino’s Boards Manager.

Another benefit of switching to the JSON format, which allows communicating all info Arduino uses, is the Tools > Get board Info menu now works with Teensy.

The multithreaded JSON-based Ports menu was developed on 1.8.6 and ported to 1.8.7 and back-ported to 1.8.5, so you get this speedup on any of those versions.

Linux 64 bit ARM (AARCH64)

Arduino 1.8.7 is the first non-beta Arduino release which supports Linux on 64 bit ARM, also known as “AARCH64”.  Jetson TX1, Jetson TX2 and Odroid C2 are the main platforms needing AARCH64 support today.

However, Arduino’s downloads page still has ARM64 only on the hourly build and beta build sections.  The Arduino 1.8.7 ARM64 file is actually on their server and can be accessed by copying the link to the ARM32 version, and replace “arm” with “aarch64”.

The final hold-up is due to Oracle’s Java runtime environment (JRE) for 64 bit ARM.  It is “headless”, meaning it only supports command line programs.  Unlike the other Linux copies, there is no “java” folder with the correct Java runtime.  As a result, the IDE will use whatever Java runtime exists on your Linux system, which may or may not be compatible.

Here is a copy of Arduino 1.8.7 with a compatible copy of OpenJDK added in the “java” folder.  Other this this addition, it is identical to the Arduino 1.8.7 file on Arduino’s server.

https://www.pjrc.com/teensy/td_144/arduino-1.8.7-linuxaarch64.tar.xz

Just extract this file, then download and run the Teensyduino 1.44 installer.  Like all Linux systems, Teensy’s udev rule file must be installed to access the USB device files.

The default kernel that ships with Jetson lacks the cdc_acm driver needed for USB serial communication.  You can still use Teensy without this this driver, because Teensy Loader uses HID protocol, and the new Ports menu is able to natively detect USB devices even when their drivers don’t load.  But to use the serial monitor with a Teensy programmed to be USB serial, you will need to install the cdc_acm driver.  If following those instructions, you may need to type “./installCDCACM.sh” to run the script, rather than “./installCDCACMModule.sh” as the instructions say.

Obviously AARCH64 support is very new.  If you encounter issues, please report them on the forum.

Teensyduino 1.43 Released

Today PJRC is releasing Teensyduino version 1.43.

The 1.43 installers are available now at the downloads page.

Arduino 1.8.6 Support

The main new feature in 1.43 is support for Arduino 1.8.6.  The main reason to upgrade is 1.8.6 can compile your code significantly faster.

Arduino 1.8.6 is the first non-beta Arduino IDE to support parallel compile.  If your computer has a quad-core processor, when rebuilding all files, Arduino may compile up to 4 pieces of code at the same time.  Usually the speed increase is much less than 4 times faster, but still it manages to compile code in much less time than running every compiler process 1 at a time.

When you change boards or settings, a full rebuild of all libraries files must be done for all library files your code uses.  Arduino 1.8.2 to 1.8.5 would often do this full rebuild unnecessarily, especially if you edited any of the library files (not in the Arduino IDE’s editor).  1.8.6 fixes this unnecessary rebuilding.

However, not everything is perfect with 1.8.6.  Several bugs were discovered after release which cause 1.8.6 to crash, especially if certain data files are corrupted.  Teensyduino 1.43 includes fixes for a couple of these bugs.  The rest will be fixed in Arduino 1.8.7, which may appear soon.  When it does, of course we’ll release Teensyduino 1.44 to support it.

Headless Install

The installer now support a “headless” command line install.  This can be useful if you wish to create scripts to automatically install Teensyduino.  The main intended use is for Continuous Integration testing with systems such as Travis-CI.

Run the installer with –dir=<directory> to specify the Arduino install location.  Using this option cases the installer to run automatically without the GUI.

Adafruit has offered to include Teensy in their automated testing script.  Soon this will allow Teensy to be automatically tested (at least to verify libraries compile without error) for all of Adafruit’s libraries!

Bugs Fixed

Several issues are fixed in version 1.43.

  • Fix default Ethernet CS pins on Teensy 2.0 & Teensy++ 2.0.  Old versions of Ethernet would default to the “SS” pin on AVR chips, and if you wanted any other pin your only option was to edit the Ethernet library code!  With the addition of Ethernet.init(pin), you could choose which pin to use, but this change also caused the default to become pin 10, even if SS was a different pin on your board (as it is with Teensy 2.0 & Teensy++ 2.0).  Now the default is restored to the actual SS pin, and you can use Ethernet.init(pin).
  • Fix USB Keyboard ‘#’ for UK & Irish layouts.
  • Generic UDP class support beginMulticast.  Some libraries using multicast need this defined in the board’s core library.
  • Fix USB MIDI hogging transmit buffers.  If you used USB MIDI together with USB Serial or other USB communication, and you transmit USB MIDI messages faster than your computer can process, previously the MIDI message could consume all the USB buffer memory.  This fix prevents MIDI from hogging all the buffers, so the other non-MIDI communication (hopefully) will not stall.
  • Fix FreqCount for use at high frequencies.  A bug which caused very infrequent errors when measuring very high frequencies has been fixed.
  • Fix SerialPlotter for Ports(Teensy).  Previously Arduino’s Serial Plotter would only work if you had selected Tools > Ports from the “Serial” section of the menu.  Now the “Teensy” ports section is fully supported.  When using a “Teensy” port, board disconnect and reconnect are supported.  The plot restarts from zero when you plug the cable in.  Proper stop and restart is also supported when you upload new code.
  • USBHost_t36 fix for Gigabyte keyboard (thanks KurtE).  These special gaming keyboards with “N Key Rollover” should now work.
  • OctoWS2811 update movie2serial.pde for compatibility with Processing 3.4.  This program streams video to large LED projects.  Minor updates were needed to work with the newest version of Processing and its video library.
  • Remove BYTE define.  This was previously included in Teensyduino for pre-1.0 Arduino compatibility.  But some libraries and code tend to use “BYTE” for their own constants and variables, causing a conflict.  This feature for compatibility with ancient Arduino libraries was causing more harm than good.  It’s been removed.
  • Update WS2812Serial documentation.  A mistake in the documentation showed an extra pin, which was never actually supported and can’t work due to hardware limitation.
  • Improve installer help dialog on Windows.  The “Windows App” incompatible with Teensyduino.  The installer now mentions this in the “?” help dialog.
  • Workaround a rare USB buffering issue.  During sustained fast data transfer from a PC to Teensy, a rare bug could cause wrong data to be received after many megabytes of transfer.  A workaround was added to prevent this problem.  Special thanks to Trammell Hudson for providing a test case.
  • Fix for Arduino 1.8.6 startup (Arduino issue #7917).  If any library you have installed has a version number which Arduino 1.8.6 can’t understand, the IDE crashes at startup.  A fix for this problem is included, so you aren’t left with the software unable to run if you have a “bad” library installed.
  • Add Arduino’s fix for slow 1.8.6 menus on Mac (Arduino issue #7935).  Newer versions of Java on Macintosh are much slower to create menus.  The Arduino developers worked around this problem by creating the menus only once, and they’re merely modified when changes are needed.  Teensyduino 1.43 adds this fix to your copy of 1.8.6.