Using USB Keyboard
| CAUTION: Save your work! Unexpected keystrokes can quickly ruin your program. |
Your PC or Mac will detect a new keyboard. Then your program can send keystrokes which your computer will recognize as coming from a standard USB keyboard.
There are two ways you can make your Teensy send USB keystrokes.
The Easy Way: Keyboard.print()
Keyboard.print() works the same way as Serial.print(), except the message is typed as keystrokes. You can print strings, numbers, single characters with all the same control as Serial.print().Here is a very simple example, using Keyboard.print().
int count = 0;
void setup() { } // no setup needed
void loop() {
  Keyboard.print("Hello World ");
  Keyboard.println(count);
  count = count + 1;
  delay(5000);
}
When this program is run, it will type "Hello World" and the increasing count. As you can see in this screenshot, the computer sees a USB keyboard and the keystrokes directly enter the Arduino editor. If delay(5000) had not been used, the result could be very unpleasant.
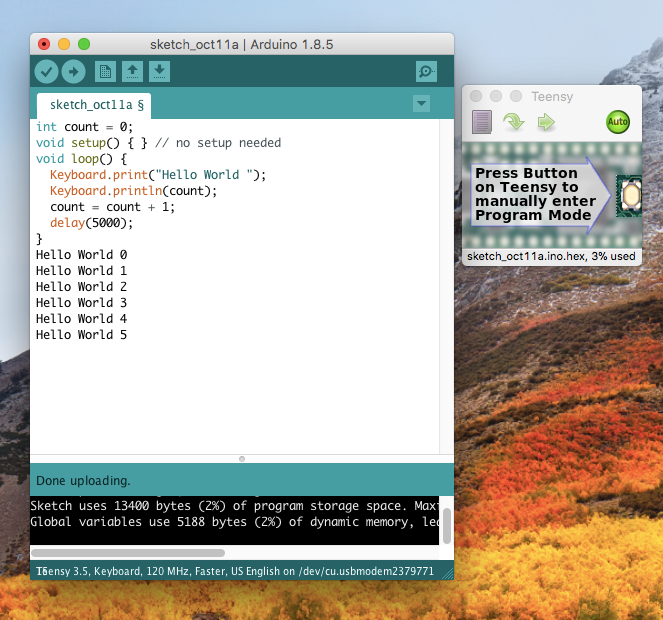
Sometimes "Hello World 0" may not appear. The PC takes a brief time to detect the presence of a new USB device, but this program begins running immediately. If you use Keyboard.print() before the PC finishes the detection process (called "enumeration" in USB lingo), Keyboard.print() does nothing. A delay() can be added in setup().
Keyboard Layouts
The Tools > Keyboard Layout menu selects the type of keyboard Teensy will emulate. This setting takes effect when you Upload to Teensy.
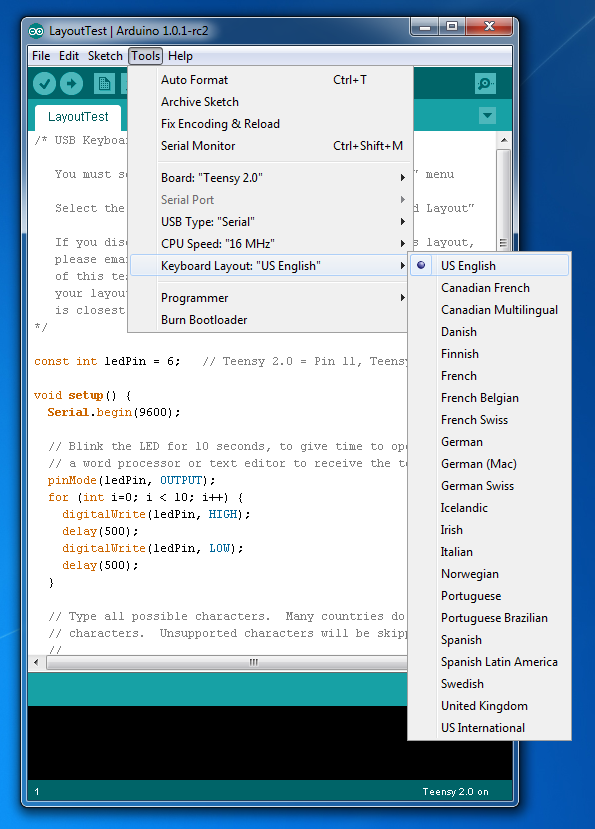
If you see the wrong characters from Keyboard.print(), Teensy may be emulating a US keyboard layout, but your computer expects a non-US keyboard, or vise-versa. The layout setting only affects Keyboard.print() and Keyboard.write().
Using Pushbuttons
Many projects need to send messages to a computer when pushbuttons are pressed.The Bounce library provides the easiest way to reliably detect pushbuttons changes. This code shows the basic approach. Just update() each object, and then use the fallingEdge() to check if it has changed.
void loop() {
  // Update all the button objects.
  button1.update();
  button2.update();
  button3.update();

  // Check each button for "falling" edge.
  // falling = high (not pressed - voltage from pullup resistor)
  //           to low (pressed - button connects pin to ground)
  if (button1.fallingEdge()) {
    Keyboard.println("B1 press");
  }
  if (button2.fallingEdge()) {
    Keyboard.println("B2 press");
  }
  if (button3.fallingEdge()) {
    Keyboard.println("B3 press");
  }
For a complete example: File > Examples > Teensy > USB_Keyboard > Buttons.
Individual Key Press / Release
Sometimes you may need precise keyboard control. Many Windows programs will not recognize a CTRL-C character as a copy command unless the CTRL key is pressed before and remains held down while the C key is pressed. Some programs require keys to be held for more than the minimum time. "Home" and "Print Screen" and other special can not be represented in a normal string usable with Keyboard.print().You can use Keyboard.press(key) and Keyboard.release(key) to send individual key press and release events. The "key" may be ordinary characters, or special key codes.
  if (button3.fallingEdge()) {
    Keyboard.press(KEY_MEDIA_VOLUME_DEC);
    Keyboard.release(KEY_MEDIA_VOLUME_DEC);
  }
  if (button4.fallingEdge()) {
    Keyboard.press(KEY_MEDIA_VOLUME_INC);
    Keyboard.release(KEY_MEDIA_VOLUME_INC);
  }
  if (button6.fallingEdge()) {
    Keyboard.press(KEY_MEDIA_EJECT);
    delay(300);  // Mac OS-X will not recognize a very short eject press
    Keyboard.release(KEY_MEDIA_EJECT);
  }
All Keys Codes
| Normal Keys | |||
|---|---|---|---|
| KEY_A | KEY_B | KEY_C | KEY_D |
| KEY_E | KEY_F | KEY_G | KEY_H |
| KEY_I | KEY_J | KEY_K | KEY_L |
| KEY_M | KEY_N | KEY_O | KEY_P |
| KEY_Q | KEY_R | KEY_S | KEY_T |
| KEY_U | KEY_V | KEY_W | KEY_X |
| KEY_Y | KEY_Z | KEY_1 | KEY_2 |
| KEY_3 | KEY_4 | KEY_5 | KEY_6 |
| KEY_7 | KEY_8 | KEY_9 | KEY_0 |
| KEY_ENTER | KEY_ESC | KEY_BACKSPACE | KEY_TAB |
| KEY_SPACE | KEY_MINUS | KEY_EQUAL | KEY_LEFT_BRACE |
| KEY_RIGHT_BRACE | KEY_BACKSLASH | KEY_SEMICOLON | |
| KEY_QUOTE | KEY_TILDE | KEY_COMMA | KEY_PERIOD |
| KEY_SLASH | KEY_CAPS_LOCK | KEY_F1 | KEY_F2 |
| KEY_F3 | KEY_F4 | KEY_F5 | KEY_F6 |
| KEY_F7 | KEY_F8 | KEY_F9 | KEY_F10 |
| KEY_F11 | KEY_F12 | KEY_PRINTSCREEN | KEY_SCROLL_LOCK |
| KEY_PAUSE | KEY_INSERT | KEY_HOME | KEY_PAGE_UP |
| KEY_DELETE | KEY_END | KEY_PAGE_DOWN | KEY_RIGHT |
| KEY_LEFT | KEY_DOWN | KEY_UP | KEY_NUM_LOCK |
| KEYPAD_SLASH | KEYPAD_ASTERIX | KEYPAD_MINUS | KEYPAD_PLUS |
| KEYPAD_ENTER | KEYPAD_1 | KEYPAD_2 | KEYPAD_3 |
| KEYPAD_4 | KEYPAD_5 | KEYPAD_6 | KEYPAD_7 |
| KEYPAD_8 | KEYPAD_9 | KEYPAD_0 | KEYPAD_PERIOD | Modifier Keys |
| MODIFIERKEY_CTRL | MODIFIERKEY_RIGHT_CTRL | - Control Key | |
| MODIFIERKEY_SHIFT | MODIFIERKEY_RIGHT_SHIFT | - Shift Key | |
| MODIFIERKEY_ALT | MODIFIERKEY_RIGHT_ALT | - Alt Key | |
| MODIFIERKEY_GUI | MODIFIERKEY_RIGHT_GUI | - Windows (PC) or Clover (Mac) | Media Player Keys |
| KEY_MEDIA_PLAY | KEY_MEDIA_PAUSE | ||
| KEY_MEDIA_RECORD | KEY_MEDIA_STOP | ||
| KEY_MEDIA_REWIND | KEY_MEDIA_FAST_FORWARD | ||
| KEY_MEDIA_PREV_TRACK | KEY_MEDIA_NEXT_TRACK | ||
| KEY_MEDIA_VOLUME_DEC | KEY_MEDIA_VOLUME_INC | ||
| KEY_MEDIA_PLAY_PAUSE | KEY_MEDIA_PLAY_SKIP | ||
| KEY_MEDIA_MUTE | KEY_MEDIA_EJECT | System Control Keys | |
| KEY_SYSTEM_POWER_DOWN | KEY_SYSTEM_SLEEP | ||
| KEY_SYSTEM_WAKE_UP | |||
The Micro Manager Way
The micro manager way requires more effort but gives you complete control. Normally Keyboard.press(key) and Keyboard.release(key) are sufficient, but the "Micro Manager Way" allows you to exactly control the 6 possible key slots used by the USB communication sent to your PC.Only key codes may be used with the Micro Manager functions. The key codes represent the location of a key on the USA English keyboard layout. The keyboard layout is not used. The media and system keys are not supported. With this way, you are very directly controlling the actual key codes without any extra software translation!
The USB keyboard can have up to 6 normal keys and 4 modifier keys pressed at the same time. To micro manage the keyboard, you use functions to set which combination of keys you want pressed (and zero for the ones you want not pressed), and then use Keyboard.send_now() to send each combination.
You can use delay() or write code to check millis() between calling Keyboard.send_now(), to create the condition of a key held down similarly to a human typing. Auto-repeat is done by the driver on your PC or Mac, so if you have a long delay between pressing and releasing a normal key, the auto-repeat feature may deliver many key events to software.
When micro managing, you need to send a zero for each key you've pressed to cause that key to be released (as if a finger were lifting off the key and its spring were returning it to the resting position).
Modifier Keys
There are 4 modifier keys: Shift, Alt, Ctrl, and GUI. GUI is either the "windows key" (PC) or the "clover key" (Macintosh), usually located to the side of the space bar. These 4 keys are special, and can only be used with Keyboard.set_modifier().
| Name | Function | ||
|---|---|---|---|
| MODIFIERKEY_CTRL | MODIFIERKEY_RIGHT_CTRL | - Control Key | |
| MODIFIERKEY_SHIFT | MODIFIERKEY_RIGHT_SHIFT | - Shift Key | |
| MODIFIERKEY_ALT | MODIFIERKEY_RIGHT_ALT | - Alt Key | |
| MODIFIERKEY_GUI | MODIFIERKEY_RIGHT_GUI | - Windows (PC) or Clover (Mac) | |
If you want no modifier keys pressed, use a zero.
Keyboard.set_modifier(0);
To press just one modifier is simple.
Keyboard.set_modifier(MODIFIERKEY_SHIFT);
To press more than one modifier, use the logic OR operator. For example:
Keyboard.set_modifier(MODIFIERKEY_CTRL | MODIFIERKEY_ALT);
Normal Keys
Six keys are always tranmitted by the USB keyboard. Normally, only the first key is used and the other 5 are zero. However, you can use the 6 keys in any way you like. For example, this code would send keys A, B, C, D, E and F, all pressed at once.
Keyboard.set_key1(KEY_A);
Keyboard.set_key2(KEY_B);
Keyboard.set_key3(KEY_C);
Keyboard.set_key4(KEY_D);
Keyboard.set_key5(KEY_E);
Keyboard.set_key6(KEY_F);
To release a key, you must set it to zero. For the above example, all six would need to be set back to zero if the next Keyboard.send_now() should not have any of these 6 keys pressed.
Keyboard.send_now()
After you have set the normal and modifier keys, use Keyboard.send_now() to communicate that combination to the PC or Mac.The keys remain as you set them, so between each call to Keyboard.send_now(), you only need to make the changes you need. For example, this code would send a CTRL-ALT-DELETE sequence.
// press and hold CTRL
Keyboard.set_modifier(MODIFIERKEY_CTRL);
Keyboard.send_now();

// press ALT while still holding CTRL
Keyboard.set_modifier(MODIFIERKEY_CTRL | MODIFIERKEY_ALT);
Keyboard.send_now();

// press DELETE, while CLTR and ALT still held
Keyboard.set_key1(KEY_DELETE);
Keyboard.send_now();

// release all the keys at the same instant
Keyboard.set_modifier(0);
Keyboard.set_key1(0);
Keyboard.send_now();
It is important to set normal keys back to zero and send. If you do not, the key will remain pressed, and the PC or Mac USB driver will begin auto-repeat.
If you are familiar with the older PS/2 keyboard "scan codes", please be aware that USB keyboard codes work differently (and use different numerical values). The old scan codes sent different messages for key down and key up events, where each message represented a single key's change. With USB, each message represents the complete state of the keyboard. Up to any 6 keys may be pressed at once, plus any combination of the 8 modifier keys.
Bandwidth - Less Than You Might Expect
USB Keyboard speed is limited to 500 keystrokes per second, and some operating systems may limit the speed to only 62.5 keystrokes per second. There is nothing you can do about these limits. Reading the rest of this section will only help you understand why they exist.The HID protocol is used by USB keyboards, and HID uses the USB "interrupt" transfer type, which allocates 1 packet per a configurable number of USB frames. Each USB frame is 1ms, and the Teensyduino USB keyboard code requests the interval to be every frame. If the operating system honors this request, bandwidth is available for 1000 packets per second.
Each keystroke requires 2 calls to Keyboard.send_now(), the first to press the key and the second to release it. This translates to 500 keystrokes per second. Of course, you can send 10 different keys in each, but logic inside the USB device driver will analyze for changes, which imposes a practical limit, especially when sending to already-written software which expects "normal" typing.
Some operating systems might disregard the request and instead schedule 1 packet every 8 frames. At 16ms each, only 62.5 keystrokes per second are possible.
Some software, even when running on a multi-gHz, multi-core processor may perform so much work per keystroke (or be written so infficiently), that sending at such "fast" speeds could overwhelm the computer. You might need to add extra delays.
USB keyboard is slow. If you need substantial bandwidth, use USB serial.