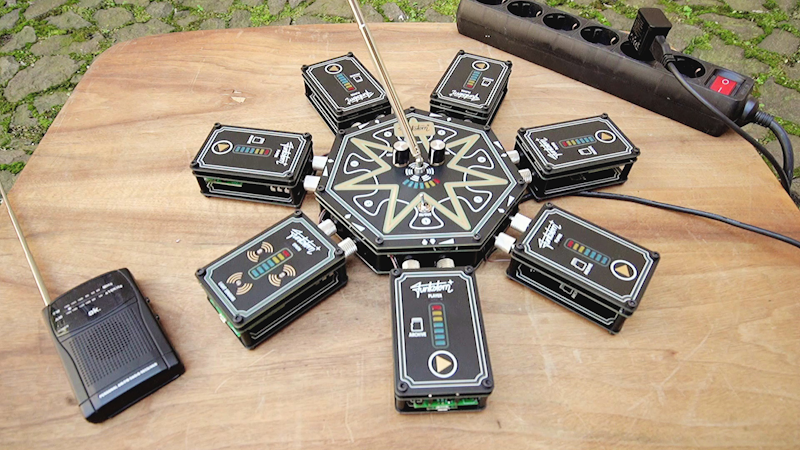
Noisio is a kit maker of minimalistic audio kits inspired by classic circuits like the Atari Punk Console. Funkstern Plus radio art object is the latest example of this design maxim.
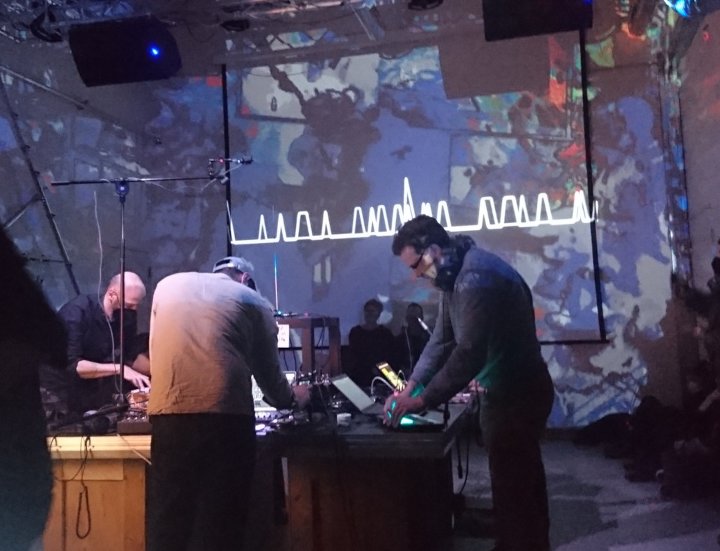
The Funkstern Plus is bespoke project combining synthesizer, FM transmitter, audio player and 7-channel stereo mixer. It was commissioned by the Rundfunkorchestra for the Bauhaus University Weimar “Archiv der Moderne” collection.
The instrument is also used by the Rundfunkorchestra in live shows, and recently won the Saxon State Prize for Design 2023 in the Digital Design category. More information can be found on noisio’s blog, as well as in the video below.
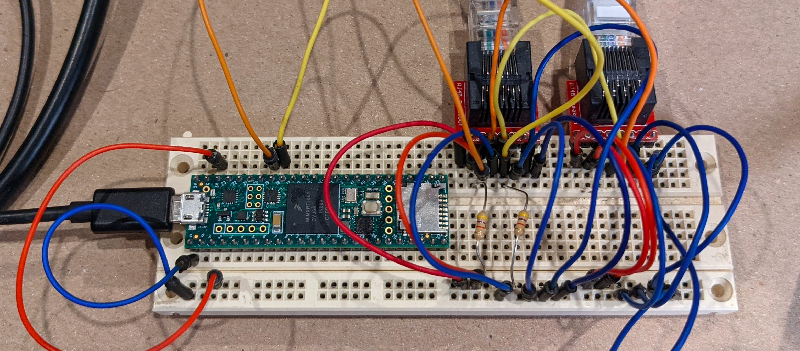
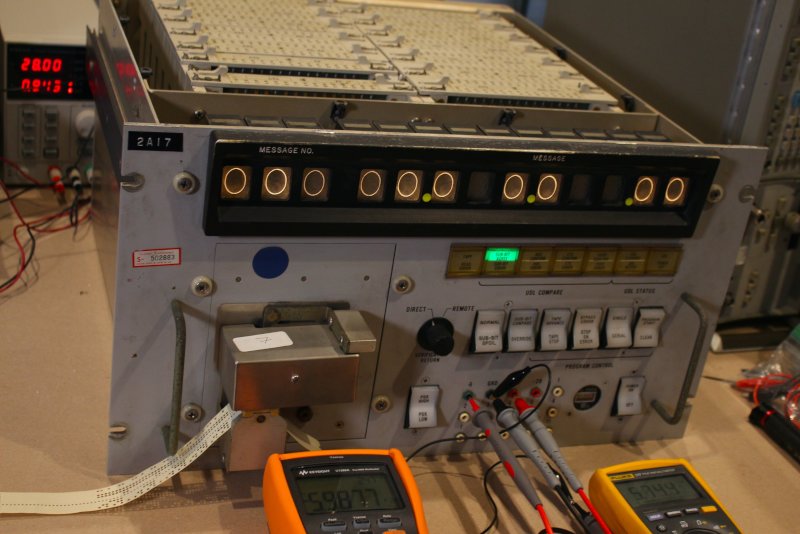
While attempting to understand the mess of wires that is the Apollo-era space program Up-Data Link Confidence Test Set, Ken Shirriff decided to automate the manual probing process with an automatic connection tracing system that he calls the Beep-o-matic.
Ken Shirriff’s blog is a veritable smorgasbord of fascinating in-depth retrocomputing content, and he also documents his work extensively on Twitter. His reverse engineering of the Apollo Guidance Computer is a particularly fascinating project, and it is here that our humble Teensy 4.1 comes into play!
By combining three 16-bit PCA9555A GPIO chips with the appropriate connectors and a Teensy 4.1 over I2C, Ken can scan through all 47 pins in under a second, rather than laboriously listening for a multimeter beep while probing each manually.
A couple of Python scripts capture and process the output, and voila, you have … an extremely specific tool that is unlikely to be of use to anyone else on the planet? However! The same concept could certainly be applied to other reverse engineering problems, so take a look at the project details and code on GitHub, and let us know if you end up adapting the idea for other uses!
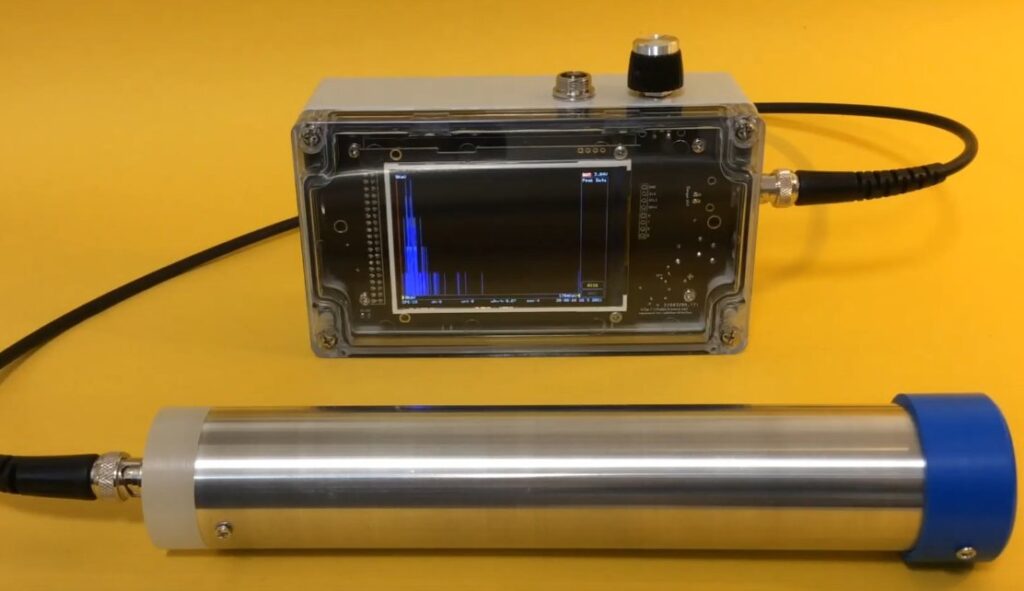
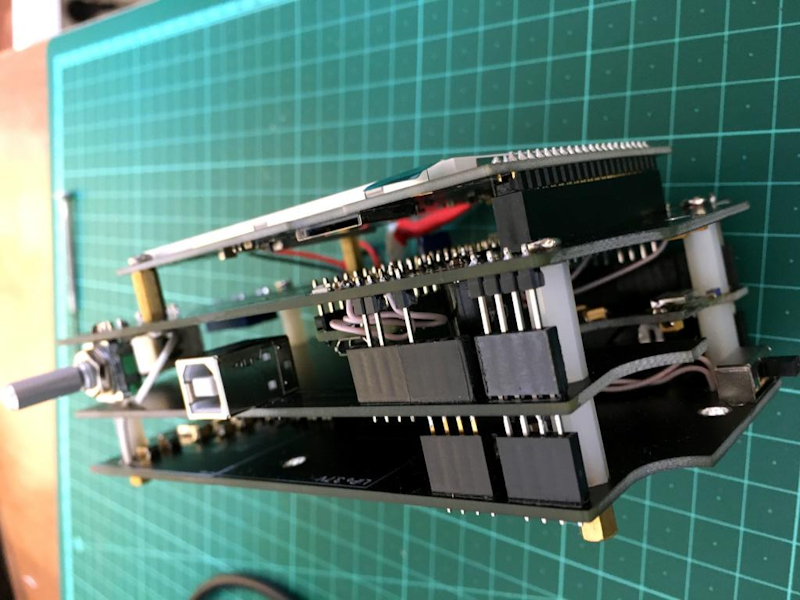
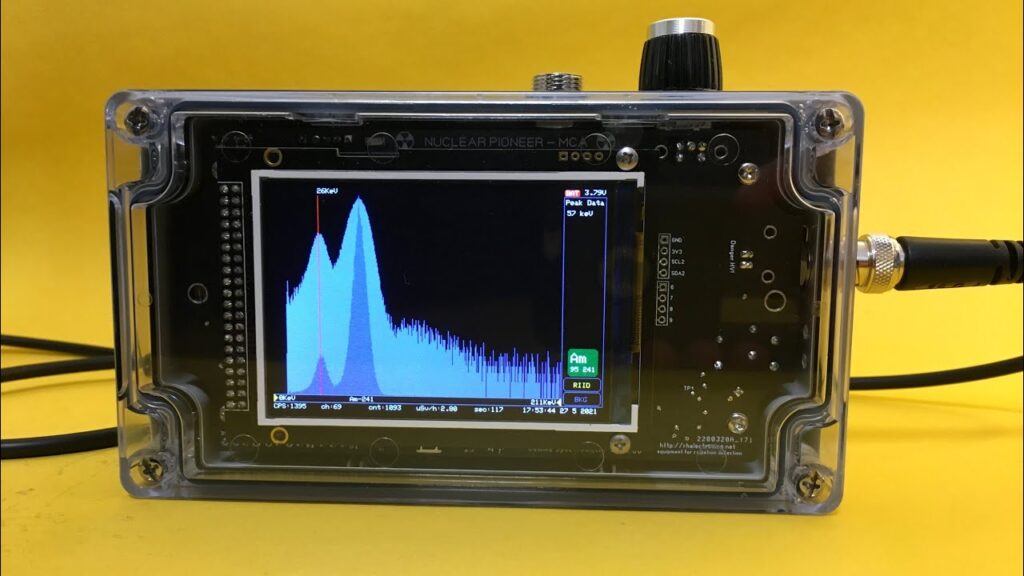
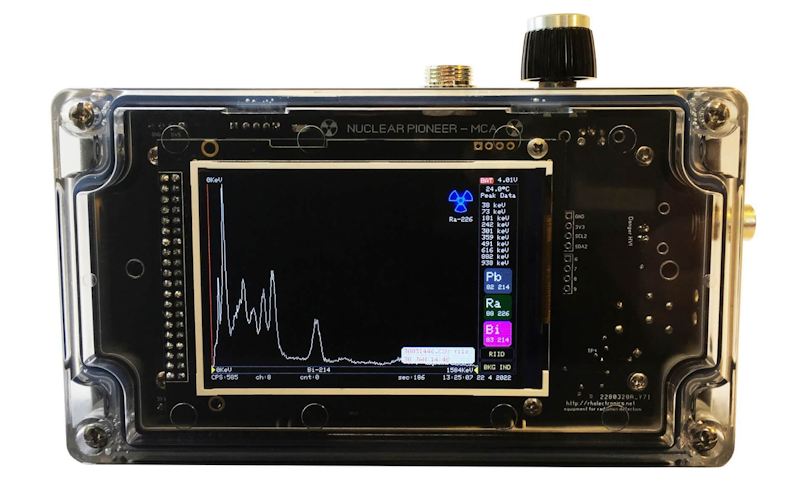
This device from AlexRH really caught our eye: the RH Electronics Nuclear Pioneer Multichannel Analyzer (MCA) Gamma Spectrometer. Based on the Teensy 3.5, the MCA can function as both a gamma ray spectrometer and a scintillation counter survey meter.
Gamma spectrometers work by detecting gamma energy from radioactive decay via a scintillation probe. The MCA can detect radioactive elements and automatically identify isotopes on a range of 32keV-3000keV.
With high-voltage regulated power module featuring an adjustable output of 600-1000V, the device can be connected to an external photomultiplier tube, plus has a 400V regulated power supply for an internal Geiger counter.
Read more about its capabilities on the RH Electronics web site, or check out the video below for a detailed demonstration.
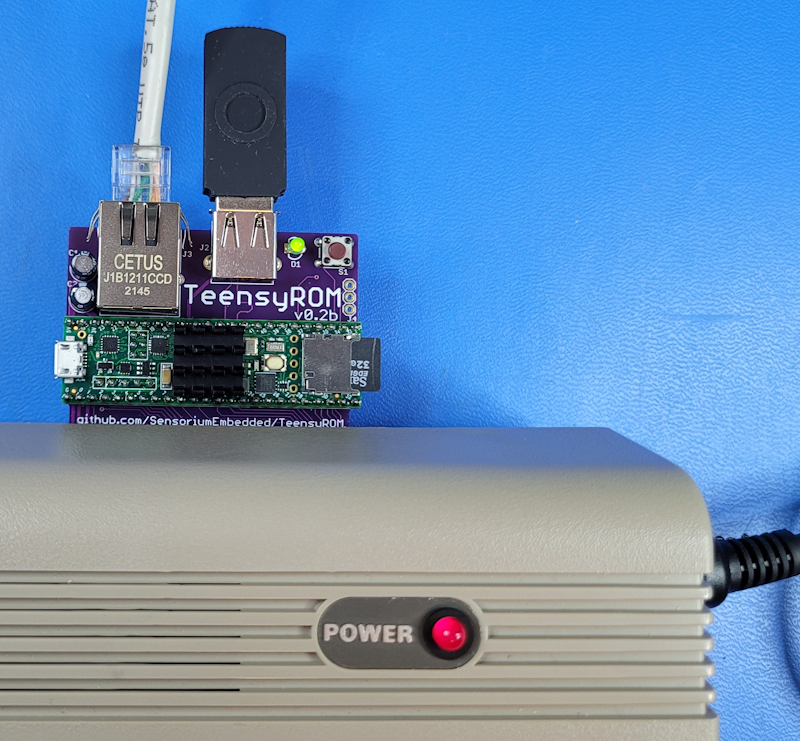
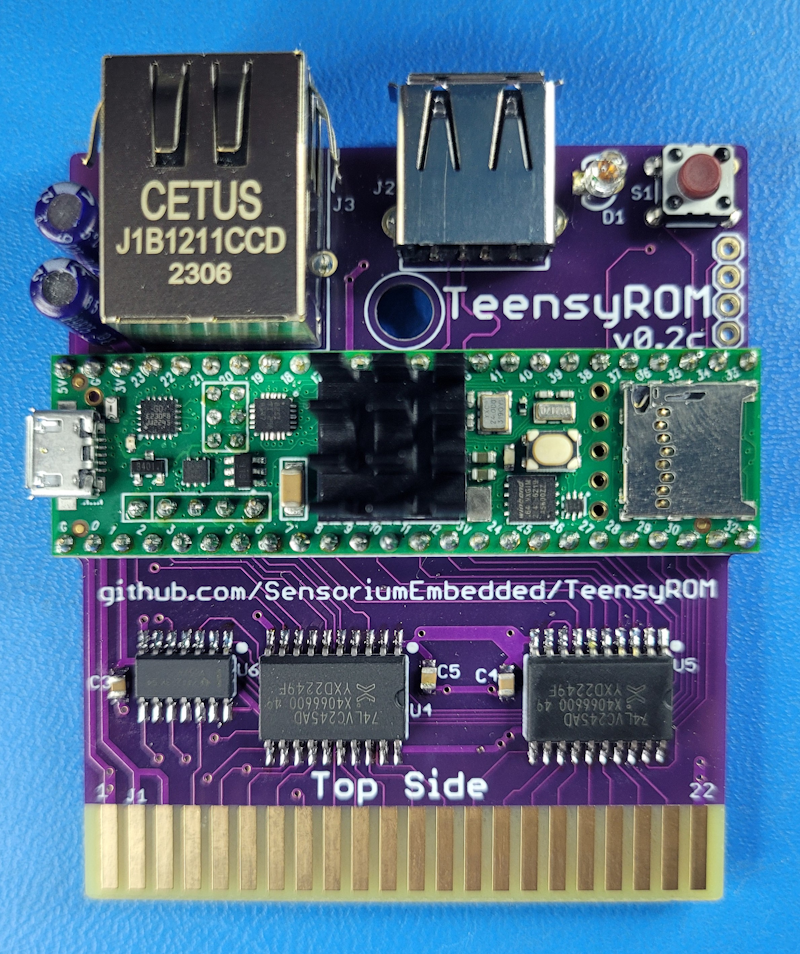
Connecting to the Commodore 64 or 128 expansion port like a “normal” cartridge, TeensyROM from Sensorium adds ROM emulation, Internet, and even USB MIDI to some of the 1980’s most popular 8-bit machines.
We love seeing Teensy boards being used to give old hardware new superpowers, and the TeensyROM is a fantastic example of this!
TeensyROM emulates ROMs loaded from a USB thumb drive (via USB Host port), the Teensy’s mSD slot, or internal flash. USB Host is also used for MIDI in/out, allowing you to for example play the C64’s legendary SID chip with a MIDI keyboard using Cynthcart software.
An RJ-45 jack means you can connect to your favorite Telnet BBS via 38.4k modem emulation, as well as update system time using an Internet Time Server, like modern OSes. You can even load games via NFC tags, as shown in the video below! Source, schematics, and more can be found on the project’s GitHub repo.
We’ve seen Teensy boards in rockets, satellites, and more, but the first step of getting space-bound is developing a reliable engine.
Georgia Tech’s student-run Yellow Jacket Space Program enlisted three proud Teensy 3.6s in their mission to develop a liquid oxygen/kerosene rocket engine, the YJ-1S.
The first Teensy is used as a switchboard to control individual valves within the engine, as well as initiate engine startup and firing sequences. The engine controller uses another two Teensy boards to communicate with the switchboard and take control of the engine valves once initiated.
The results in the video below speak for themselves, and demonstrate the engine meeting its 790 pounds of force thrust target.
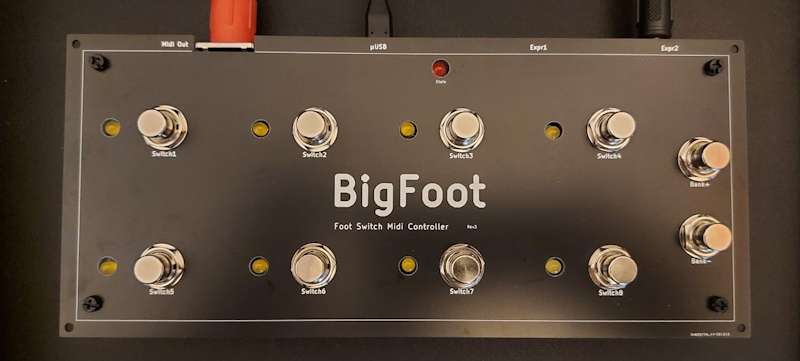
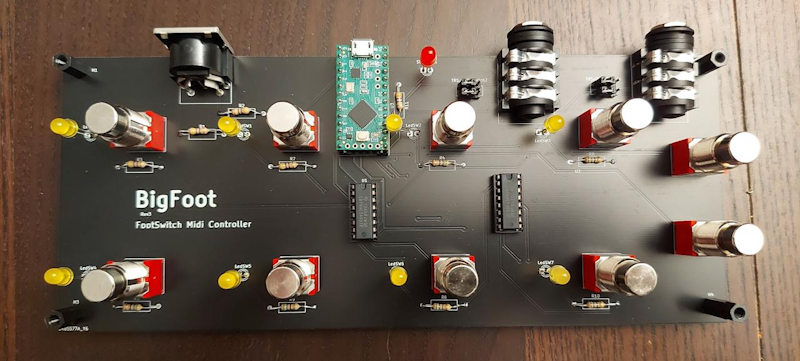
The elegant stacked-PCB system features eight assignable footswitches, bank selection, two expression pedal connectors with TRS/RTS switch, USB MIDI in/out, and MIDI DIN out.
Plan is to later build a full enclosure that will strengthen the structure.
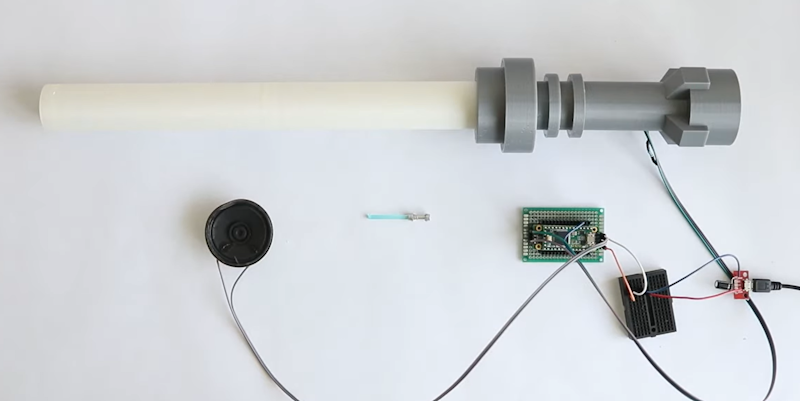
The Sketchy Maker wanted to do something big for Star Wars day, but with only two weeks to put it together, this was a rather tall order.
The idea of a giant LEGO Luke Skywalker with working lightsaber came to mind, and thankfully a Teensy 3.2 and Prop Shield was at hand, greatly facilitating the electronic aspects of the project.
The minifig itself is 3d-printed, with a servo to move the lightsaber-toting arm up and down. Ninety WS2812B LEDs light said saber, and a small speaker adds sound effects. The Sketchy Maker finished the project in time for its May the Fourth debut, and put it on display for the local community to enjoy.
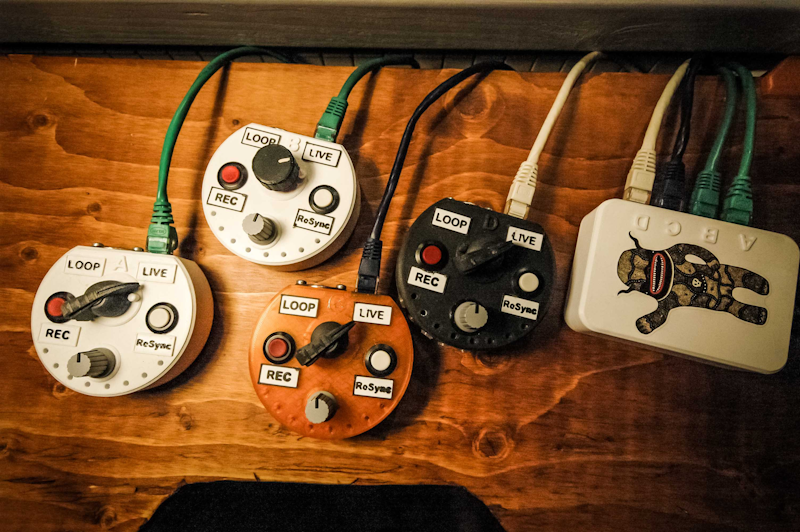
Swedish sound designer Christian wanted to jam with other musicians using Ableton Live, but it wasn’t working. Instead of playing cooperatively, it seemed like everyone would end up in their own little bubbles, locked in a volume arms race that typically results in one big sonic mess.
The solution? Custom controllers to gather loops from everyone, all orchestrated by a Teensy 3.5.
The resulting setup gives each musician their own channels, with someone controlling the overall mix, as well as their own sync button, headphone monitoring, and ability to contribute clips on the fly. The controllers connect to the Teensy via ethernet, which in turn talks to the host computer via a Max patch over USB serial using Open Sound Control (OSC) to talk to Ableton.
Clips start playing as soon as they are recorded, and looping status is indicated by eight RGB LEDs (red when recording, green while playing). Like a DJ cuing up the next track, the central knob acts as a crossfader, allowing the performer to experiment using headphones while only the loop is heard by the audience. Find out more about this unique system on Hackaday, or see it in action in the video below.
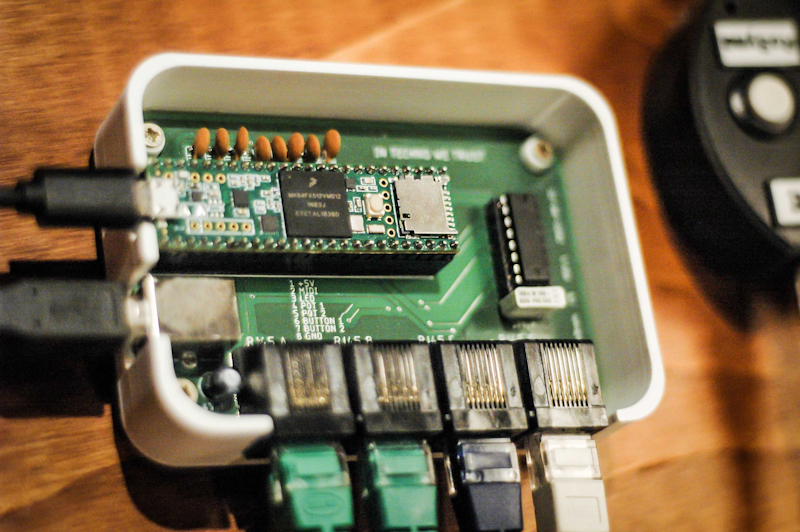
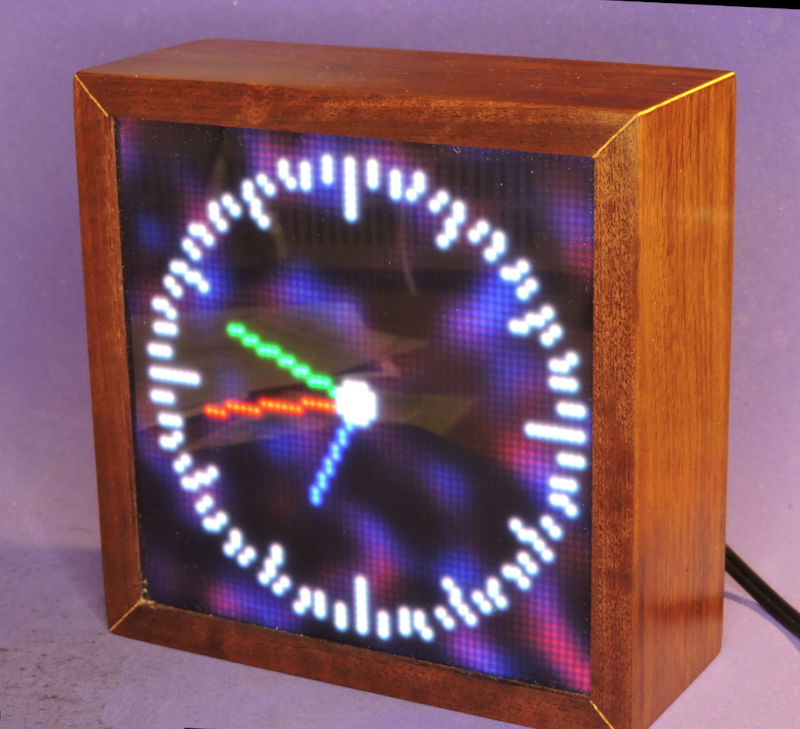
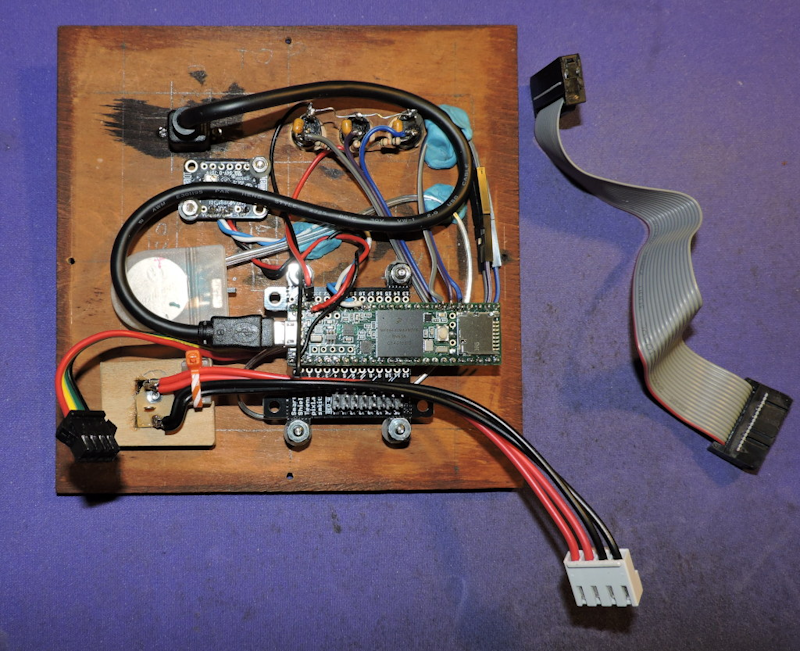
When Jim Harvey aka WB8NBS finally got his hands on an 64×64 RGB LED matrix, the question quickly became what to do with it. Experimentation with libraries and examples eventually led to the notion of a digital clock, and ultimately to Jim’s Sand Clock or “Clock with Benefits.”
Based on a Teensy 3.6, this unique timepiece adds some interesting features to the traditional timekeeping appliance.
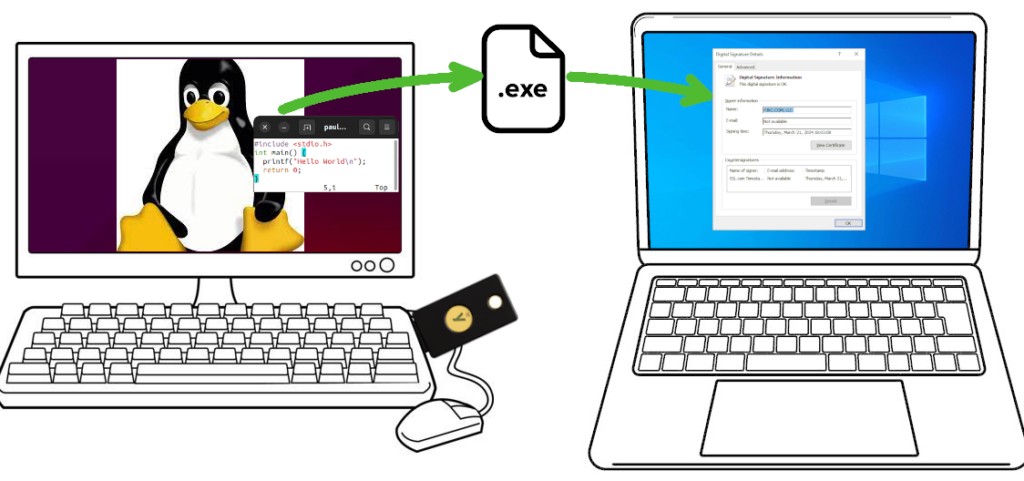
I recently obtained a new code signing certificate used to sign the Windows version of Teensy’s software. Because key storage rules have changed, and very little information currently exists for use in a cross compile workflow, I decided to write this article.
The basic concept is you wish to compile software for Windows, from the comfort of your Linux machine. The Windows EXE file needs to be properly signed, so users see “Verified Publisher” and Microsoft Defender SmartScreen will (eventually) learn your application is safe.
These steps were performed on Ubuntu 22.04. Other Linux distributions can very likely also work.
Buying a Code Signing Certificate
Before June 2023, obtaining a code signing cert was simpler and less expensive. You would create a private key and use it to send a certificate signing request (CSR). After verifying your identity, the certificate authority would send you the certificate file.
Signing a Windows EXE file requires these 2 items, a secret key and a certificate issued by one of the certificate authority companies Microsoft trusts. Previously it was just 2 files on your computer, or a single “P12” format file which can hold both.
Since June 2023, your secret key must either be stored inside a hardware token and/or stored on the certificate authority’s cloud service. Supposedly this is more secure.
It is also much more expensive! As with buying anything, shop around. Prices vary and change. As of March 2024, the best price I found was at SSL.com. This article isn’t sponsored or affiliated with SSL.com in any way. They simply had the best (least bad) price in March 2024. Pricing for “OV” was $110 per year for 3 years, and $250 for the hardware key. The actual hardware has $80 retail price when blank from Yubico.
If you choose another certificate authority, you might contact them to confirm the hardware key is Yubikey FIPS. Theoretically other hardware keys might exist, if not today then at some point in the future, and you would want to confirm whether the hardware they send works with Linux and libengine-pkcs11-openssl.
SSL.com also offers a cloud service which eliminates the need for a hardware key, but its least expensive tier is $20/month. That’s almost as much as the Yubikey FIPS hardware, repeated every year! Worse year, that low tier offers only 20 signatures per month. Teensy’s software has several signed EXE files. Merely building a few beta tests could mean needing the next tier.
After you’ve paid, the certificate authority will verify your identity. For “OV” level, the verification is so simple that the price and complexity of needing a hardware token feels rather wasteful. Nonetheless, to get Windows “Verified Publisher” this is the process.
Then all you can do is wait for your Yubikey token to arrive.
Collect Critically Important Data
Your Yubikey FIPS token will arrive initialized with 2 passwords, called PIN and PUK. Your first step is to obtain these 2 passwords.
From SSL.com, my Yubikey came with an 8 digit serial number, printed on a label and also on the key. On the SSL.com website order summary, under “CERTIFICATE DETAILS” -> “physical tokens” was an “activate” link. Clicking it brings up a dialog box to enter the 8 digit serial number. After entering the serial number, the PIN and PUK passwords appeared.
Other certificate authorities will likely work differently, but all Yubikey FIPS use these PIN and PUK passwords for access to the key. You must get the PIN and PUK passwords the certificate authority used. If the PIN is entered incorrectly 3 times, the key becomes locked. The PUK password lets you assign a new PIN password. If PUK is incorrect 3 times, the hardware becomes unusable! Make sure you have the correct PIN and PUK before using your key.
You will also need the certificate data. On the SSL.com I found this on the order summary page under “END ENTITY CERTIFICATES”. It begins “—–BEGIN CERTIFICATE—–“, has a couple dozen lines of base64 encoded data, and ends with “—–END CERTIFICATE—–“. Save this to a file. Any name is ok, I named it “mycert.pem”.
Install Software
Fortunately Ubuntu 22.04 has all the required software as packages. Use these commands install everything demonstrated in this article.
You only need the (large) wine package if you want to run your freshly compiled EXE on Linux.
Check Yubikey Hardware
Now you’re ready to plug in your Yubikey and check it. First run this command:
ykman list
You should see it detect your Yubikey and print basic info. The 8 digit serial number should appear.
YubiKey 5 NFC FIPS (5.4.3) [OTP+FIDO+CCID] Serial: 00000000
Type this command to check the keys stored:
ykman piv info
You should see results like this, but with actual serial numbers instead of zeros.
PIV version: 5.4.3
PIN tries remaining: 3/3
Management key algorithm: TDES
Management key is stored on the YubiKey, protected by PIN.
CHUID: 0000000000000000000000000000000000000000000000000000000000000000000000000000000000000000000000000000000000000000000000
CCC:   No data available.
Slot 84:
        Algorithm: ECCP384
        Subject DN: CN=SSL.com Code Signing Intermediate CA ECC R2,O=SSL Corp,L=Houston,ST=Texas,C=US
        Issuer DN: CN=SSL.com Root Certification Authority ECC,O=SSL Corporation,L=Houston,ST=Texas,C=US
        Serial: 00000000000000000000000000000000000000
        Fingerprint: 0000000000000000000000000000000000000000000000000000000000000000
        Not before: 2019-03-07 19:35:47
        Not after: 2034-03-03 19:35:47
Slot 9a:
        Algorithm: ECCP384
        Subject DN: CN=PJRC.COM\, LLC,O=PJRC.COM\, LLC,L=Sherwood,ST=Oregon,C=US
        Issuer DN: CN=SSL.com Code Signing Intermediate CA ECC R2,O=SSL Corp,L=Houston,ST=Texas,C=US
        Serial: 00000000000000000000000000000000000000
        Fingerprint: 0000000000000000000000000000000000000000000000000000000000000000
        Not before: 2024-03-04 15:51:07
        Not after: 2027-03-04 15:51:07
The “PIN tries remaining” is particularly important. If you enter the PIN password incorrectly 3 times, the hardware becomes locked. Best to download the graphical YubiKey Managers software from Yubico’s website, and use it to set a new PIN with the PUK password. However, 3 wrong tries with PUK locks the hardware completely. Unlocking requires deleting the keys you paid $250 to get.
Compile a Windows EXE program
Create a file “hello.c” with any simple C program.
#include <stdio.h>
int main() {
    printf("Hello World\n");
    return 0;
}
The default PKCS11 module pathname is /usr/lib/x86_64-linux-gnu/libykcs11.so
If you run Linux on hardware other than x86-64, such as Raspberry Pi, or if you use a different Linux distribution, the pathname may differ. On Ubuntu, you can use dpkg to see all the files the ykcs11 package installed.
dpkg -L ykcs11
ls -l /usr/lib/x86_64-linux-gnu/libykcs11.so
ls -l /usr/lib/x86_64-linux-gnu/libykcs11.so.2
ls -l /usr/lib/x86_64-linux-gnu/libykcs11.so.2.2.0
Sign your hello.exe file
To sign your freshly compiled EXE file, run osslsigncode with these parameters. If your PKCS11 module pathname is different, replace it as needed.
Replace XXXXXXXX with your PIN password. Remember, your Yubikey becomes locked after 3 wrong PIN password attempts!
If hello2.exe already exists, osslsigncode isn’t very smart and will show confusing errors. Best to make sure it’s deleted before running osslsigncode.
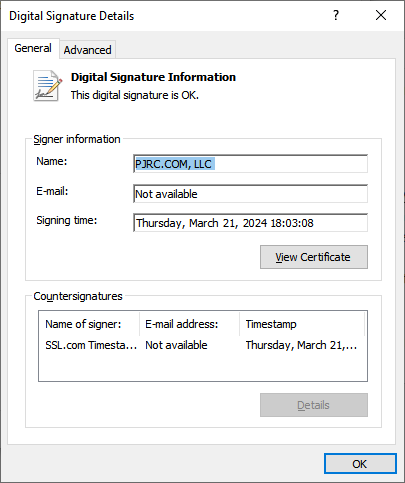
Your new hello2.exe file is a signed copy. When copied to a Windows computer, right click and view Properties. It should have a Digital Signatures tab. Clicking Details should show the signature info.
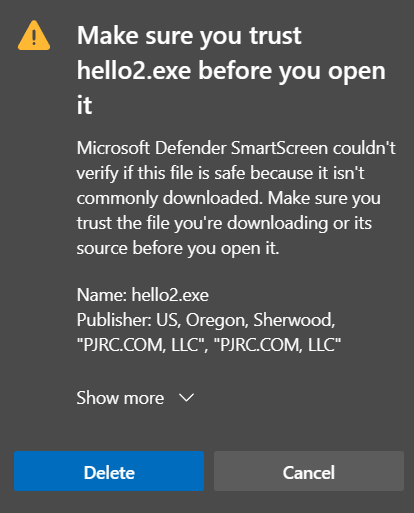
Microsoft Defender SmartScreen
Unfortunately, unless you purchased the most expensive “EV” type certificate, your signature using a brand new key will not yet have a reputation with SmartScreen. Windows users will see “isn’t commonly downloaded”.
Eventually as more people download and use your software, SmartScreen will begin to trust it.