Laptop Keyboard Converter

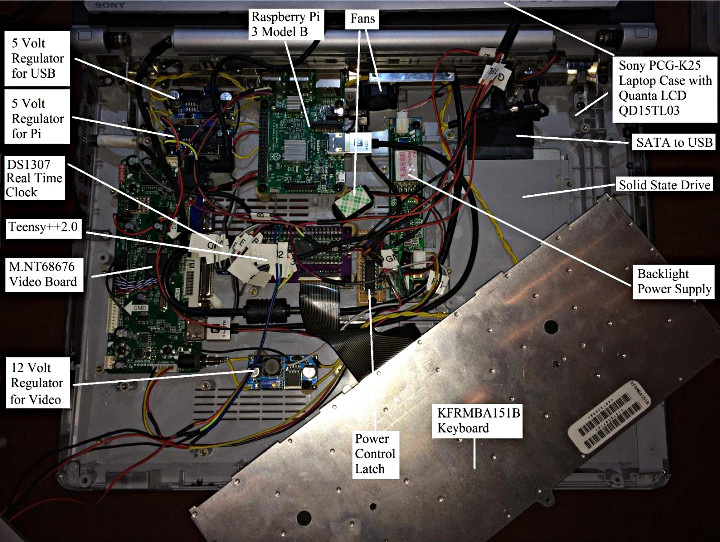
Frank Adams came up with a “nearly universal” USB controller to allow users to breathe life back into the keyboards from old lap tops.

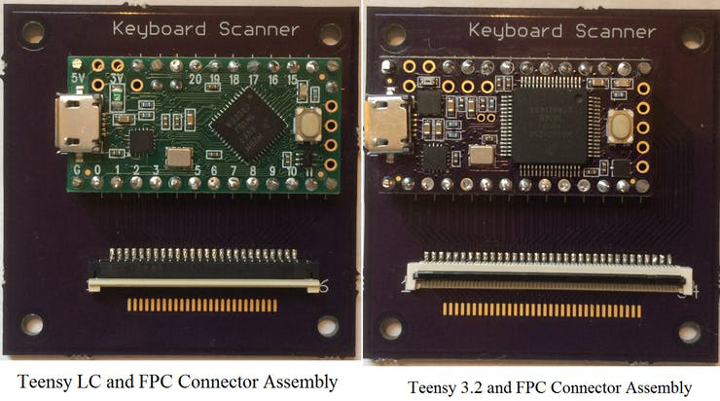
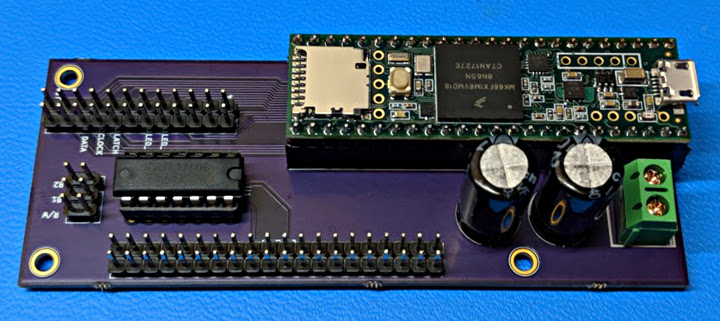
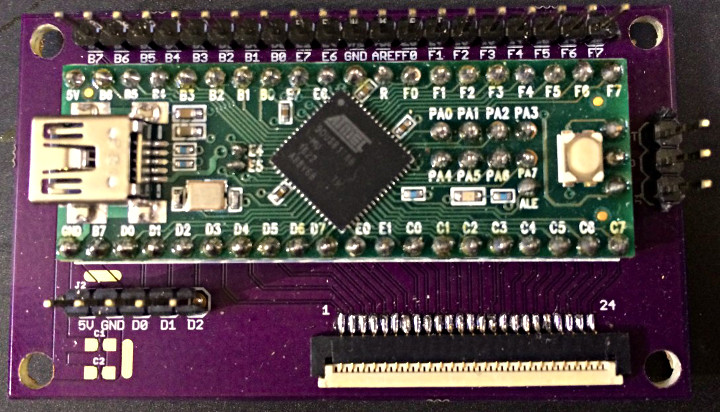
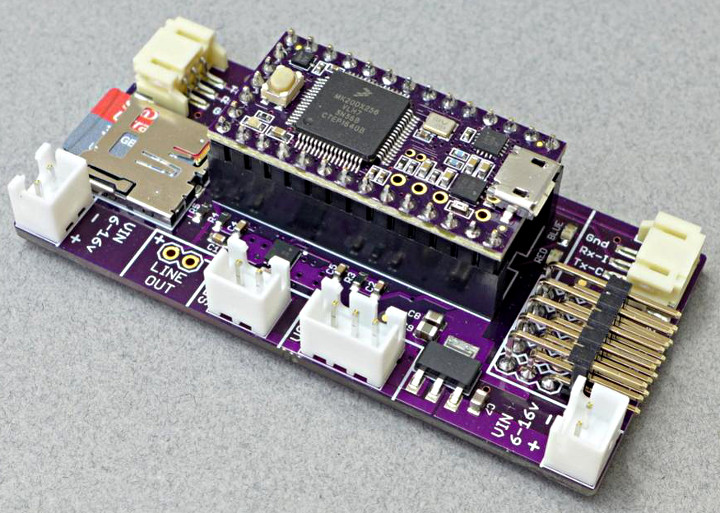
Frank saw a lot of forum posts from people asking how to revive a keyboard from an old, broken laptop.  Many of the answers were to the tune of “it can’t be done” or “it’s too hard”, so he set out to come up with a solution.  The final result is clever controller board that works with almost all keyboards.  One side of the board uses a Teensy-LC for FPC cables with up to 26 pins.  The other side uses a Teensy-32 for FPC cables with up to 34 pins.

Check out this Instructibles page for detailed information on how to build this yourself.

Code for the project is available in this GitHub repository.


Bixel – 16×16 Interactive LED Panel

Adam Haile and Dan Ternes of Maniacal labs created Bixel, an incredible interactive LED panel.

This incredible 16×16 display features SK9822 LEDs, each with a pushbutton, and 595 shift registers soldered to a massive 500x500mm PCB.  A Teensy 3.6 scans the buttons and sends the data to a Raspberry Pi 3 that drives the LEDs over a USB serial connection.

There is a great write up the project on the Maciacal Labs web site.

Design files and code are available on GitHub.

PolyMod – Polyphonic Digital Modular Synth

Matt Bradshaw designed and built PolyMod, a very cool, open source, polyphonic, modular digital synthesizer.

The PolyMod can operate in polyphonic (poly) mode making each module able to play multiple sounds, generating chords and harmonies.

This synth is entirely digital using a Teensy 3.6 with a Teensy Audio Shield to replicate traditional analog functions in software.  This approach allows users to easily create polyphonic patches, something that can be more challenging in analog systems.  This project also has the advantage of being a fairly low cost way to get into modular synthesis.

When the synth is powered up, the Teensy scans each of the module sockets and for each one detected, creates a virtual equivalent in software.  When a key on the keyboard is pressed, the Teensy coverts the data to a control voltage (CV) signal, which can be connected to any of the modules to generate sound.

Current modules include an oscillator, filter, envelope, low frequency oscillator (LFO), amplifier, and noise generator.

More details on the PolyMod can be found on the HackaDay project page.

Code can be found in this GitHub repository.

Teensy Beats Shield

Chris Miller made the Teensy Beats Shield, an open source, hand held, highly portable, step sequencer.

The inspiration for the project came from Chris’s desire to fill a void in open source handheld musical instruments after finding that most portable audio sequencers are expensive and completely closed sourced.  Someone recommended using Teensy with its digital signal processing (DSP) capabilities – and the Teensy Beats Shield was born.This handheld synth uses a Teensy 3.6 and the SGTL5000 audio codec chip and features a 2.4″ TFT display.  It

Detailed information on the project including information on how to build your own can be found on this HackaDay project page.

Code for the project is available in the teensy-beats GitHub respository.

The bare PCB for the project is available on Tindie.


Sony PCG-K25 Laptop Keyboard Controller

Frank Adams converted a Sony Vaio PCG-K25 laptop into a Raspberry Pi computer using a Teensy ++ for the keyboard controller.

In this project Frank uses a Teensy ++ to handle the VAIO keyboard, buttons, and LED I/O.  It also replaced the control pad for the M.NT68676 video card.  The Teensy also monitors the battery voltage and returns the result over the I2C bus.

The Teensy is mounted to a circiut board that Frank designed to bring out the pins.  24 of the Teensy digital I/O pins routed to the FPC connector pads and the remaining I/O pins are routed to through hole pads for connecting other devices – touch pad, video card, LEDs, and the Raspberry Pi.

This video shows the Pi-Teensy laptop in action

The code for the project, as well as a great detailed write up on the project is available in this Github repository.

Open Panzer Sound for RC Models

LukeZ developed a great board to add sound to RC models – The Open Panzer Sound Card.

Luke is a model tank enthusiast and wanted to come up with an inexpensive, open source, high quality sound source project for RC models.  After going through the audio tutorial workshop he got started on the project.

The project uses a Teensy 3.2 plugged in to a carrier board.  The Teensy does the processing the carrier board provides an amplifier, low-dropout regulator (LDO), SD card socket, and connections for a speaker, volume and other things needed for RC models.  There are 5 RC inputs on the board that allow for control of the engine and some other auxiliary sounds.Luke detailed much of the development process on the Open Panzer forum.

The project is well documented with code, schematics, and bill of materials available on the OP-Sound Github page.  The PCB for the carrier board is available at OSH Park.

Autopilot System

Curtis Olson has developed a low cost DIY autopilot system that supports the AuraUAS autopilot flight code and firmware.

This version of the hardware is the latest in his continuing evolution of a DIY autopilot system.  Each version has had improvements in both performance and features.  In the latest version Curtis switched to using KiCad for the PCB layout to gain more flexibility in ordering PCBs.

The basic design of the system uses a “little” (Teensy 3.2) and “big” (PocketBeagle) working together as a distributed system.  The Teensy handles all the hard real time sensor I/O tasks while the PocketBeagle does the heavy lifting – control, navigation, logging, etc.

Be sure to check out the Github page for the project for more details as well as code, PCBs files, and build instructions.

LED Gyro Sphere

NZDoug made a cool interactive LED sphere using gyro and sound sensors.

This nifty LED sphere has multiple sensors to make it interactive.  It features a gyro board and audio mice controlling 130 addressable LEDs.  The project uses takes advantage of the processing power and memory of the Teensy 3.6.

There are menu buttons on the sphere used to select up to 9 different effects:

  1. Gyro Color – Rotating sphere will change color of all LEDs
  2. Gyro Puzzle – Three Bands of color set by X, Y, Z axis control of the Gyro. The objective is to rotate the ball until all bands are the same color.
  3. Sound Meter – All LEDs (Great next to a Blue Tooth Speaker!!)
  4. Sound Meter – Single VU Meter with 130 LEDs spiraling down
  5. Dot Snakes Sound – 4 snakes run around sphere and change speed with sound
  6. Dot on Top – Gyro keeps color dot on top of the sphere when sphere rolled on floor
  7. Colorwash – Beautiful effect of all colors cycled through on sphere
  8. Dot Snakes – 4 snakes run around sphere at constant speed
  9. Gyrosnake – Sound changes color as LEDs spiral downward

Code, schematics, and build details are available both on the Hackster.io project page and Instructables

Notes and Volts Teensy-Synth

Dave over at Notes and Volts has published a great series of DIY tutorials called Teensy-Synth.

In the first episode Dave walks you through assembling your Teensy and Audio shield and how to use the audio library.  He also makes code available to help you get going.

The next 7 episodes progress to controlling your synth with Pure Data software, connecting a USB-MIDI keyboard, code optimization, adding an ADSR envelope generator, adding waveforms, filters, pitch blending, and more.

If you want to get started building your own synth, this series is a great place to start.