Addressable LEDs before it was cool…
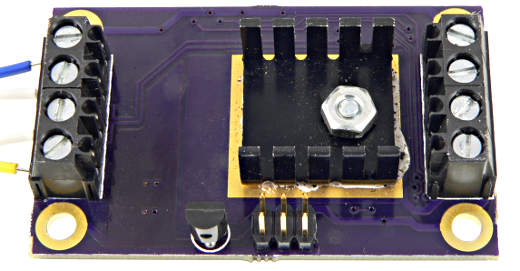
In January 2011, Mykle Hansen put out a call for LED help for his Lightbar event. I made this 3W LED board:
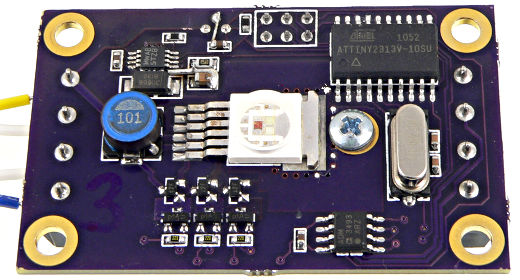
It’s incredibly bright.
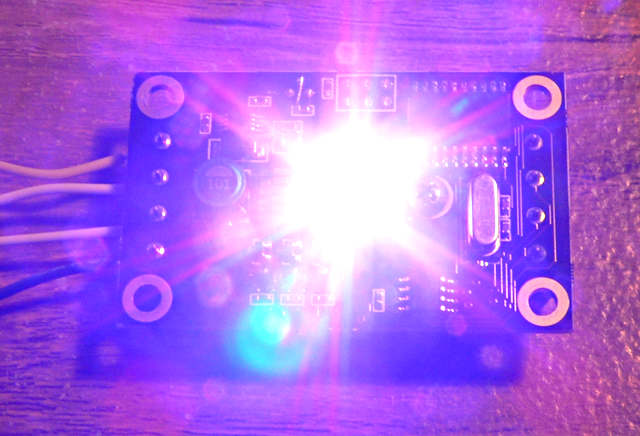
Here it’s set to color pink (#FF20FF).
Mykle wrote more about the lights and using them at Lightbar. This blog entry is mostly about the technical details and design files. Read on for details…
This little project was inspired by Mykle’s Lightbar message on December 2. Well, probably intending to help prior years was a factor. Anyway, here’s that message:
Subject: [dorkbotpdx-blabber] LIGHTBAR cometh … LED help?
hi dorky people!
to any of you who remember LIGHTBAR from two years ago, or heard about it, i’d like to announce that LIGHTBAR 2011 is in the planning stages for this February.
LIGHTBAR is a Seasonal Affective Disorder (SAD) treatment center that appears intermittently in the month of February to bring inspiration, fresh air and wide spectrum light to the people of Portland.
This year I’m working on a Mobile LIGHTBAR system — a folding portable structure. But there’s some tricky parts I’m trying to overcome regarding the light itself.
For one: we’re going to be generator powered at best, so I’m investigating low-power lighting options. LEDs were not really wide-spectrum last time i checked, but maybe they’ve gotten better? Can anybody suggest types of LED lighting wider than the standard white and RGB varieties we’ve had bouncing around since 2005? I’m just not up on the latest LED fashions, I guess.
For two: I’m looking to rent or borrow a portable gas generator during the month of February. I’m asking everybody, yourselves included. I will treat it like a baby.
For three: My Mobile LIGHTBAR will have a folding skin, and I’d really like to integrate some kind of LED lighting system directly in the fabric, or else on some kind of net that easily hangs between the skin and the frame. this would be your standard controlling-a-bunch-of-LEDs project, but it has to be designed for durability, ease of repair, and fairly long runs of cable. If it was all RGB LEDs and they were independently addressable, that would be even better. Probably I’d be talking about something in the range of 100 – 200 LEDs, of 1 watt or less. (roughly!) Picture trying to spread those evenly across a 20′ diameter hemisphere, with the power & control system located somewhere on the edge.
I’ve thought about doing this with the BlinkM units, since they’re bus-addressable, but I feel like with this many units it might be cheaper to have something custom-fabbed. on the other hand, time is tight. i’d be thrilled if i could find system already designed to do exactly this.
and/or, does anybody in Dorkbot feel like taking this on as their own project? i think i could find some budget …
-m-
So, I started looking at some RGB LED specs. I pretty quickly found that the lower power LEDs, like the one on BlinkM, aren’t specified in Lumens (total light output), or if they are, the Lumens per Watt aren’t great.
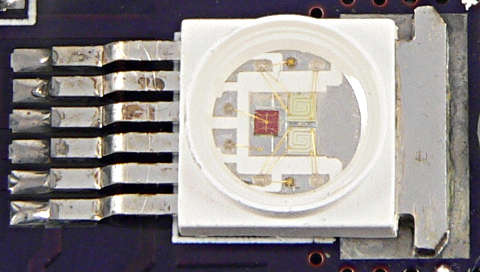
After comparing lots of LEDs, I finally ended up with ASMT-MT00, which is in the 30-some Lumen/Watt range. It’s not cheap (about $10 to $15 in small qty), but it really works!
Here’s a close-up of the LED.
Today many more high power LEDs are available, some from Chinese sellers with questionable specs, but so cheap they’re hard to pass up! Back in 2011, this seemed like the best option.
Mykle wanted to keep the cost low. In fact, he wanted to use cheaper LEDs… But this was my little weekend project-on-a-whim, and I wanted 100+ lumens! I also really wanted to make it run on 12 volts and have very efficient conversion and tolerate some voltage drop without changing the LED brightness, and I wanted RS485 communication so the signals can run a long distance (unlike BlinkM). This design does all that. In the end, it worked really well for Lightbar… so well that Mykle is building 18 more boards!
Pretty much on a whim, I ordered a few ASMT-MT00’s and other parts, and came up with a somewhat unconventional design.
IC manufacturers generally recommend using 3 of their LED drivers for RGB LEDs, one for each color. Of course, they love to sell 3 specialized chips, which aren’t cheap! Instead, I decided to try using only 1 special power supply chip, and the LM3407 from National Semiconductor looked like one of the most economical (cheapest) choices. And I was going to use only 1 instead of 3.
The basic idea was run all 3 LEDs in series. The ASMT-MT00 nicely provides each LED separately on 6 pins, instead of common anode or common cathode, which makes this possible.
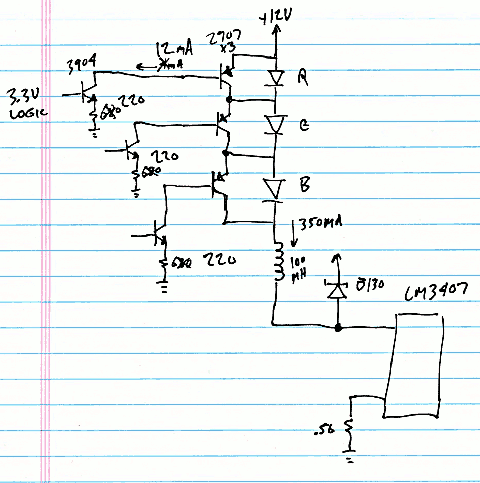
The LM3407 can operate without any output capacitor. It is a constant current afterall. Normally a 22 uH inductor would be recommended. But I decided to increase it to 100 uH (the datasheet is light on details of stability in continuous vs discontinuous mode, but it seemed like continuous conduction buck mode would work). The LM3407 datasheet mentions being able to omit the output cap, with increased variance in output. Since I wasn’t going to have any output cap, I wanted the current to be better regulated, and upsizing the inductance is the way to do it.
The reason to omit the output capacitor is because I decided to change the color by diverting the current around each LED. Red is about 2 volts, and blue and green about about 3.5 volts. But when shorted by a PNP transistor, the voltage suddenly changes to about 0.5 volts. Better transistors would be less than 0.5, but I used cheap 2907’s.
Since the PNP transistors basically “float” at whatever voltage the power supply and drop on other LEDs or transistors happen to make, I used 3904 NPNs so a microcontroller can turn on and off their base current. When the processor drives 3.3 volts, about 2.6 volts is driven onto the 220 ohm resistor on the emitter, or about 12 mA in the 220 ohm resistor. That 12 mA comes mostly through the collector (which doesn’t care what it’s voltage happens to be when used in linear mode), which pulls the current from the floating PNP transistor base.
Yes, this is a pretty unusual transistor circuit… and I wasn’t completely sure if it’d work, but this whole thing was just a whim. I spend 2 days on it, the first one reading about the LEDs, LM3407 (and lots of other chips), and thinking about that circuit. The second day, I drew up the circuit board. I knew the LED gets hot, and so would the LM3407 and maybe the transistors too? I just drew some copper planes and thermal vias, and a big pad for a small heatsink (leftover from another old project). No prototype, no simulation, no real analysis… just a lot of guesswork and hunches, and at the end of the second day I sent off the files to Laen’s PCB Order (which is now OSH Park).
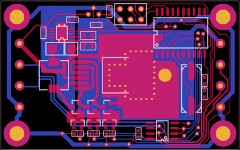
Here are the PCB files.
I never drew any schematic for the rest, but it’s just a ATTINY2313 chip to control everything. There’s 4 PWM signals, 3 connected to the transistors, and the 4th to the “DIM” control pin on the LM3407, so it can shut off when none of the LEDs need to be on. There’s also a RS485 interface chip and a few other necessary parts, but nothing really special.
Here is a full parts list:
qty  part number        part description                        sources
---  -----------        ----------------                        -------
1  ASMT-MT00-00001      RGB LED, 3W                             mouser, digikey
1  LM3407MYCT-ND        LED driver chip, 350 mA                 digikey
1  ADM3493ARZ-ND        RS485 chip, 3V                          digikey
1  556-ATTINY2313V10SU  ATTINY2313, SOIC-20 ("20SU" is ok)      mouser, digikey, avnet
1  296-26120-ND         LP2950 3.3V TO-92                       digikey
3                       MMBT3904, NPN transistor                digikey
3  771-PMST2907A115     PMST2907A, PNP transistor               digikey
1  B130-FDICT-ND        Diode, Schottky, B130, SMA              digikey
1  445-1208-1-ND        Inductor, 100 uH, 500 mA, 7mm           digikey
1  535-10211-1-ND       Crystal, 7.3728 MHz                     digikey
2                       Capacitor, 33pF, 603                    digikey
3                       Capacitor, 1uF, 16V, X7R, 603           digikey
1  490-5523-1-ND        Capacitor, 10uF, 25V, X5R, 805          digikey
1  311-.56SCT-ND        Resistor, 0.56, 1%, 805                 digikey (have 47 more)
2                       Resistor, 47K, 603                      digikey
3                       Resistor, 220, 603                      digikey
2                       Terminal block, 4 pin
1                       Header, 3x2, 0.1 inch (AVR prog)        (cut from 20x2 strip)
1  532-507302B00        Heatsink                                mouser
1                       Screw, 4-40, 1/4 inch
1                       Nut, 4-40
1                       Lock Washer, #4
1                       PCB                                     dorkbot
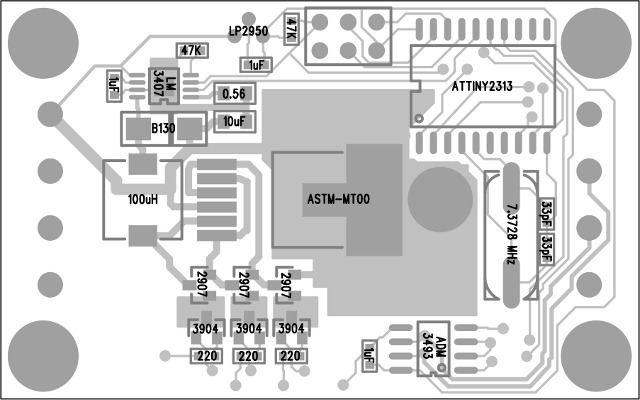
If anyone actually builds more boards (Mykle is building 18 more), here’s a parts placement diagram:
I pretty much set this thing aside and forgot about it, until the boards arrived a few weeks later. I set them aside for a few days, but the Dorkbot Monday meetup was the motivation I needed to get them actually working!
Then I spent one late night session Sunday night building and testing the hardware. Amazingly, the LM3407 chip worked great. I was worried the current regulation might respond too slowly when the output voltage suddenly changes by 3 or 6 or 8 volts! But it works great (at least without any output capacitor). It is designed by be PWM controlled by the DIM pin… but there weren’t any specs about how it’d respond to the ‘LED voltage” suddenly changing. I actually spent a couple hours with an oscilloscope and waveforms driving onto the transistors to make sure it really worked.
The other thing I tested and verified, is the switching power supply really does efficiently convert the power and adjust as the color changes. Even though the current is still “on”, when 2 of the lights are off, the voltage is only 0.5 volts (the cheap 2907 can’t get it any lower). Because power is voltage * current, the input current really does go down even though the output current stays the same, because the output voltage changed, and the switcher is pretty efficient. It really does work well that way. The switcher also does a great job of making exactly the same output, even if the input drops to 10 volts instead of 12.
About mid-morning Monday, with the Dorkbot meetup looming only hours away, but the hardware pretty well tested, I started working on the software side.
One confession I need to make is the ISP header was routed for the usual pinout with the header on the “top” side, but I soldered it to the “bottom” side (the side with the heatsink). Fortunately, I had a Teensy with ArduinoISP sitting on my desk, so it was pretty easy to just reverse the pinout to match. But if anyone else builds this little board and tries to use an off-the-shelf AVR ISP programmer, well, either solder the header to the LED side, or plan on wiring up a little adaptor to reverse the pinout.
In about an hour, I banged out this extremely simple code to run on the ATTINY2313 chip.
It listens for 8 character ASCII commands at 115200 baud. The input is hex, where the first byte is the board’s address, and the next 3 bytes are the RGB color. Any non-hex byte causes it to discard any data and begin listening for a new comment. Normally, sending a byte like “:” before a command, or pressing Enter after each command is a good idea. Here’s a few commands:
01FFFFFF Board #1, White
030000FF Board #3, Blue
02000000 Board #2, Off
Each board needs to have its address hard-coded. The makefile runs AVRDUDE automatically, so this isn’t very difficult.
Mykle has already added some new features to the code, like a broadcast address. I don’t have his latest code, but he’s planning to set up a CVS (or similar) server for the code. Hopefully he’ll post a reply below with a link.
The code could do a lot of things. The address bytes could be stored in EEPROM, instead of hard-coded. The protocol could be extended, or features like BlinkM could be added. Even DMX should, in theory, be possible.
I spent about 1 hour on the code. Much of that was making the PWM polarities correct.
With a few extra hours to spare before Dorkbot that Monday evening, I did some fiddling to make the lights work with Puredata. All 3 boards I made were working well that night.
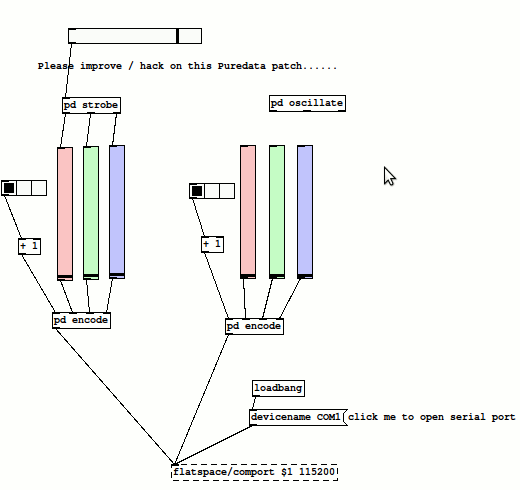
I must confess, I’m not very experienced with Puredata. But quite a Dorkbot regulars are. Jason, Brian and others hacked on the Pd stuff and made the LEDs blink and fade. Here’s the Puredata Code, both my original attempts, and the end result of hacking on the code during 1 evening at Backspace.
The evening, Mykle took home the 3 boards, and a RS-485 converter I had (left over from other projects). They were used at Lightbar, and I made it out there one of the evenings. Good times.
Mykle is building 18 more lights, and plans to do fun things with the software.
I’m not planning to do much more with this, but I wanted to get this blog post written, so the info, and all the available design files and code would be posted publically. If you, dear reader, build these or use the ideas or info for another project, please post a comment below.
Enjoy!
This article was originally published on the DorkbotPDX website, on March 22, 2013. In late 2018, DorkbotPDX removed its blog section. An archive of the original article is still available on the Internet Archive. I am republishing this article here, in the hope it may continue to be found. But today, many awesome addressable LED products exist on the market, so this sort of project probably doesn’t make good economic sense compared to just buying a ready-made LED strip.