VirtualWire Library
VirtualWire, by Mike McCauley (PDF), helps you use very inexpensive wireless radio modules.
| Download: |
Included with the Teensyduino Installer |
Very low cost RF modules require specially formatted data, with sync patterns, equal balance of 0 and 1 bits, and error checking. VirtualWire provides all of these features, allowing for best performance from very cheap radio circuits.
Hardware Requirements
VirtualWire requires RF modules. In these photos, a 315 MHz RF Link Kit sold by Seeed Depot ($4.90) was used.
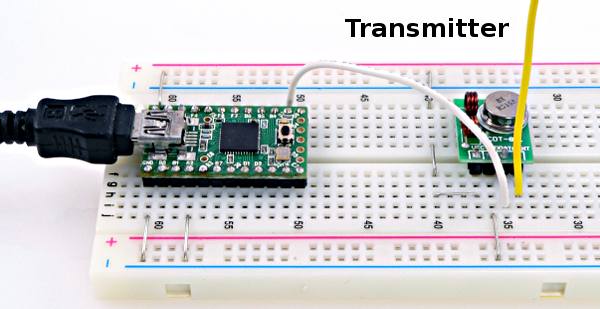 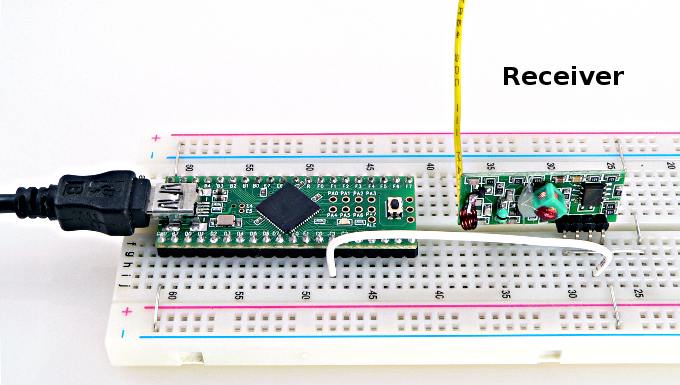 |
These low cost modules are very simple. The receiver output signal indicates if energy from a transmitter is heard. It can be connected to any pin, but it can not drive pins with a LED attached.
Transmitters usually have only a single data pin, which activate the RF output when high. Some modules 2-way modules, with both a transmitter and receiver also have a transmitter enable pin.
VirtualWire uses Timer1, which means some PWM pins which require Timer1 will not work. Other libraries using Timer1 will be incompatible with VirtualWire. On Teensy 3.0, an IntervalTimer is used, which avoids conflicts with timers used for PWM.
| Board | Receive Pin | Transmit Pin | Transmit Enable Pin | PWM Pins Affected |
|---|---|---|---|---|
| Teensy 3.0 | Any, except 13 | Any | Any | - |
| Teensy 2.0 | Any, except 11 | Any | Any | 4, 14, 15 |
| Teensy 1.0 | Any, except 6 | Any | Any | 15, 17, 18 |
| Teensy++ 2.0 | Any, except 6 | Any | Any | 25, 26, 27 |
| Teensy++ 1.0 | Any, except 6 | Any | Any | 25, 26, 27 |
|
Basic Usage
VirtualWire works somewhat differently than most Arduino libraries. Many individual functions are used, and their names are somewhat different. Fortunately, each one is simple.Configuration Functions
vw_set_tx_pin(transmit_pin)Configure the transmit pin. Default is pin 12. Blah
vw_set_rx_pin(receive_pin)Configure the receive pin, Default is pin 11. On Teensy 2.0, pin 11 should not be used because most receiver modules can not work correctly with the orange LED on that pin.
vw_set_ptt_pin(transmit_en_pin)Configure the transmit enable pin, or "push to talk". Default is pin 10.
vw_set_ptt_inverted(true)Configure the "push to talk" polarity.
vw_setup(2000)Begin using all settings and initialize the library. This is similar to the "begin" function of other libraries. All pins should be configured before calling this function.
Transmission Functions
vw_send(message, length)Transmit a message. "message" is an array of the bytes to send, and "length" is the number of bytes stored in the array. This function returns immediately and the message is sent slowly by an interrupt-based background process.
vw_tx_active()Returns true if the message is being sent, or false if the transmitter is not active. You can use this after sending a message to test when it has finished being transmitted.
vw_wait_tx()Wait for a message to be fully transmitted. Often the simplest approach is to call this after vw_send.
Reception Functions
vw_rx_start()Activate the receiver process. You must call this function before any reception can occur. An interrupt-based background process is started which monitors the reception of data.
vw_have_message()Returns true if message has been received. This is similar to the "available" function of most other libraries.
vw_wait_rx()Wait for a message to be received. This will only return when a message has been received, otherwise it will wait forever.
vw_wait_rx_max(timeout_ms)Wait for a message, but give up after "timeout_ms". Returns true if a message was received, or false if the timeout period elapsed.
vw_get_message(buf, &buflen))Read the last received message. This should be called only when a message is known to be received with any of the 3 functions above. "buf" is an array where the message is copied. "buflen" should have the array's maximum size upon input, and upon return the number of bytes actually copied is retured. The function itself returns true if the message was verified correct, or false if a message was received but appears to have been corrupted.
vw_rx_stop()Disable the receiver process.
The official VirtualWire documentation (PDF), explains these functions and other usage considerations.Example Program - Transmit
#include <VirtualWire.h>

const int led_pin = 11;
const int transmit_pin = 12;
const int receive_pin = 2;
const int transmit_en_pin = 3;

void setup()
{
  // Initialise the IO and ISR
  vw_set_tx_pin(transmit_pin);
  vw_set_rx_pin(receive_pin);
  vw_set_ptt_pin(transmit_en_pin);
  vw_set_ptt_inverted(true); // Required for DR3100
  vw_setup(2000);	 // Bits per sec
}

byte count = 1;

void loop()
{
  char msg[7] = {'h','e','l','l','o',' ','#'};

  msg[6] = count;
  digitalWrite(led_pin, HIGH); // Flash a light to show transmitting
  vw_send((uint8_t *)msg, 7);
  vw_wait_tx(); // Wait until the whole message is gone
  digitalWrite(led_pin, LOW);
  delay(1000);
  count = count + 1;
}
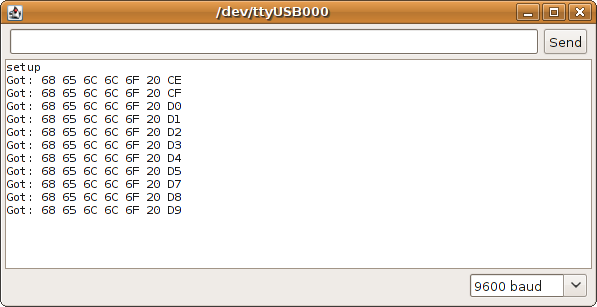
Example Program - Receive
|
#include <VirtualWire.h>

const int led_pin = 6;
const int transmit_pin = 12;
const int receive_pin = 11;
const int transmit_en_pin = 3;

void setup()
{
    delay(1000);
    Serial.begin(9600);	// Debugging only
    Serial.println("setup");

    // Initialise the IO and ISR
    vw_set_tx_pin(transmit_pin);
    vw_set_rx_pin(receive_pin);
    vw_set_ptt_pin(transmit_en_pin);
    vw_set_ptt_inverted(true); // Required for DR3100
    vw_setup(2000);	 // Bits per sec

    vw_rx_start();       // Start the receiver PLL running
}

void loop()
{
    uint8_t buf[VW_MAX_MESSAGE_LEN];
    uint8_t buflen = VW_MAX_MESSAGE_LEN;

    if (vw_get_message(buf, &buflen)) // Non-blocking
    {
	int i;

        digitalWrite(led_pin, HIGH); // Flash a light to show received good message
	// Message with a good checksum received, print it.
	Serial.print("Got: ");

	for (i = 0; i < buflen; i++)
	{
	    Serial.print(buf[i], HEX);
	    Serial.print(' ');
	}
	Serial.println();
        digitalWrite(led_pin, LOW);
    }
}
Realistic Performance Expectations
Many of the cheapest RF modules are sold with very unrealistic claims of data rate and maximum communication distance, and sometimes with very little (or even incorrect) documentation. VirtualWire will help these modules perform as well as they can, but the old saying applies: "you get what you pay for".For example, the 315 MHz modules shown above were documented with only this image.
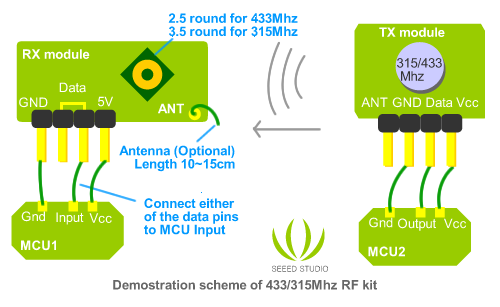
The only "documentation" for $4.90 module pair shown above |
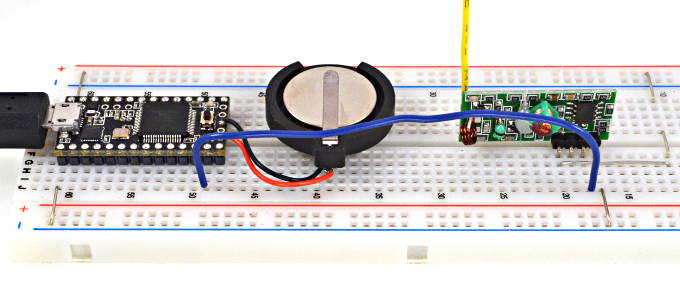
These modules worked very reliably when sitting only close to each other on a table. When separated by about 20 feet with ordinary office furniture, and a 13 cm wire attached to each (in the middle of the 10 to 15 cm suggested), they were able to communicate, but approximately 20% of messages were corrupted.
Perhaps using better antennas could help, but each board has a loading coil that appears to be designed for relatively short antennas, and no other documentation seems to exist regarding best antennas.
These modules can work well for low performance, non-critical applications. For more demanding applications, more sophisticated (and more expensive) RF modules should be considered.
RF Modules
- 315Mhz RF kit <-- has schematics and antenna advice!
- 315Mhz RF link kit
- 433Mhz RF link kit
-
RF Link Transmitter - 315MHz
- RF Link 4800bps Receiver - 315MHz