CapacitiveSensor Library
CapacitiveSensor, written by Paul Badger, lets you create sensors that can detect touch or proximity.
| Download: |
Included with the Teensyduino Installer Latest Developments on Github |
Hardware Requirements
Each "sensor" can be any sizable metal object. In this example, three pieces of copper tape are used.
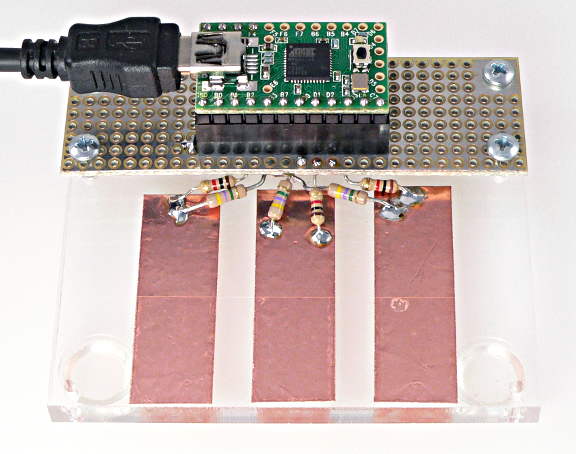
Each sensor connects to 2 pins, send and receive. The send pin must connect with a large-value resistor, between 100K to 50M. Larger values allow more sensitivity, but with slower response. The example above uses 4.7M resistors.
The receive pin may be connected with a wire, but a 1K or higher resistor will help protect the Teensy's pin if a user directly touches the object and delivers an electro-static shock. The safest construction uses an insulating layer, such as the clear tape in the example above.
Multiple sensors can share a single send pin, but each must have its own receive pin.
Teensy's ground pin should be connected to earth ground for best results. Normally the USB cable connects to a PC, which connects to earth ground by its power code. But when using a laptop on battery power or running without a computer, you may need to make a dedicated connection to earth ground.
Teensy LC, 3.0, 3.1, 3.2 & 3.6 have superior hardware-based capacitive touch sensing circuitry on specific pins. They do not require this library. To read capacitance on those pins, simply use touchRead(pin). Hardware-based sensing offers much faster measurements with better stability over temperature variation.
Basic Usage
CapacitiveSensor mySensor(sendPin, reveicePin)Create the CapacitiveSensor object, using a specific pair of pin. You should create a separate CapacitiveSensor object for each sensor. Sensors can share the same sendPin, but each needs its own reveicePin.
mySensor.capacitiveSensor(numSamples)Measure the sensor. The measurement is repeated numSamples times. More measurements increases sensitivity, but takes longer. The elapsed time, in arbitrary units, is returned. A negative number is returned if any error occurs.
More functions are available, documented at the CapacitiveSensor page in the Arduino Playground.New development on this library can be found at this GitHub repository.
Example Program
You can open this example from the File > Examples > CapacitiveSensor > CapacitiveSensorSketch menu.
#include <CapacitiveSensor.h>

/*
 * CapitiveSense Library Demo Sketch
 * Paul Badger 2008
 * Uses a high value resistor e.g. 10M between send pin and receive pin
 * Resistor effects sensitivity, experiment with values, 50K - 50M. Larger resistor values yield larger sensor values.
 * Receive pin is the sensor pin - try different amounts of foil/metal on this pin
 */


CapacitiveSensor   cs_4_2 = CapacitiveSensor(4,2);        // 10M resistor between pins 4 & 2, pin 2 is sensor pin, add a wire and or foil if desired
CapacitiveSensor   cs_4_6 = CapacitiveSensor(4,6);        // 10M resistor between pins 4 & 6, pin 6 is sensor pin, add a wire and or foil
CapacitiveSensor   cs_4_8 = CapacitiveSensor(4,8);        // 10M resistor between pins 4 & 8, pin 8 is sensor pin, add a wire and or foil

void setup()
{
   cs_4_2.set_CS_AutocaL_Millis(0xFFFFFFFF);     // turn off autocalibrate on channel 1 - just as an example
   Serial.begin(9600);
}

void loop()
{
    long start = millis();
    long total1 =  cs_4_2.capacitiveSensor(30);
    long total2 =  cs_4_6.capacitiveSensor(30);
    long total3 =  cs_4_8.capacitiveSensor(30);

    Serial.print(millis() - start);        // check on performance in milliseconds
    Serial.print("\t");                    // tab character for debug windown spacing

    Serial.print(total1);                  // print sensor output 1
    Serial.print("\t");
    Serial.print(total2);                  // print sensor output 2
    Serial.print("\t");
    Serial.println(total3);                // print sensor output 3

    delay(10);                             // arbitrary delay to limit data to serial port
}