MIDI Library
MIDI, by Francois Best, allows you to control and receive data from musical instruments.
| Download: |
Included with the Teensyduino Installer Latest Developments on Github |
MIDI works with all Teensy models.
Hardware Requirements
MIDI uses the hardware serial ports to communicate with standard MIDI devices at 31250 baud. This is completely separate from, and can be used together with USB MIDI. Teensy 3.6 can also support USB Host MIDI, and with Ethernet hardware RTP-MIDI is also possible. This page documents ordinary serial MIDI which uses round 5-pin DIN connectors.You can use Serial.print() to observe what your program is doing, while using MIDI, or USB MIDI.
 |
MIDI connects using the UART's transmit and receive pins.
| Serial Port | Signal | Teensy 1.0 | Teensy 2.0 | Teensy++ 1.0, 2.0 | Teensy LC | Teensy 3.0, 3.1, 3.2 | Teensy 3.5, 3.6 | Teensy 4.0 | Teensy 4.1 |
|---|---|---|---|---|---|---|---|---|---|
| Serial1 | Receive | 2 | 7 | 2 | 0 | 0 | 0 | 0 | 0 |
| Transmit | 3 | 8 | 3 | 1 | 1 | 1 | 1 | 1 | |
| Serial2 | Receive | - | - | - | 9 | 9 | 9 | 7 | 7 |
| Transmit | - | - | - | 10 | 10 | 10 | 8 | 8 | |
| Serial3 | Receive | - | - | - | 7 | 7 | 7 | 15 | 15 |
| Transmit | - | - | - | 8 | 8 | 8 | 14 | 14 | |
| Serial4 | Receive | - | - | - | - | - | 31 | 16 | 16 |
| Transmit | - | - | - | - | - | 32 | 17 | 17 | |
| Serial5 | Receive | - | - | - | - | - | 34 | 21 | 21 |
| Transmit | - | - | - | - | - | 33 | 20 | 20 | |
| Serial6 | Receive | - | - | - | - | - | 47 | 25 | 25 |
| Transmit | - | - | - | - | - | 48 | 24 | 24 | |
| Serial7 | Receive | - | - | - | - | - | - | 28 | 28 |
| Transmit | - | - | - | - | - | - | 29 | 29 | |
| Serial8 | Receive | - | - | - | - | - | - | - | 34 |
| Transmit | - | - | - | - | - | - | - | 35 |
Teensy LC and 3.x support alternate pins for some of their serial ports. Use setTX() and setRX() before MIDI.begin(). Details can be found on the serial page.
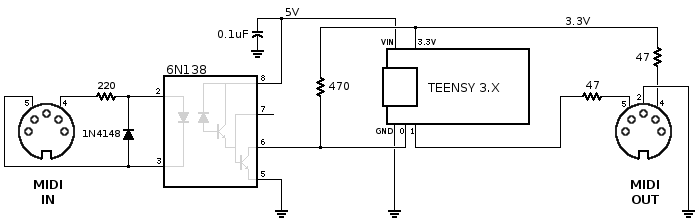
MIDI input requires an optically isolated input. Output requires only 2 resistors. This schematic is recommended for Teensy 4.x & 3.x & LC:
 |
For Teensy 2.0, use this schematic:
 |
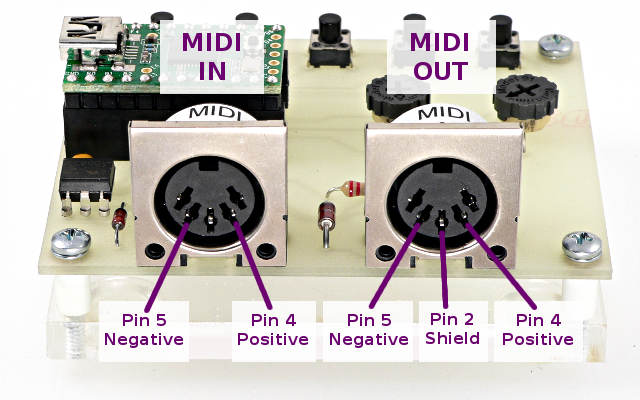
When connecting the signals on the 5 pin DIN connectors, be sure to connect to the correct pins.
 |
6N138 and some 6N139 optocouplers may be used instead of PC900 / H11L1. Many work with pin 7 unconnected, but some may require a 10K resistor from pin 7 to ground.
Basic Usage
MIDI_CREATE_INSTANCE(HardwareSerial, Serial1, MIDI);Define which serial port will be used. Multiple ports may be used if each has a unique name, rather than the default MIDI.
MIDI.begin(MIDI_CHANNEL_OMNI);Initialize the MIDI library. The receive channel may be specified, or MIDI_CHANNEL_OMNI to receive all 16 channels. This only affects reception. You can send on any MIDI channel regardless of this setting.
MIDI.sendNoteOn(note, velocity, channel);MIDI.sendNoteOff(note, velocity, channel);
MIDI.sendProgramChange(programNumber, channel);
MIDI.sendControlChange(controlNumber, controlValue, channel);
MIDI.sendPitchBend(value, channel);
MIDI.sendPolyPressure(note, pressure, channel);
MIDI.sendAfterTouch(pressure, channel);
Transmit basic MIDI messages. These allow you to easily send each MIDI message.
MIDI.read();Receive a MIDI message. This returns true if a message has been received, or false if no new message has arrived. After returning true, the get functions can be used to obtain the MIDI message information.
MIDI.getType();
Returns the type of message received. The types are:
midi::NoteOff
midi::NoteOn
midi::AfterTouchPoly
midi::ControlChange
midi::ProgramChange
midi::AfterTouchChannel
midi::PitchBend
midi::SystemExclusive
MIDI.getData2();
These return the 2 data bytes of the received MIDI message.
Example Output Program
 |
This simple examples sends a rapid sequence of notes. Not very exciting, but a simple and easy test.
#include <MIDI.h>

MIDI_CREATE_INSTANCE(HardwareSerial, Serial1, MIDI);
const int channel = 1;

void setup() {
  MIDI.begin();
}

void loop() {
  int note;
  for (note=10; note <= 127; note++) {
    MIDI.sendNoteOn(note, 100, channel);
    delay(200);
    MIDI.sendNoteOff(note, 100, channel);
  }
  delay(2000);
}
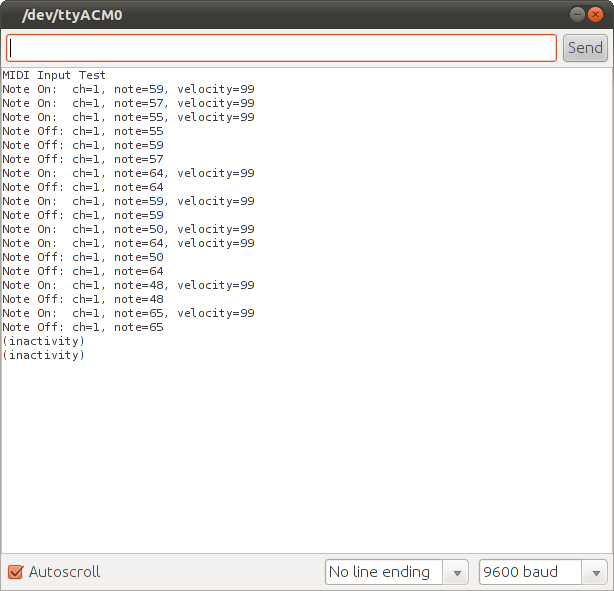
Example Input Program
 |
/* MIDI Input Test - for use with Teensy or boards where Serial is separate from MIDI
 * As MIDI messages arrive, they are printed to the Arduino Serial Monitor.
 *
 * Where MIDI is on "Serial", eg Arduino Duemilanove or Arduino Uno, this does not work!
 *
 * This example code is released into the public domain.
 */

#include <MIDI.h>

MIDI_CREATE_INSTANCE(HardwareSerial, Serial1, MIDI);

void setup() {
  MIDI.begin(MIDI_CHANNEL_OMNI);
  Serial.begin(57600);
  Serial.println("MIDI Input Test");
}

unsigned long t=0;

void loop() {
  int type, note, velocity, channel, d1, d2;
  if (MIDI.read()) {                    // Is there a MIDI message incoming ?
    byte type = MIDI.getType();
    switch (type) {
      case midi::NoteOn:
        note = MIDI.getData1();
        velocity = MIDI.getData2();
        channel = MIDI.getChannel();
        if (velocity > 0) {
          Serial.println(String("Note On:  ch=") + channel + ", note=" + note + ", velocity=" + velocity);
        } else {
          Serial.println(String("Note Off: ch=") + channel + ", note=" + note);
        }
        break;
      case midi::NoteOff:
        note = MIDI.getData1();
        velocity = MIDI.getData2();
        channel = MIDI.getChannel();
        Serial.println(String("Note Off: ch=") + channel + ", note=" + note + ", velocity=" + velocity);
        break;
      default:
        d1 = MIDI.getData1();
        d2 = MIDI.getData2();
        Serial.println(String("Message, type=") + type + ", data = " + d1 + " " + d2);
    }
    t = millis();
  }
  if (millis() - t > 10000) {
    t += 10000;
    Serial.println("(inactivity)");
  }
}
 |
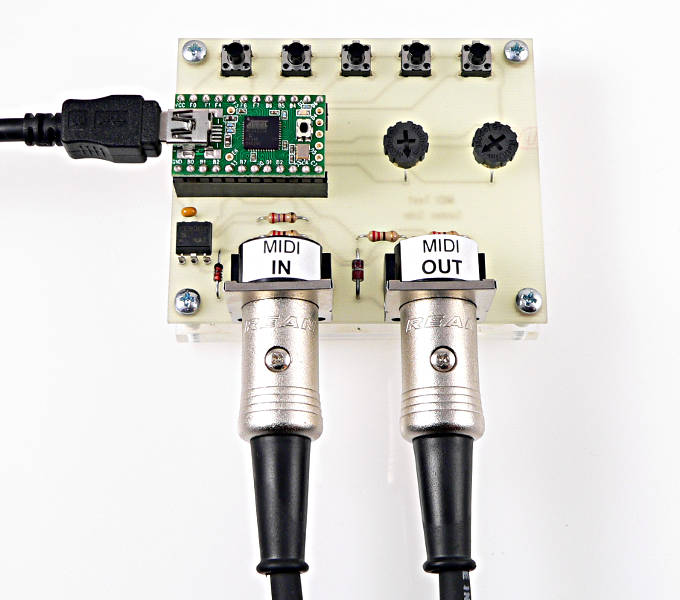
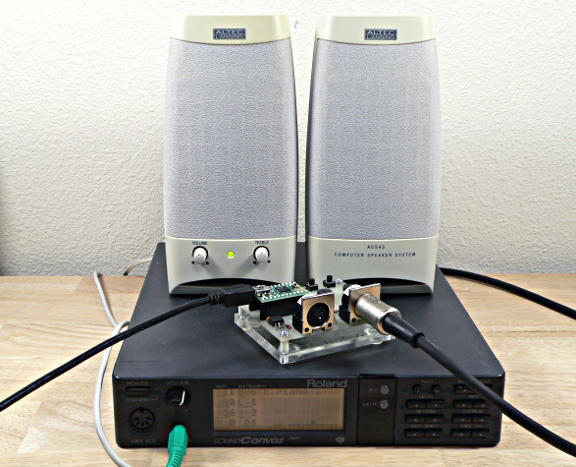
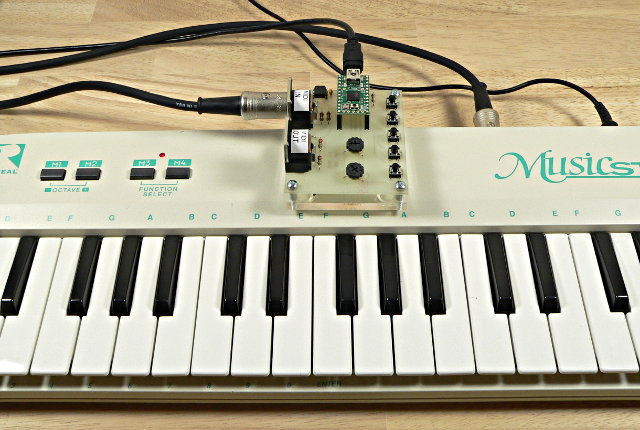
Demo Board, PCB Design Files
The demo board shown above was created to test the MIDI library with Teensy 2.0. It is not sold by PJRC. However, if you would like make this same board, here are the files:
Single Side Version
Standard Version
The board in the photos was fabricated by Futurlec. Their single-side service is probably the least expensive for only a single piece. When PJRC made this prototype, Futurlec's service was very slow.... so slow that we have not used them since.
For the highest quality, OSH Park is usually best. Using the normal files, you should see this preview when using their website.
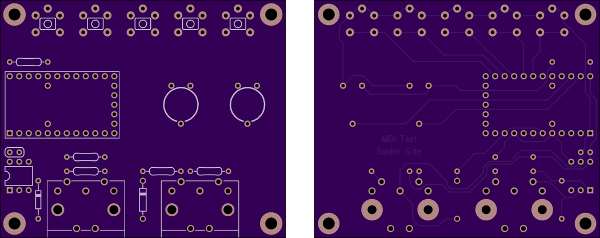
The extra diode between the 2 MIDI connectors is a 5.6V zener. Other than this extra diode, the circuit board followed the schematic shown above. The zener diode is not necessary for normal opertation, but does provide extra protection if external voltage is applied to the MIDI OUT port.