Using the Hardware Serial Ports
The Teensy boards have 1 to 8 hardware serial ports, which may be used to connect to serial devices, like GPS receivers, XBee & ESP Wifi modules, Modbus controllers, serial interface displays and many other serial devices.The most common issue with serial ports on Teensy is use of code designed for Arduino Uno with Serial within the code. On Teensy, Serial accesses the USB only. USB and Serial1 (pins 0 & 1) are not shared on Teensy. For hardware serial ports, Serial1, Serial2, Serial3, Serial4, Serial5, Serial6, Serial7 or Serial8 must be used.
Hardware
| Serial Port | Signal | Teensy 1.0 | Teensy 2.0 | Teensy++ 1.0 & 2.0 | Teensy LC | Teensy 3.0, 3.1, 3.2 | Teensy 3.5 & 3.6 | Teensy 4.0 | Teensy 4.1 |
|---|---|---|---|---|---|---|---|---|---|
| Serial1 | Receive | 2 | 7 | 2 | 0, 3, 21, 25 | 0, 21 | 0, 21, 27 | 0,(xbar) | 0,52,(xbar) |
| Transmit | 3 | 8 | 3 | 1, 4, 5, 24 | 1, 5 | 1, 5, 26 | 1 | 1,53 | |
| Transmit Enable | Any | Any | Any | Any | Any | Any | Any | Any | |
| RTS | - | - | - | Any | Any | Any | Any | Any | |
| CTS | - | - | - | - | 18, 20 | 18, 20 | (xbar*) | (xbar*) | |
| Serial2 | Receive | - | - | - | 9 | 9, 26 | 9 | 7,(xbar) | 7,(xbar) |
| Transmit | - | - | - | 10 | 10, 31 | 10 | 8 | 8 | |
| Transmit Enable | - | - | - | Any | Any | Any | Any | Any | |
| RTS | - | - | - | Any | Any | Any | Any | Any | |
| CTS | - | - | - | - | 23 | 23 | (xbar*) | (xbar*) | |
| Serial3 | Receive | - | - | - | 7, 6 | 7 | 7 | 15,(xbar) | 15,(xbar) |
| Transmit | - | - | - | 8, 20 | 8 | 8 | 14 | 14 | |
| Transmit Enable | - | - | - | Any | Any | Any | Any | Any | |
| RTS | - | - | - | Any | Any | Any | Any | Any | |
| CTS | - | - | - | - | 14 | 14 | 19,(xbar*) | 19,(xbar*) | |
| Serial4 | Receive | - | - | - | - | - | 31 | 16,(xbar) | 16,(xbar) |
| Transmit | - | - | - | - | - | 32 | 17 | 17 | |
| Transmit Enable | - | - | - | - | - | Any | Any | Any | |
| RTS | - | - | - | - | - | Any | Any | Any | |
| CTS | - | - | - | - | - | - | (xbar*) | (xbar*) | |
| Serial5 | Receive | - | - | - | - | - | 34 | 21,38,(xbar) | 21,46,(xbar) |
| Transmit | - | - | - | - | - | 33 | 20,39 | 20,47 | |
| Transmit Enable | - | - | - | - | - | Any | Any | Any | |
| RTS | - | - | - | - | - | Any | Any | Any | |
| CTS | - | - | - | - | - | 24 | 35,(xbar*) | 43,(xbar*) | |
| Serial6 | Receive | - | - | - | - | - | 47 | 25,(xbar) | 25,(xbar) |
| Transmit | - | - | - | - | - | 48 | 24 | 24 | |
| Transmit Enable | - | - | - | - | - | Any | Any | Any | |
| RTS | - | - | - | - | - | Any | Any | Any | |
| CTS | - | - | - | - | - | 56 | (xbar*) | (xbar*) | |
| Serial7 | Receive | - | - | - | - | - | - | 28,(xbar) | 28,(xbar) |
| Transmit | - | - | - | - | - | - | 29 | 29 | |
| Transmit Enable | - | - | - | - | - | - | Any | Any | |
| RTS | - | - | - | - | - | - | Any | Any | |
| CTS | - | - | - | - | - | - | (xbar*) | (xbar*) | |
| Serial8 | Receive | - | - | - | - | - | - | - | 34,48,(xbar) |
| Transmit | - | - | - | - | - | - | - | 35 | |
| Transmit Enable | - | - | - | - | - | - | - | Any | |
| RTS | - | - | - | - | - | - | - | Any | |
| CTS | - | - | - | - | - | - | - | 50,(xbar*) |
XBAR pins may be used with attachCts() or setRX(). Each serial port can make only one connection to the XBAR for flexible pin routing, so on each port you can assign an XBAR pin to either CTS or RX, but not both. XBAR alternate pins each override use of one of the primary pins, so care should be used to avoid conflicts if using alt pins.
- Teensy 4.0: Primary XBAR Pins 1, 2, 3, 4, 5, 7, 8, 30, 31, 32, 33 - Alt Pins: 0, 34, 35, 36, 37, 38, 39
- Teensy 4.1: Primary XBAR Pins 1, 2, 3, 4, 5, 7, 8, 30, 31, 32, 33 - Alt Pins: 0, 36, 37, 42, 43, 44, 45, 46, 47
- MicroMod Teensy: Primary XBAR Pins 1, 2, 3, 4, 5, 7, 8, 30, 31, 32, 33 - Alt Pins: 0, 34, 35, 36, 37, 38, 39
* CTS polarity is inverted when connected through XBAR. Normally CTS is active low, meaning Teensy is allowed to transmit data when CTS is low, and must pause when CTS is driven high. But when using XBAR, Teensy transmits when the pin is logic high and pauses transmission while the pin is low.
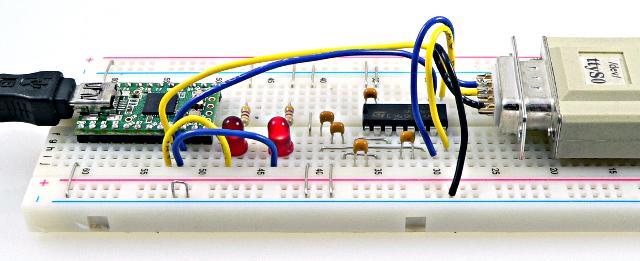
The serial signals on the Rx and Tx pins are "TTL level". To convert to RS-232 level a MAX232 or similar chip is needed.
 |
 |
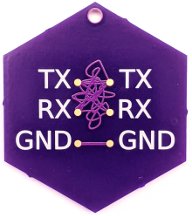 |
| Serial connection confusion is so common that Shawn Hymel designed this badge and Drew Fustini made a purple PCB. Don't feel bad if you get it mixed up. You're not alone! |
All serial ports on all Teensy boards use interrupt-based transmit and receive buffering, to allow your program to avoid waiting when writing short messages, and to allow data to be reliably received even if your program must spend time performing other tasks.
On Teensy 3.6 when running faster than 120 MHz, writing to EEPROM may momentarily interfere with Serial1 and Serial2 baud rates. Reading EEPROM does not interfere. Serial3 to Serial6 are not affected.
Commonly Used Serial Protocols
- MIDI
- ESP8266 (with fast baud rate and RTS/CTS flow control)
- SBUS
- Modbus RTU (see RS-485 transmitterEnable function)
- M-Bus
- Robotis Dynamixel AX and MX-T
- GPS NMEA0183
- DMX Lighting
- EasyTransfer library
- BlueSMiRF
- XBee
Example Code
This simple example shows how to use both the UART and USB Serial at the same time. Both are monitored for incoming bytes, and when either receives data, the results are printed to both.
// set this to the hardware serial port you wish to use
#define HWSERIAL Serial1

void setup() {
  Serial.begin(9600);
  HWSERIAL.begin(9600);
}

void loop() {
  int incomingByte;

  if (Serial.available() > 0) {
    incomingByte = Serial.read();
    Serial.print("USB received: ");
    Serial.println(incomingByte, DEC);
    HWSERIAL.print("USB received:");
    HWSERIAL.println(incomingByte, DEC);
  }
  if (HWSERIAL.available() > 0) {
    incomingByte = HWSERIAL.read();
    Serial.print("UART received: ");
    Serial.println(incomingByte, DEC);
    HWSERIAL.print("UART received:");
    HWSERIAL.println(incomingByte, DEC);
  }
}
Standard Serial Functions
All of the standard Serial functions are supported.Serial1.begin(baud)
Initialize the Uart object. The baud rate must be given.If begin(baud) is called after serial data is already incoming, any 0 data bit may be mistakenly detected as the first start bit, resulting in corrupted reception. If started out of sync, the receiver needs an idle time of 9 bits between a stop bit and the next start bit to "get into sync". Certain 100% bandwidth utilization patterns may never sync, which is a fundamental limitation of serial communication.
Serial1.print(data) and Serial1.println(data)
Print a number or string. Serial1.print() prints only the number or string, and Serial1.println() prints it with a newline character.
  // Serial1.print() can print many different types
  int number = 1234;
  Serial1.println("string");     // string
  Serial1.println('a');          // single character
  Serial1.println(number);       // number (base 10 if 16 or 32 bit)
  Serial1.println(number, DEC);  // number, base 10 (default)
  Serial1.println(number, HEX);  // number, base 16/hexidecimal
  Serial1.println(number, OCT);  // number, base 8/octal
  Serial1.println(number, BIN);  // number, base 2/binary
  Serial1.println(3.14);         // number in floating point, 2 digits
Serial1.availableForWrite()
Returns the number of bytes that may be written without significant delay. If you write more than this number, Serial1.write() may need to wait for data to transmit before it can place your data into the transmit buffer.Serial1.write(byte)
Transmit a byte.Serial1.available()
Returns true if at least 1 byte is available, or false if nothing has been received.
Serial1.read()
Read 1 byte (0 to 255), if available, or -1 if nothing available. Normally Serial1.read() is used after Serial1.available(). For example:
  if (Serial1.available()) {
    incomingByte = Serial1.read();  // will not be -1
    // actually do something with incomingByte
  }
In 9 bit mode, the return value is 0 to 511, or -1 if nothing available.
Serial1.flush()
Wait for any transmitted data still in buffers to actually transmit. If no data is waiting in a buffer to transmit, flush() returns immediately.Serial1.clear()
Discard any received data that has not been read.Serial1.setTX(pin)
Configure the serial port to use an alternate transmit pin. Teensy LC and 3.x support only specific alternate pins. This function may be called before Serial1.begin(baud), to pre-configure the pin used. It may also be used while the serial port is active. Physical pullup resistors are recommended for applications which change pins while running.Serial1.setRX(pin)
Configure the serial port to use an alternate receive pin. Teensy LC and 3.x support only specific alternate pins. This function may be called before Serial1.begin(baud), to pre-configure the pin used. It may also be used while the serial port is active. Physical pullup resistors are recommended for applications which change pins while running.Serial1.transmitterEnable(pin)
Use a pin to automatically enable a RS-485 transceiver chip. This pin outputs a logic HIGH when transmitting data. It goes LOW after the last stop bit, to allow reception when not transmitting.Most RS-485 chips have 2 control signals, an active-high transmitter enable and an active-low receiver enable. Normally those 2 signals are wired together and connected to the transmitter enable output.
Serial1.addMemoryForRead(buffer, size)
Increase the amount of buffer memory between reception of bytes by the serial hardware and the available() and read() functions. This is useful when your program must spend lengthy times performing other work, like writing to a SD card, before it can return to reading the incoming serial data.The buffer array must be a global or static variable. Maximum total bufer size is 64K.
Serial1.addMemoryForWrite(buffer, size)
Increase the amount of buffer memory between print(), write() and actual hardware serial transmission. This can be useful when your program needs to print or write a large amount of data, without waiting.The buffer array must be a global or static variable. Maximum total bufer size is 64K.
Serial1.attachRts(pin)
Enable RTS flow control. The specified pin becomes an output. Low indicates the Teensy is ready to recieve data. High is a request for the other device to pause transmission. RTS is driven high before Teensy's receive buffer is full, to allow tolerance for devices which do not immediately pause transmission in response to RTS.This function must be called after Serial1.begin();
The RTS output from Teensy should be connected to the CTS input on the other serial device, similarly to the TX output connecting to the other device's RX input. Do not simply connect same-named signals with serial.
Supported only on Teensy LC, 3.x, 4.x. Any digital pin may be used.
Serial1.attachCts(pin)
Enable CTS flow control. When this pin is driven high, Teensy will pause transmission after the currently transmitting byte (if any) is completed.This function must be called after Serial1.begin();
The CTS input from Teensy should be connected to the RTS output on the other serial device, similarly to the RX input connecting to the other device's TX output. Do not simply connect same-named signals with serial.
Supported only on Teensy 3.x, 4.x. Only specific pins may be used.
Serial1.begin(baud, format)
Initialize the serial object with a baud rate and data format. Supported only on Teensy LC, 3.0, 3.1, 3.2, 3.5, 3.6.
| Format Name | Data Bits | Parity | Stop Bits | RX Polarity | TX Polarity |
|---|---|---|---|---|---|
| SERIAL_7E1 | 7 | Even | Normal | Normal | |
| SERIAL_7O1 | 7 | Odd | |||
| SERIAL_8N1 | 8 | None | |||
| SERIAL_8N2 | 8 | None | |||
| SERIAL_8E1 | 8 | Even | |||
| SERIAL_8O1 | 8 | Odd | |||
| SERIAL_7E1_RXINV | 7 | Even | Inverted | Normal | |
| SERIAL_7O1_RXINV | 7 | Odd | |||
| SERIAL_8N1_RXINV | 8 | None | |||
| SERIAL_8N2_RXINV | 8 | None | |||
| SERIAL_8E1_RXINV | 8 | Even | |||
| SERIAL_8O1_RXINV | 8 | Odd | |||
| SERIAL_7E1_TXINV | 8 | Even | Normal | Inverted | |
| SERIAL_7O1_TXINV | 8 | Odd | |||
| SERIAL_8N1_TXINV | 8 | None | |||
| SERIAL_8N2_TXINV | 8 | None | |||
| SERIAL_8E1_TXINV | 8 | Even | |||
| SERIAL_8O1_TXINV | 8 | Odd | |||
| SERIAL_7E1_RXINV_TXINV | 7 | Even | Inverted | Inverted | |
| SERIAL_7O1_RXINV_TXINV | 7 | Odd | |||
| SERIAL_8N1_RXINV_TXINV | 8 | None | |||
| SERIAL_8N2_RXINV_TXINV | 8 | None | |||
| SERIAL_8E1_RXINV_TXINV | 8 | Even | |||
| SERIAL_8O1_RXINV_TXINV | 8 | Odd | |||
| The following formats are available when HardwareSerial.h is edited with SERIAL_9BIT_SUPPORT | |||||
| SERIAL_9N1 | 9 | None | Normal | Normal | |
| SERIAL_9E1 | 9 | Even | |||
| SERIAL_9O1 | 9 | Odd | |||
| SERIAL_9N1_RXINV | 9 | None | Inverted | Normal | |
| SERIAL_9E1_RXINV | 9 | Even | |||
| SERIAL_9O1_RXINV | 9 | Odd | |||
| SERIAL_9N1_TXINV | 9 | None | Normal | Inverted | |
| SERIAL_9E1_TXINV | 9 | Even | |||
| SERIAL_9O1_TXINV | 9 | Odd | |||
| SERIAL_9N1_RXINV_TXINV | 9 | None | Inverted | Inverted | |
| SERIAL_9E1_RXINV_TXINV | 9 | Even | |||
| SERIAL_9O1_RXINV_TXINV | 9 | Odd | |||
Serial1.write9bit(word)
Transmit 9 bit data. The "word" may have the 9th bit set or cleared.
Teensy 3.0, 3.1, 3.2 support 9 bit mode on Serial1, Serial2 and Serial3.
Teensy 3.5, 3.6 support 9 bit mode on Serial1, Serial2, Serial3, Serial4, Serial5 and Serial6.
Teensy LC supports 9 bit mode only on Serial1. Serial2 and Serial3 do not have 9 bit mode.
In 7 and 8 bit modes, this function is the same as write(byte).
Usable Baud Rates
Serial communcation can tolerate about 2.5% error. Because the baud rates are created using the CPU clock, which is not an exact multiple of standard baud rates, higher speed baud rates can not be used if the clock is set (in the Tools > CPU Speed menu) to slower speeds.
| Intended Baud Rate |
Teensy 3.6 Error at 180 MHz Serial 1-2 |
Teensy 3.6 Error at 180 MHz Serial 3-6 |
Teensy 3.5 Error at 120 MHz Serial 1-2 |
Teensy 3.5 Error at 120 MHz Serial 3-6 |
Teensy 3.2 Error at 96 MHz Serial 1-2 |
Teensy 3.2 Error at 96 MHz Serial 3 |
Teensy LC Error at 48 MHz Serial 1-3 |
|---|---|---|---|---|---|---|---|
| 4608000 | 0.16% | 0.16% | 0.16% | 0.16% | -0.79% | -0.79% | -65.45% |
| 2000000 | 0.00% | 0.00% | 0.00% | 0.00% | 0.00% | 0.00% | -25.00% |
| 1000000 | 0.00% | 0.00% | 0.00% | 0.00% | 0.00% | 0.00% | -25.00% |
| 921600 | -0.10% | 0.16% | 0.16% | 0.16% | 0.16% | 0.16% | -18.62% |
| 500000 | 0.00% | 0.00% | 0.00% | 0.00% | 0.00% | 0.00% | 0.00% |
| 460800 | +0.03% | 0.16% | -0.03% | 0.16% | -0.08% | 0.16% | 8.51% |
| 250000 (DMX) | 0.00% | 0.00% | 0.00% | 0.00% | 0.00% | 0.00% | 0.00% |
| 230400 | -0.03% | -0.03% | -0.03% | -0.03% | 0.04% | -0.08% | -6.99% |
| 115200 | 0.00% | -0.03% | 0.02% | -0.03% | -0.02% | 0.04% | 0.16% |
| 57600 | 0.00% | 0.02% | 0.01% | 0.02% | 0.01% | -0.02% | 0.16% |
| 38400 | 0.00% | 0.00% | 0.00% | 0.00% | 0.00% | 0.00% | 0.16% |
| 31250 (MIDI) | 0.00% | 0.00% | 0.00% | 0.00% | 0.00% | 0.00% | 0.00% |
| 19200 | 0.00% | 0.00% | 0.00% | 0.00% | 0.00% | 0.00% | 0.16% |
| 9600 | 0.00% | 0.00% | 0.00% | 0.00% | 0.00% | 0.00% | 0.16% |
| 4800 | 0.00% | 0.00% | 0.00% | 0.00% | 0.00% | 0.00% | -0.16% |
| 2400 | 0.00% | 0.00% | 0.00% | 0.00% | 0.00% | 0.00% | 0.00% |
| 1200 | 14.44% | 0.00% | 0.00% | 0.00% | 0.00% | 0.00% | 0.00% |
| 300 | 357.77% | 52.59% | 205.18% | 52.59% | 144.14% | 22.07% | 0.00% |
| Intended Baud Rate | Teensy 3.0 Error at 48 MHz | Teensy 3.0 Error at 24 MHz | Teensy 2.0 Error at 16 MHz | Teensy 2.0 Error at 8 MHz | Teensy 2.0 Error at 4 MHz | Teensy 2.0 Error at 2 MHz | Teensy 2.0 Error at 1 MHz |
|---|---|---|---|---|---|---|---|
| 115200 | +0.04% | -0.08% | +2.12% | -3.55% | +8.51% | +8.51% | +8.51% |
| 57600 | -0.02% | +0.04% | -0.79% | +2.12% | -3.55% | +8.51% | +8.51% |
| 38400 | +0.00% | +0.00% | +0.16% | +0.16% | +0.16% | -6.99% | +8.51% |
| 31250 (MIDI) | +0.00% | +0.00% | +0.00% | +0.00% | +0.00% | +0.00% | +0.00% |
| 19200 | +0.00% | +0.00% | +0.16% | +0.16% | +0.16% | +0.16% | -6.99% |
| 9600 | +0.00% | +0.00% | +0.16% | +0.16% | +0.16% | +0.16% | +0.16% |
| 4800 | +0.00% | +0.00% | -0.08% | +0.16% | +0.16% | +0.16% | +0.16% |
| 2400 | +0.00% | +0.00% | +0.04% | -0.08% | +0.16% | +0.16% | +0.16% |
| 1200 | +0.00% | +0.00% | -0.02% | +0.04% | -0.08% | +0.16% | +0.16% |
| 300 | +22.07% | +0.00% | +0.01% | +0.01% | -0.02% | +0.04% | -0.08% |
High Speed Baud Rates
Serial1 and Serial2 on Teensy 3.2, 3.5 and 3.6 have FIFOs, which reduce interrupt overhead when used at high baud rates. These first 2 ports also run from a higher clock speed, for higher accuracy at very fast baud rates. All serial ports on Teensy 4.0, Teensy 4.1 and MicroMod Teensy have FIFOs.At very high baud rates, even small software delays can allow a recive buffer to overflow which causing incoming data to be lost. RTS/CTS flow control offers the very best solution to data loss, but requires 2 extra signals and proper RTS/CTS support by the other device communicating with Teensy. The alternative is to use addMemoryForRead() to increase the receive buffer size large enough to capture all incoming data during times your program is busy with other work.
On Teensy 4 boards, the serial ports normally are limited to 6 Mbit/sec baud rate. However, maximum baud rate can be increased to 20 Mbit/sec by reconfiguring the UART clock source.
Arduino Uno at 57600 Baud - It's Actually 58824
Arduino Uno creates the same baud rates as Teensyduino, except at 57600, where Arduino's error is +2.12%. When communicating with an Arduino board, the combined +2.12% and -0.79% error is too much. Successful communication with Arduino requires 58824 baud.
void setup() {
  Serial1.begin(58824);  // Arduino 57600 is actually 58824
}
Alternately, if you edit the Arduino code to use "Serial.begin(57601)", Arduino will create a baud rate with only -0.79% error, which exactly matches Teensy.
The Arduino bootloader on Duemilanove and Diecimila, and the 8u2 or 16u2 chip on Arduino Uno when set to 57600, are always 58824 baud. These are not easily reconfigured, so setting Teensy to 58824 baud is the best solution if you must communicate with these.
Alternate Hardware Serial Libraries
- FlexIO_t4 / FlexSerial - Can emulate many more serial ports using FlexIO hardware. Usable with MIDI library, 6 additional ports (14 serial total)_confirmed working.
- DMA Serial Library for Teensy 4.0 - Uses DMA with same Arduino API as normal Serial1 to Serial7
- DMA_UARTs_Nov2022_SD.zip
- DMA_UARTs_test_RX_idle-231023a.zip - Supports special hardware features, 1-wire mode, RS485 direction control, interrupt on Rx idle, and 9 bit data.
- exo_sensor_handling.ino - Receives data from FUTEK LSB206 Load cells with UART output.
- WS2812Serial - Meant for addressable, transmits LED data using serial with DMA. No receive capability, but WS2812Capture can receive LED data using FlexPWM timers.