Using USB Joystick
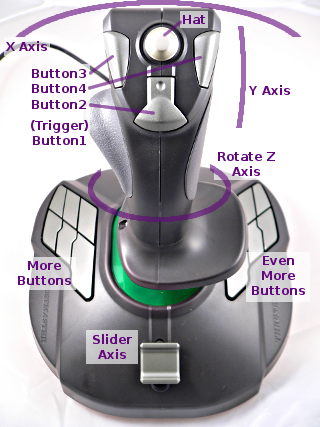
| Typical Joystick Layout |
|---|
 |
| Typical Gamepad Layout |
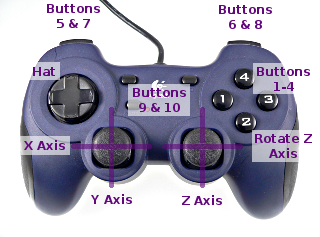 |
- 32: Buttons
- 6: Axis (X, Y, Z, Rotate Z, Left Slider, Right Slider)
- 1: Hat Switch
Basic Usage
To send button actions, just use Joystick.button, with the button number to change (1 to 32), and either pressed (1) or not pressed (0).Joystick.button(num, 1); // Press button "num" (1 to 32) Joystick.button(num, 0); // Release button "num" (1 to 32)There are six functions to control the Joystick's 6 axes. Each takes a number from 0 to 1023, where 512 is the center or resting position.
  Joystick.X(value);            // "value" is from 0 to 1023
  Joystick.Y(value);            //   512 is resting position
  Joystick.Z(value);
  Joystick.Zrotate(value);
  Joystick.sliderLeft(value);
  Joystick.sliderRight(value);
The hat switch can be moved in 45 degree increments. Use -1 to return the hat to center resting position.
Joystick.hat(angle); // "angle" is 0,45,90,135,180,225,270,315,-1
Testing
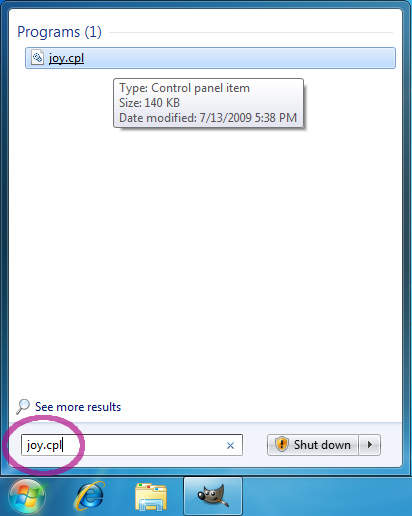
A test program can be found in File > Examples > Teensy > USB_Joystick > Complete. The test expects six voltages on analog inputs 0 to 5, and buttons on 0 to 15 (for Teensy) or 0 to 31 (for Teensy++). The buttons has the input pullup pin mode, so it's ok to just connect a button from the pin to ground.The simplest test is the Windows Game Controllers Control Panel. To open it, search for "joy.cpl" in the start menu.
 |
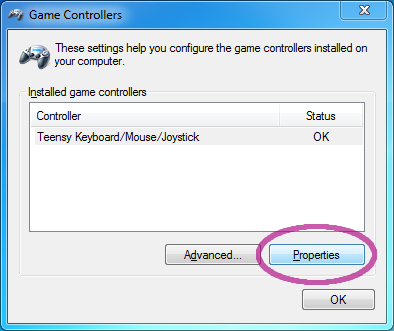
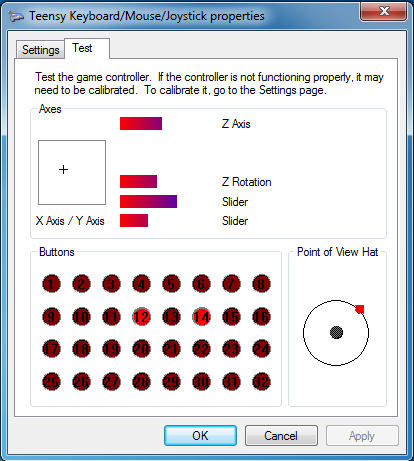
Select "Teensy Keyboard/Mouse/Joystick" and click "Properties".
 |
The properties page shows all of your joystick's controls, which update as you move or press buttons. This window is very helpful for testing your code!
 |
Precision Timing
Normally each function you use causes a USB packet to be sent to your computer, with the new Joystick position and buttons state. If you wish to have control over when the USB packets are transmitted, you can enable manual send mode.Joystick.useManualSend(true);When manual send mode is active, Joystick's USB packets are only transmitted when you call this send_now() function.
Joystick.send_now();If you want 2 buttons to be pressed at exactly the same instant, or a button press to occur exactly as you change the X and Y asix to a specific position, send_now() gives you complete control. You can turn manual mode on and off, as needed, or just leave manual mode active and always use send_now().
Example Program
File > Examples > Teensy > USB_Joystick > Basic./* Basic USB Joystick Example Teensy becomes a USB joystick You must select Joystick from the "Tools > USB Type" menu Pushbuttons should be connected to digital pins 0 and 1. Wire each button between the digital pin and ground. Potentiometers should be connected to analog inputs 0 to 1. This example code is in the public domain. */ void setup() { pinMode(0, INPUT_PULLUP); pinMode(1, INPUT_PULLUP); } void loop() { // read analog inputs and set X-Y position Joystick.X(analogRead(0)); Joystick.Y(analogRead(1)); // read the digital inputs and set the buttons Joystick.button(1, digitalRead(0)); Joystick.button(2, digitalRead(1)); // a brief delay, so this runs 20 times per second delay(50); }
Customizing
Kenton Hamaluik wrote a guide to making a custom Joystick on Teensy 3.0.Some work has been done to create a alternate joystick with 23 axes, 128 buttons and 4 hat switches. Not all software can use so many inputs. If you try this, please comment on the forum with your results.