Using USB MIDI
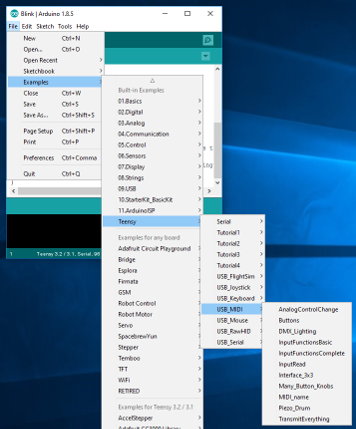 To get started with examples, click: File > Examples > Teensy > USB_MIDI |
MIDI can be used for non-music applications, such a controlling a large number of lights from a PC. Environments like Puredata and Max/MSP can give you access to MIDI for almost any purpose. MIDI is optimized to simultaneously transmit and receive large numbers of short messages with minimal delay.
Teensyduino implements a "class compliant" MIDI device, which can work with the built-in drivers on all major operating systems. When MIDIx4 or MIDIx16 are selected, Teensy implements a class compliant device with 4 or 16 virtual cables/ports.
This page documents the MIDI message functions. However, for building a MIDI controller, this MIDIcontroller library provides easy-to-use functions to communicate MIDI messages for buttons, knobs, encoders and other commonly used hardware.
Transmitting Messages
These functions allow you to transmit all of the standard MIDI messages.
  usbMIDI.sendNoteOn(note, velocity, channel);
  usbMIDI.sendNoteOff(note, velocity, channel);
  usbMIDI.sendAfterTouchPoly(note, pressure, channel);
  usbMIDI.sendControlChange(control, value, channel);
  usbMIDI.sendProgramChange(program, channel);
  usbMIDI.sendAfterTouch(pressure, channel);
  usbMIDI.sendPitchBend(value, channel);
  usbMIDI.sendSysEx(length, array, hasBeginEnd);
  usbMIDI.sendTimeCodeQuarterFrame(index, value);
  usbMIDI.sendSongPosition(beats);
  usbMIDI.sendSongSelect(song);
  usbMIDI.sendTuneRequest();
  usbMIDI.sendRealTime(usbMIDI.Clock);
  usbMIDI.sendRealTime(usbMIDI.Start);
  usbMIDI.sendRealTime(usbMIDI.Continue);
  usbMIDI.sendRealTime(usbMIDI.Stop);
  usbMIDI.sendRealTime(usbMIDI.ActiveSensing);
  usbMIDI.sendRealTime(usbMIDI.SystemReset);
MIDI messages are grouped together into USB packets. Up to 16 messages can transmit at once! They are held for a brief time, not more than 1 ms, to facilitate grouping. You can use the send_now() function to immediately allow any buffered messagse to transmit
usbMIDI.send_now()
USB bandwidth is shared among devices. Usually there is very little delay, unless other USB devices are using all the available USB bandwidth.
Transmit Example
This simple sketch shows how to use the Bounce library together with MIDI. A longer example can be found in File > Examples > Teensy > USB_MIDI > Buttons.
#include <Bounce.h>  // Bounce library makes button change detection easy
const int channel = 1;

Bounce button1 = Bounce(1, 5);  // 5 = 5 ms debounce time
Bounce button2 = Bounce(2, 5);  // which is appropriate for good
Bounce button3 = Bounce(3, 5);  // quality mechanical pushbuttons
void setup() {
  pinMode(1, INPUT_PULLUP);
  pinMode(2, INPUT_PULLUP);
  pinMode(3, INPUT_PULLUP);
}

void loop() {
  button1.update();
  button2.update();
  button3.update();
  // Note On messages when each button is pressed
  if (button1.fallingEdge()) {
    usbMIDI.sendNoteOn(60, 99, channel);  // 60 = C4
  }
  if (button2.fallingEdge()) {
    usbMIDI.sendNoteOn(61, 99, channel);  // 61 = C#4
  }
  if (button3.fallingEdge()) {
    usbMIDI.sendNoteOn(62, 99, channel);  // 62 = D4
  }
  // Note Off messages when each button is released
  if (button1.risingEdge()) {
    usbMIDI.sendNoteOff(60, 0, channel);  // 60 = C4
  }
  if (button2.risingEdge()) {
    usbMIDI.sendNoteOff(61, 0, channel);  // 61 = C#4
  }
  if (button3.risingEdge()) {
    usbMIDI.sendNoteOff(62, 0, channel);  // 62 = D4
  }

  // MIDI Controllers should discard incoming MIDI messages.
  while (usbMIDI.read()) {
  }
}
Transmit With Virtual Cables/Ports
When MIDIx4 or MIDIx16 is selected, Teensy implements virtual cables/ports. All of the send functions can accept an extra input for the cable number, from 0 to 15. See File > Examples > Teensy > USB_MIDI > Interface_3x3 for an example.Transmit Any Arbitrary Non-SysEx Message
A generic send function is also available, primarily meant for use to forward messages between Serial (5 pin DIN) MIDI or USB Host MIDI.usbMIDI.send(type, data1, data2, channel)For examples, see File > Examples > Teensy > USB_MIDI > Interface_3x3 to route messages to the Arduino MIDI library, and File > Examples > USBHost_t36 > MIDI > Interface_16x16 to route messages to the USB MIDI devices plugged into the USB host port on Teensy 3.6 or Teensy 4.1.
Transmit Issues
When using MIDI-OX on Windows, together with a sketch that transmits but never receives, open only the input device. From the menu Options > MIDI Devices, select "USB Audio Device" in the MIDI Inputs box. Do NOT select "USB Audio Device" in the MIDI Outputs box. Uncheck the "Automatically attach Inputs to Outputs during selection" box, then click OK.MIDI controllers which only transmit data should be designed to read and ignore all incoming messages. If MIDI-OX or similar software is sending messages to Teensy, this simple code will prevent problems with USB buffers filling up with never-read messages.
  // MIDI Controllers should discard incoming MIDI messages.
  while (usbMIDI.read()) {
    // read & ignore incoming messages
  }
Programs which use delay() can experience problems if too many MIDI messages arrive
during the delay. Structuring your program to
avoid delays is best, but if delays
must be used, they can be written to discard unwanted MIDI messages.
void delayMicroseconds_WhileDiscardingInput(unsigned int usec) {
  elapsedMicros t = 0;
  while (t < usec) {
    usbMIDI.read(); // read and ignore incoming USB MIDI
  }
}
Transmit Speed and Message Rate Limiting
Teensy USB can transmit MIDI messages very rapidly, especially Teensy 4.x which uses high speed 480 Mbit/sec. Most MIDI usage where messages represent human generated musical events is naturally paced, which needs no special rate limiting.However, programs which send MIDI messages as rapidly as USB will transmit can easily overwhelm software running on your PC or Mac. Microsoft Windows will automatically discard some incoming data if received too quickly. This can be a problem for programs which send many MIDI SysEx messages. Use of delays or elapsedMillis or elapsedMicros is needed to pace the sustained transmission to a rate the computer's software can handle.
Receiving Messages with Read & Callback Functions
The easiest way to receive MIDI messages is with functions that are automatically called when each type of message is received. Usually you would create one or more of these:
  void myNoteOn(byte channel, byte note, byte velocity)
  void myNoteOff(byte channel, byte note, byte velocity)
  void myAfterTouchPoly(byte channel, byte note, byte velocity)
  void myControlChange(byte channel, byte control, byte value)
  void myProgramChange(byte channel, byte program)
  void myAfterTouch(byte channel, byte pressure)
  void myPitchChange(byte channel, int pitch)
  void mySystemExclusiveChunk(const byte *data, uint16_t length, bool last)
  void mySystemExclusive(byte *data, unsigned int length)
  void myTimeCodeQuarterFrame(byte data)
  void mySongPosition(uint16_t beats)
  void mySongSelect(byte songNumber)
  void myTuneRequest()
  void myClock()
  void myStart()
  void myContinue()
  void myStop()
  void myActiveSensing()
  void mySystemReset()
  void myRealTimeSystem(byte realtimebyte)
For each function you create, you must use the corresponding "setHandle" functions to tell usbMIDI to call it when that message type is read.
  usbMIDI.setHandleNoteOff(myNoteOff)
  usbMIDI.setHandleNoteOn(myNoteOn)
  usbMIDI.setHandleAfterTouchPoly(myAfterTouchPoly)
  usbMIDI.setHandleControlChange(myControlChange)
  usbMIDI.setHandleProgramChange(myProgramChange)
  usbMIDI.setHandleAfterTouch(myAfterTouch)
  usbMIDI.setHandlePitchChange(myPitchChange)
  usbMIDI.setHandleSystemExclusive(mySystemExclusiveChunk);
  usbMIDI.setHandleTimeCodeQuarterFrame(myTimeCodeQuarterFrame);
  usbMIDI.setHandleSongPosition(mySongPosition);
  usbMIDI.setHandleSongSelect(mySongSelect);
  usbMIDI.setHandleTuneRequest(myTuneRequest);
  usbMIDI.setHandleClock(myClock);
  usbMIDI.setHandleStart(myStart);
  usbMIDI.setHandleContinue(myContinue);
  usbMIDI.setHandleStop(myStop);
  usbMIDI.setHandleActiveSensing(myActiveSensing);
  usbMIDI.setHandleSystemReset(mySystemReset);
  usbMIDI.setHandleRealTimeSystem(myRealTimeSystem);
Once everything is set up, you then need the "read" function to actually read data. The callback functions are only called when you use read. There are 2 choices for read:
usbMIDI.read(); // All Channels
If you give a specific channel number to read, messages to other channels are ignored, which is easier than having to check the channel number in your callback function.
usbMIDI.read(channel); // One Specific Channel (1 to 16)
Here is a simple example which controls a LED by MIDI note messages:
// USB MIDI receive example, Note on/off -> LED on/off
// contributed by Alessandro Fasan

int ledPin = 13;

void OnNoteOn(byte channel, byte note, byte velocity) {
  digitalWrite(ledPin, HIGH); // Any Note-On turns on LED
}

void OnNoteOff(byte channel, byte note, byte velocity) {
  digitalWrite(ledPin, LOW);  // Any Note-Off turns off LED
}

void setup() {
  pinMode(ledPin, OUTPUT);
  usbMIDI.setHandleNoteOff(OnNoteOff);
  usbMIDI.setHandleNoteOn(OnNoteOn) ;
  digitalWrite(ledPin, HIGH);
  delay(400);                 // Blink LED once at startup
  digitalWrite(ledPin, LOW);
}

void loop() {
  usbMIDI.read();
}
Receiving Large System Exclusive Messages
System Exclusive messages can be handled by a simple 2 input function which delivers the entire message at once, but is limited by the size of a buffer inside the USB MIDI code. Or a more complex 3 input function may be used, where long System Exclusive messages are delivered in chunks with a boolean input to indicate whether the current chunk is the final piece.
// This 3-input System Exclusive function is more complex, but allows you to
// process very large messages which do not fully fit within the usbMIDI's
// internal buffer.  Large messages are given to you in chunks, with the
// 3rd parameter to tell you which is the last chunk.  This function is
// a Teensy extension, not available in the Arduino MIDI library.
//
void mySystemExclusiveChunk(const byte *data, uint16_t length, bool last) {
  Serial.print("SysEx Message: ");
  printBytes(data, length);
  if (last) {
    Serial.println(" (end)");
  } else {
    Serial.println(" (to be continued)");
  }
}

// This simpler 2-input System Exclusive function can only receive messages
// up to the size of the internal buffer.  Larger messages are truncated, with
// no way to receive the data which did not fit in the buffer.  If both types
// of SysEx functions are set, the 3-input version will be called by usbMIDI.
//
void mySystemExclusive(byte *data, unsigned int length) {
  Serial.print("SysEx Message: ");
  printBytes(data, length);
  Serial.println();
}
For example code, open File > Examples > Teensy > USB_MIDI > InputFunctionsComplete.
Receiving Messages with Read & Query Functions
Instead of callback functions, you can also check the return value from read(). When it returns true, a new message has arrived. The "get" functions allow you to access information about the most recently received MIDI message.usbMIDI.getType()
The types are:
| Name | Number | MIDI Message |
|---|---|---|
| usbMIDI.NoteOff | 0x80 | Note Off |
| usbMIDI.NoteOn | 0x90 | Note On |
| usbMIDI.AfterTouchPoly | 0xA0 | Polyphonic AfterTouch |
| usbMIDI.ControlChange | 0xB0 | Control Change / Channel Mode |
| usbMIDI.ProgramChange | 0xC0 | Program Change |
| usbMIDI.AfterTouchChannel | 0xD0 | Channel (monophonic) AfterTouch |
| usbMIDI.PitchBend | 0xE0 | Pitch Bend |
| usbMIDI.SystemExclusive | 0xF0 | System Exclusive |
| usbMIDI.TimeCodeQuarterFrame | 0xF1 | System Common - MIDI Time Code Quarter Frame |
| usbMIDI.SongPosition | 0xF2 | System Common - Song Position Pointer |
| usbMIDI.SongSelect | 0xF3 | System Common - Song Select |
| usbMIDI.TuneRequest | 0xF6 | System Common - Tune Request |
| usbMIDI.Clock | 0xF8 | System Real Time - Timing Clock |
| usbMIDI.Start | 0xFA | System Real Time - Start |
| usbMIDI.Continue | 0xFB | System Real Time - Continue |
| usbMIDI.Stop | 0xFC | System Real Time - Stop |
| usbMIDI.ActiveSensing | 0xFE | System Real Time - Active Sensing |
| usbMIDI.SystemReset | 0xFF | System Real Time - System Reset |
usbMIDI.getChannel()The getChannel function gives you the channel number, from 1 to 16. If you requested only a specific channel when calling read, there is no need to use this.
  usbMIDI.getData1()
  usbMIDI.getData2()
The actual message data can be accessed with getData1 and getData2.
  usbMIDI.getSysExArray()
  usbMIDI.getSysExArrayLength()
For system exclusive messages, the message data is available as an array.
usbMIDI.getCable()When using virtual cables, getCable can tell you which virtual cable (0 to 15) received this message. This function always returns zero when virtual cables/ports are not in use.
Connecting Many Buttons & Knobs/Sliders
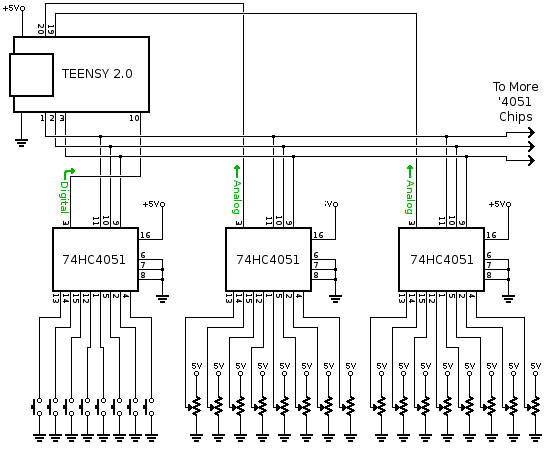
Often MIDI controllers need more pushbuttons and knobs or sliders than can be connected directly. The inexpensive 74HC4051 or 74HCT4051 chip can be used to connect 8 inputs to one pin. It works for analog or digital signals. Three digital pins are needed to control the 74HC4051, but those same 3 pins can control many chips.
|
To use these 74HC4051 chips, first select the desired channel using the 3 control pins. Then wait a brief time for the signals to propagate through the chips. 50 µs is plenty. Then you can read the pins. This process must be repeated 8 times to read all the signals.
  // select 74HC4051 channel 5 (of 0 to 7)
  digitalWrite(1, HIGH);
  digitalWrite(2, LOW);
  digitalWrite(3, HIGH);

  // allow 50 us for signals to stablize
  delayMicroseconds(50);

  // read the signals routed to pins 10, 19, 20
  // through channel 5 of each 74HC4051 chip
  buttonPin10channel5.update();
  knobPin19channel5 = analogRead(19);
  knobPin20channel5 = analogRead(20);
A delay is required between 74HC4051 change and analogRead(). Any extra capacitance can greatly increase the required delay. This forum thread shows how to calculate the delay, and what problems to expect if the delay is not long enough.
For newer Teensy boards with 3.3V signals, 74HCT4051 chips are best. Power the 74HCT4051 from 5V. If 74HC4051 (without the "T") are used, they should be powered by 3.3V when used with a Teensy that has 3.3V signals, or by 5V when used with a Teensy having 5V signals.
Working with Noisy Analog Readings
Ideally analog data would be noise-free, but in a large and complex MIDI controller with many long wires, often some noise is unavoidable. Hysteresis can be used when converting from 10 to 7 bit data to reject noise.TODO: add an example here using the awesome ResponsiveAnalogRead library!
Customizing the MIDI Name
You may with to change the MIDI device name, especially if using 2 or more Teensy boards. To start, open the example from File > Examples > Teensy > USB_MIDI > MIDI_name.
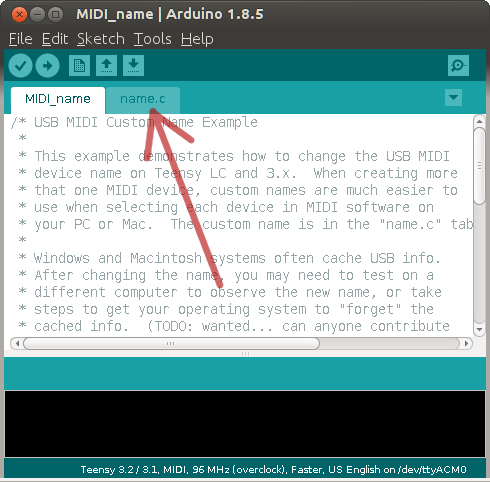
This example has 2 files, which Arduino shows in tabs. The name change must be in a separate .c file. It will not work if placed in a .cpp or Arduino .ino file.
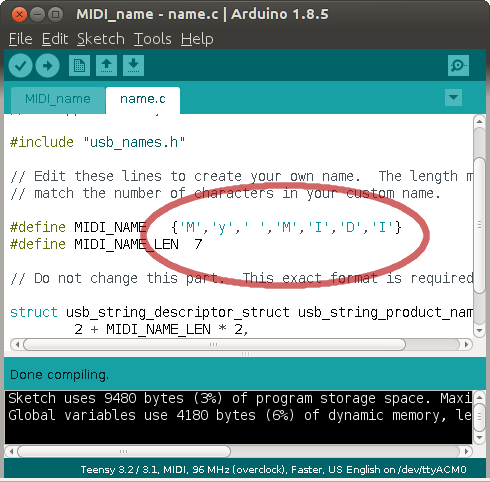
Editing the name is straightforward, but the length must be updated to match the number of characters. This name.c file may be added to any USB MIDI project to customize the MIDI name.
After uploading, you will need to take steps to get your computer to "forget" the previous name it learned.
Windows: On version 10, Windows appears to automatically recognize MIDI name changes. Older versions of Windows may require deleting the device from the Windows Device Manager, then unplug and reconnect the USB cable and allow the New Hardware Wizard to detect the change.
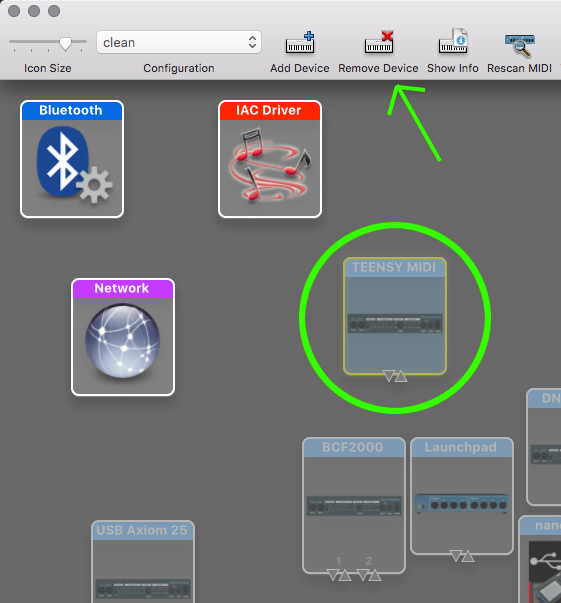
Macintosh: Open "Audio Midi Setup", unplug the Teensy device, delete it from the Midi Devices/Midi Studio Window, replug the Teensy device and your changes will show.
Teensyduino 1.40 & Earlier
Teensyduino 1.41 added support for virtual cables/ports and updated Teensy's USB MIDI functions for best compatibility with the Arduino MIDI Library.Unfortunately, this update required some incompatible changes. These are the known issues which may require changes to programs designed for earlier versions.
- Pitch bend was 0 to 16383. Now +8191 to -8192 is used.
- getType() previously returned these values: 0 = Note Off, 1 = Note On, 2 = Velocity Change, 3 = Control Change, 4 = Program Change, 5 = After Touch, 6 = Pitch Bend, 7 = System Exclusive, 8 = Real Time, 9 = Time Code Quarter Frame
Awesome MIDI Projects
MIDIcontroller 2.1.5 - A library for creating Teensy MIDI controllersYann Seznec's MIDI code - Analog, digital, touch control of notes & CC.
Using force sensitive resistors (FSR) for velocity sensitive notes with poly aftertouch.
Footsy - foot pedal controller
How to Build a Simple DIY USB MIDI Controller
Arcade Button MIDI Controller (instructables)
Using Touch sensors - Forum thread, using hysteresis.
Using force sensitive resistors - Forum thread