LedControl Library
LedControl let you control many 7 segment displays or many LEDs using one or more MAX7219 or MAX7221 chips. These chips are expensive, but they are very easy to use.
| Download: |
Included with the Teensyduino Installer |
This copy of LedControl has been updated to compile with Arduino 0018 and includes a minor change to reduce RAM usage.
Hardware Requirements
LedControl requires the MAX7219 or MAX7221 chip.

Basic Usage
LedControl mydisplay = LedControl(DIN_pin, CLK_pin, LOAD_pin, number_of_chips);Create an instance of LedControl using a name of your choice. The 3 pins where you connected the MAX7219 signals need to be given. The number of chips is also needed. Normally if you need more than one chip, it's easiest to chain them together (DOUT to DIN) and use only a single object to control them all. You could also connect each chip to 3 separate pins and create a separate object for each.
Setup
mydisplay.shutdown(chip, false);Turn the chip on or off. Use "false" to turn the chip on, "true" to shut it down. The chips default to shutdown mode, so you must turn them on before using them. If you have multiple chips, this must be done for each chip.
mydisplay.setIntensity(chip, intensity);Set the intensity on a chip. 15 is the maximum brightness. If you have multiple chips, this must be done for each chip.
Display Functions
mydisplay.setDigit(chip, digit_position, number, dot);Sets a 7 segment display to "number". The chip and position of the digit on that chip must be given. "dot" is usually false. Using "true" will turn on the dot associated with that digit.
mydisplay.setLed(chip, row, column, state);Turn a single LED on or off. Three inputs, "chip", "row" and "column" select the exact LED, and "state" must be true to turn the LED on, or false to turn it off.
Example Program
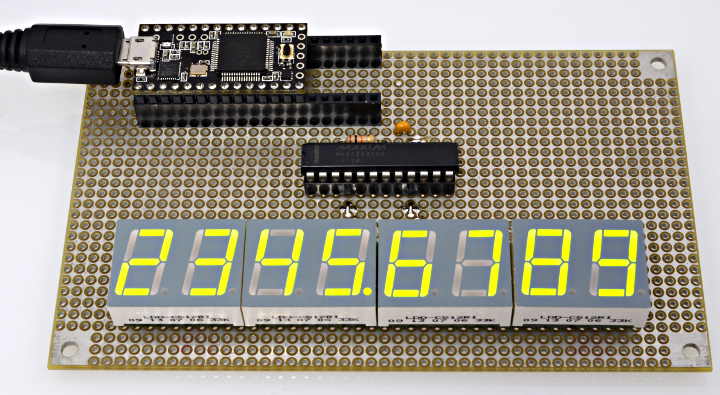
#include <LedControl.h>

// inputs: DIN pin, CLK pin, LOAD pin. number of chips
LedControl mydisplay = LedControl(45, 44, 43, 1);

void setup() {
  mydisplay.shutdown(0, false);  // turns on display
  mydisplay.setIntensity(0, 15); // 15 = brightest
  mydisplay.setDigit(0, 0, 9, false);
  mydisplay.setDigit(0, 1, 8, false);
  mydisplay.setDigit(0, 2, 7, false);
  mydisplay.setDigit(0, 3, 6, false);
  mydisplay.setDigit(0, 4, 5, true);
  mydisplay.setDigit(0, 5, 4, false);
  mydisplay.setDigit(0, 6, 3, false);
  mydisplay.setDigit(0, 7, 2, false);
}

void loop() {
}
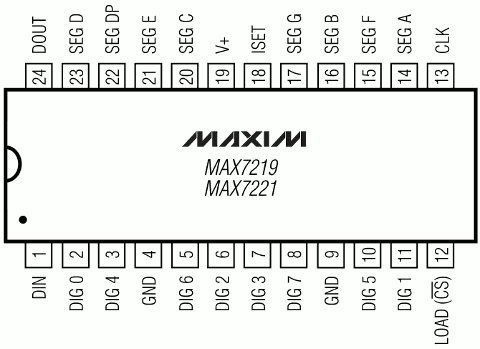
MAX7219 Connections
The MAX7219 is very easy to use. Only 3 pins (1, 12 and 13) connect to pins on Teensy. The eight "SEG" pins connect to the A to F and dot pins on each 7 segment display, and the "DIG" pins each connect to the common cathode on each display. A single 10k resistor connects between pin 19 and +5 volts, and of course power connects to the V+ pin and the two GNG pins connect to ground. The DOUT pin allows another chip to be connected.
In the example above, "DIG 0" (pin 2) was connected to the right-most 7 segment display.