|
|
| ||
|
Shopping Cart
|
| Home | Products | Teensy | Blog | Forum |
|
You are here:
MP3 Player
|
|
|
This is an archived copy of the work done
by Brad Baird, Tom Freestone, Derek Joos, Steve Saunders, and Ryan
Woodings to attempt to add ATAPI support to the PJRC MP3 player. This is their original web page.
It seemed like a good idea to archive a copy, since these student web
pages usually disappear after a while. Here is
the final code they wrote.
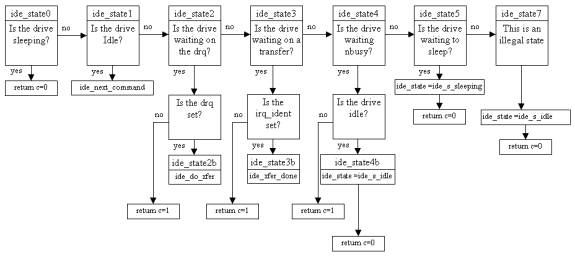
Modifications to the PJRC Firmware: This state machine forms the underpinnings of IDE IO routines needed to play a MP3.
Due to the modular nature of the player code, the state machine logic can remain the same regardless of the underlying protocol. In order to support ATAPI the sub-routines for reading in the Master Boot Record (MBR) and data blocks needed to be changed from ATA commands to ATAPI command packets. The sequence to read a MP3 file went as follows: read MBR, read BPB sector, read root file system, traverse the FAT chain, and then read the MP3 file.
When sending ATAPI packets, there is a general procedure that must be followed:
Remember that the BUSY and DRQ lines will help with the timing of when to read and write to the registers.
Initialize_task_file:
    mov    dptr, #atapi_control
    mov    a, #0x0A
    movx   @dptr, a

    mov    dptr, #atapi_feature
    mov    a, #0x00
    movx   @dptr, a

    mov    dptr, #atapi_int_cause
    mov    a, #0x00
    movx   @dptr, a

    mov    dptr, #atapi_reserved
    mov    a, #0x00
    movx   @dptr, a

      ;set the low bits of the byte count register
    mov    dptr, #atapi_byte_cnt_low
    mov    a, #0x00
    movx   @dptr, a

      ;set the high bits of the byte count register
    mov    dptr, #atapi_byte_cnt_high
    mov    a, #0x10
    movx   @dptr, a

      ;set the drive select register
    mov    dptr, #atapi_drv_sel
    mov    a, master_slave
    movx   @dptr, a

    ret


write_data_pio:
    mov    dptr, #ide_data_buf_msb       ;write byte 1
    mov    a, 0x00
    movx   @dptr, a

      ;indicates to read
    mov    dptr, #ide_data               ;write byte 0
    mov    a, #atapi_cmd_read
    movx   @dptr, a

      ;set the lba
    mov    dptr, #ide_data_buf_msb       ;write byte 3
    mov    a, f32_sector+2
    movx   @dptr, a

    mov    dptr, #ide_data               ;write byte 2
    mov    a, f32_sector+3
    movx   @dptr, a

    mov    dptr, #ide_data_buf_msb       ;write byte 5
    mov    a, f32_sector+0
    movx   @dptr, a

    mov    dptr, #ide_data               ;write byte 4
    mov    a, f32_sector+1
    movx   @dptr, a

    mov    dptr, #ide_data_buf_msb       ;write byte 7
    mov    a, #0x00
    movx   @dptr, a

    mov    dptr, #ide_data               ;write byte 6
    mov    a, #0x00
    movx   @dptr, a

    mov    dptr, #ide_data_buf_msb       ;write byte 9
    mov    a, #0x00
    movx   @dptr, a

      ;indicates to read one sector
    mov    dptr, #ide_data               ;write byte 8
    mov    a, #0x01
    movx   @dptr, a

    mov    dptr, #ide_data_buf_msb       ;write byte 11
    mov    a, #0x00
    movx   @dptr, a

    mov    dptr, #ide_data               ;write byte 10
    mov    a, #0x00
    movx   @dptr, a

    ret
FAT32 Challenges
The firmware that came with the PJRC MP3 player kit was written to use a FAT32 formatted drive. In order to concentrate on ATAPI implementation, we decided to burn a non-standard CD that is FAT32 formatted. To do this, we actually were able to burn the CD by creating a FAT32 partition and copying/burning it onto a CD. We ran into a problem with the CD since it didn't contain a master boot record, which is used to identify the partition that contains the MP3s.
Instead of further pursuing a FAT32 CD, we then moved our concentration to an Iomega Zip drive since it is also an ATAPI device, and the disks could be formatted FAT32 without being considered non-standard. As it turns out, we encountered difficulties with this approach because the FAT code in the firmware was not designed to handle a sector per cluster count below 4, which in a case of Zip disks, it is 2.
While searching for information on the ATAPI specification we discovered http://www.ata-atapi.com which has a free ATAPI driver, written in C, and a demo program that uses this driver. These tools were tremendous assets in understanding ATAPI. By analyzing the driver source code we discovered several ATAPI quirks that our firmware was not handling, such as packet timing. We were able to use the demo program to send ATAPI packets to a CD-Rom in order to further uncover additional ATAPI peculiarities. For instance, we found that the first time a command was sent to the CD-Rom, it would fail. The cause of this problem was the drive was not ready to handle the command. To resolve this, we added a loop into our code that would continuously send a `Test Unit Ready' packet (equivalent to no-op command) until the drive stopped returning errors and confirmed it was ready to receive further ATAPI commands.
The combination of the ATAPI-4 spec, the free ATAPI driver source code, and the demo program were extremely valuable in gaining an understanding of how ATAPI works, the protocol ATAPI uses to communicate with a drive, and the differences between ATA and ATAPI's Packet Interface.
|