|
|
| ||
|
Shopping Cart
|
| Home | Products | Teensy | Blog | Forum |
|
You are here:
8051 Tools
|
|
|
Using Keil's "C51" C Compiler (µVision IDE)These simple instuctions will walk you though the process of configuring Keil's µVision IDE and C51 C Compiler with settings that produce code that can be download and run on the 8051 development board.PJRC does not provide technical support for use of Keil's software. We can not provide any assistance should these instructions not apply to your project's code or your µVision installation. However, these instructions were tested and confirmed to work using "Hello World" example provided with Keil's C51 evaluation software, version 7.06a. For further assistance with Keil's software, please refer to the manaul Keil provides, or contact Keil for technical support. Step 1: Copy Startup Code To Your ProjectCopy the file "startup.a51" from "c:\keil\c51\lib" to "c:\keil\c51\examples\hello", or the equivilant pair of directories if you installed µVision in a different directory/drive location.Add this new copy of "startup.a51" to your project.
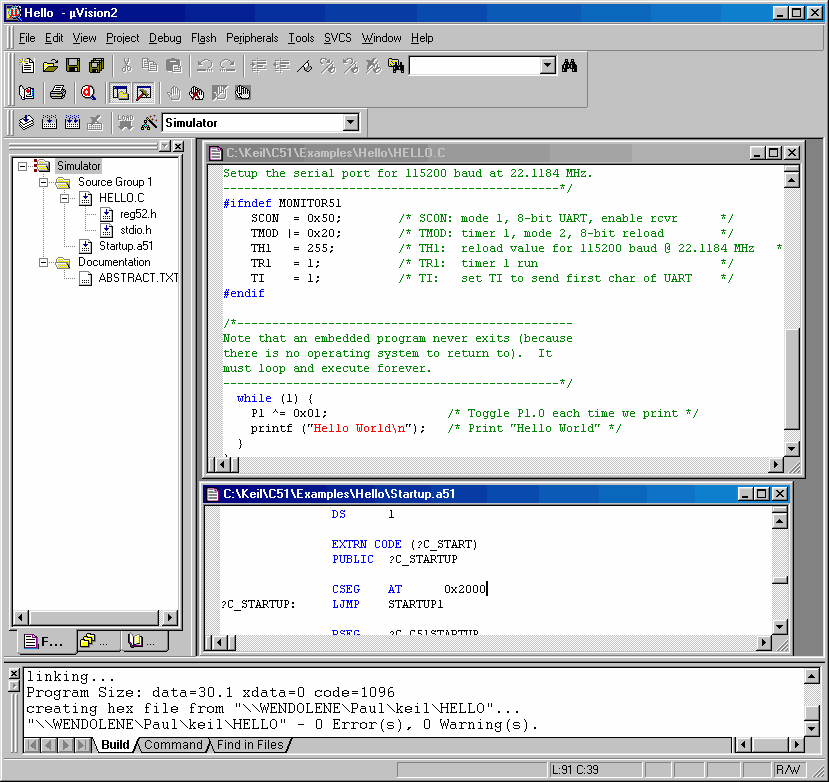
When "startup.a51" has been added to your project, the left side tree representing your project will be updated, similar to Figure 1. Step 2: Edit Startup and Other CodeEdit "startup.a51" file. Locate the line "CSEG AT 0" and change it to "CSEG AT 0x2000". Remember that this will only change the "startup.a51" that you copied to this project. The global copy in "c:\keil\c51\lib" will remain unchanged.Edit "hello.c", and change the line that sets TH1. For 115200 baud, you should set this to 255. Figure 1 shows both of these files opened in µVision, edited with these changes.
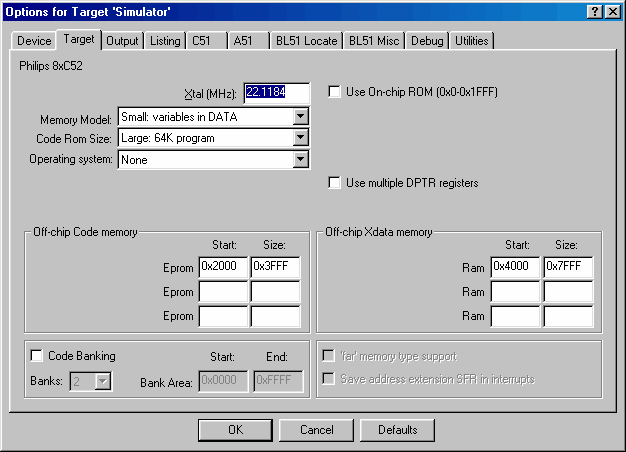
(Optional): Define a New Target Name For This BoardIn this example, the target named "Simulator" was modified to produce output compatible with this board, which is the fastest and easiest approach.Perhaps a better approach would be to create a new target, with a name such as "PJRC 8051 Development Board, Rev 5" and apply these changes to that target rather than the "Simulator" target. Step 3: Configure Build TargetClick on the "Project" menu, and select "Options for Target 'Simulator'". This will bring up the Options for Target dialog box, where you must make several changes to configure Keil's compiler to produce code that will work properly.First, select the "Target" tab:
For larger projects, you may need to change these settings to allocate the memory usage according to your project's requirements. Such memory allocation planning is beyond the scope of this simple example.
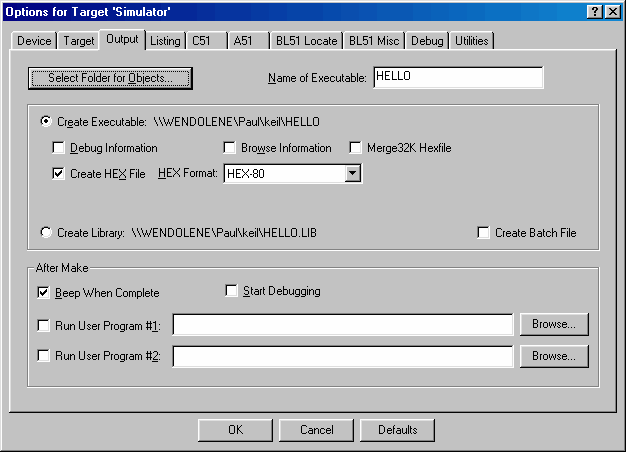
Next, select the "Output" tab. Here, you must check the "Create Hex File" option, so that an intel hex output files is created. That is the file you can use to download to the board.
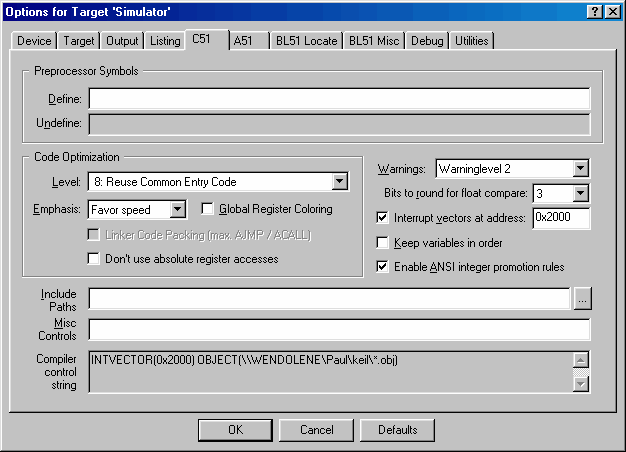
Finally, select the "C51" tab. Check "Interrupt vectors at address:" and set the corresponding value to 0x2000.
Once all these changes have been made in all three tabs, click "OK" to commit your changes to the build target. Step 4: Compile and Download Intel-Hex OutputTo compile the code, click on the "Project" menu and select "Build target". If there are no errors, the compiler will finish and produce an intel-hex output file, which in this example is "hello.hex".Download the intel-hex file as described in the Using the 8051 Development Board For the First Time page. To run your program, using the "J" (Jump) command, and enter 2000 (which should be the default). To quit, press the board's RESET button to return to the monitor. You may need to press the ENTER key to allow PAULMON2 to re-detect your baud rate, if your program overwrites the 4 bytes that are used to store the previously detected baud rate. (Optional) Reconfigure For Flash ROMAlternately, you could define the off-chip code memory from 8000 to F7FF and off-chip Xdata memory from 2100 to 0x7FFF, set CSEG to 0x8000 in startup.a51, and set the interrupt vectors at address 0x8000. This would configure the compiled code to run from the Flash ROM, and you can use the autostart utility (on the LED blink example page) to make it run automatically when the board boots. |