|
|
| ||
|
Shopping Cart
|
| Home | MP3 Player | 8051 Tools | All Projects | PJRC Store | Site Map |
|
You are here:
8051 Tools
|
|
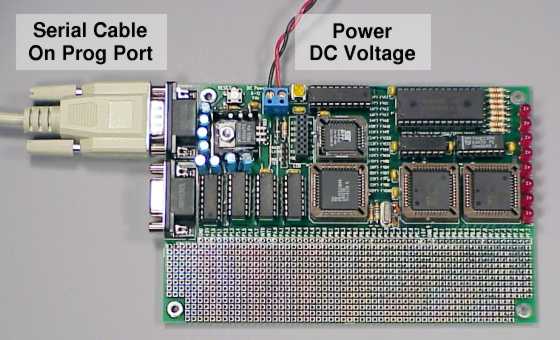
Using The 8051 Development Board For The First TimeThis page is intended to walk you through all the steps to use the 8051 development board for the first time. An attempt is made to show every step, however small. If anything here is unclear or significantly different than what happens when you follow these steps, please contact me so that I can update this page.Connecting The BoardThe 8051 development board connects to a PC using a standard serial cable. The cable should be a straight-though type. Do not use a null modem cable. The normal connection to a PC is made with the upper connector, as shown in figure 1. A DC power source between 8 to 15 volts must be connected to the power input.
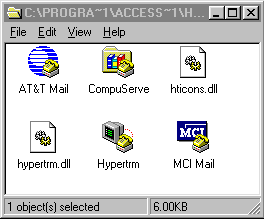
It is best to leave the board's power turned off until the terminal emulation program is running and properly configured. If some other software attempts to communicate with a device on your serial port, the board will hear whatever is sent, and may "learn" the baud rate used by the other program. This can happen, for example, when Windows is booted and the plug-n-play configuration attempt to find any modems connected. If the board has detected an incorrect baud rate from a previous communication, just turn off the power for a minute or two. Running A Terminal Emulation ProgramTo communicate with the 8051 development board, you must use a terminal emulation program. Nearly any terminal emulation software will work. Hyperterminal is a popular choice, because it is included in the default Microsoft Windows installation. With Linux, minicom is an excellent console mode terminal emulator, and is included with most Linux distributions. Seyon is available for X11, though RedHat hasn't included it since 5.2, so you may have to download and install it.The example here will focus on Windows Hyperterminal. The dialogs shown are from a fresh Windows 95 installation. Your system may display slightly different dialogs, particularly if you have a modem already installed. Hyperterminal is usually located in the "Accessories" group, which is available from "Programs" in the "Start" menu. It is usually just a folder, which should appear similar to figure 2.
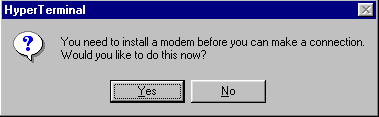
The "Hypertrm" icon represents the Hyperterminal program. When Hyperterminal is first run, it will display a dialog suggesting that you need to install a modem, as shown in figure 3. You do not actually need to install a modem, so select No from this dialog, if it appears.
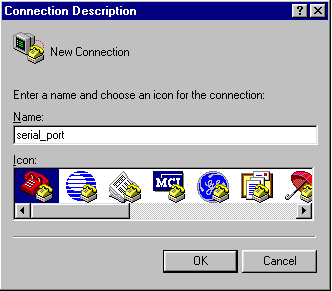
Next, Hyperterminal will ask you to provide a name for the new connection, as in figure 4. It does not matter what you name the connection. Hyperterminal may not allow certain names, such as "COM1:".
After you've provided a name, you will need to select the port where the 8051 development board is connected. Most newer (ATX) PC computers have two 9-pin serial ports, where the one closer to the top of the computer is COM1 (/dev/ttyS0 in linux), and the lower is COM2 (/dev/ttyS1 in linux). Select the one where you connected the 8051 development board.
The last, and most important step is to configure the communication settings. You must select "None" for Flow Control. The default setting is "Hardware", and this is likely to cause problems. The fastest baud rate supported by the 8051 at 11.0592 MHz is 57600. The 8051 development does not work at 38400 and 115200 baud, so be sure that you do not select these speeds. Some older PC computers, particularly those with 16450 (no fifo) UARTs are unable to communicate well at 57600 baud. Nearly all Pentium-class PCs can use 57600, but some older 486 computers can not communicate this fast. With an older computer that lacks a 16550 uart, 9600 baud is probably a better choice. If you return to this menu and change to a different baud rate, be sure to turn off the board's power. The board detects and remembers your baud rate setting, so it must be shut off (a warm boot will not do) when you change the baud rate.
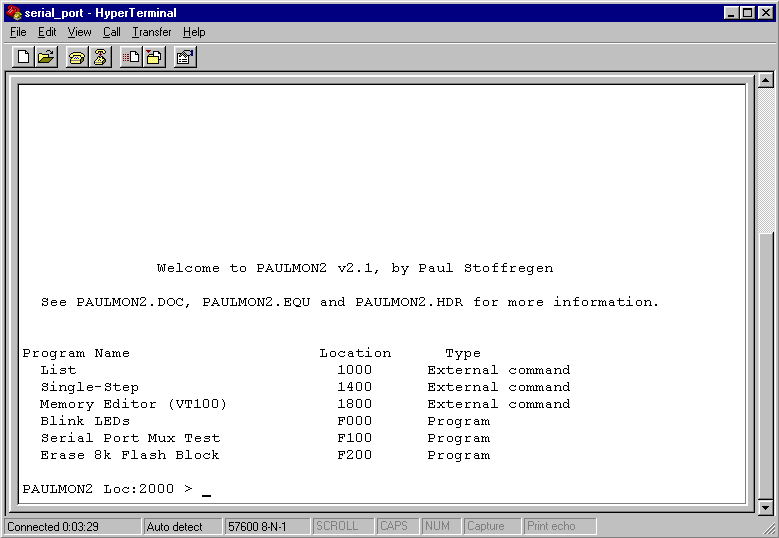
After setting up the communication parameters, Hyperterminal will show it's main window, with nothing in it. Turn on the board's power. If the board was already on, shut it off for several seconds and turn it back on. The 8051 development board waits for you to press Enter, when it does not "know" what baud rate you have selected. When you press Enter, the welcome message should appear, as in Figure 7.
Hyperterminal's File menu has a "Save As..." option which will allow you to save the setting to a file. This file can be copied to the desktop, so that you may easily run Hyperterminal again with the settings to use your board. Downloading And Running A ProgramTo make use of the 8051 development board, you will need to be able to download and run your own programs. This section demonstrates the steps to download and run programs using Hyperterminal. To follow these steps, you will need the EX1 example program. This ZIP file contains the assembly language source, and three compiled copies. This example uses the EX1_2.OBJ file. This file is 1406 bytes. This file is in the intel-hex format, which is a ascii text file. If you view it in a text editor (notpad, wordpad, vi, emacs, etc), the first four lines should appear like this:
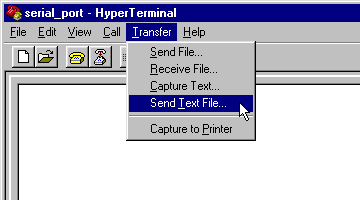
While the board is sitting at the PAULMON2 prompt, it is ready for you to begin a download of intel-hex data. Older versions required you to press "D" to enter the download mode. This step still works, but it is not necessary with version 2.1. To begin the download using Hyperterminal, select "Send Text File..." from the "Transfer" menu, as shown in figure 8.
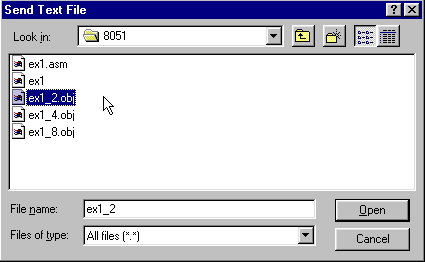
The usual Windows file choosing dialog will appear. You will need to change the type to "All files (*.*)", because the file is EX1_2.OBJ, and the default dialog only displays .TXT files. Of course, navigate to the directory where the EX1_2.OBJ file is stored and select it, as shown in figure 9.
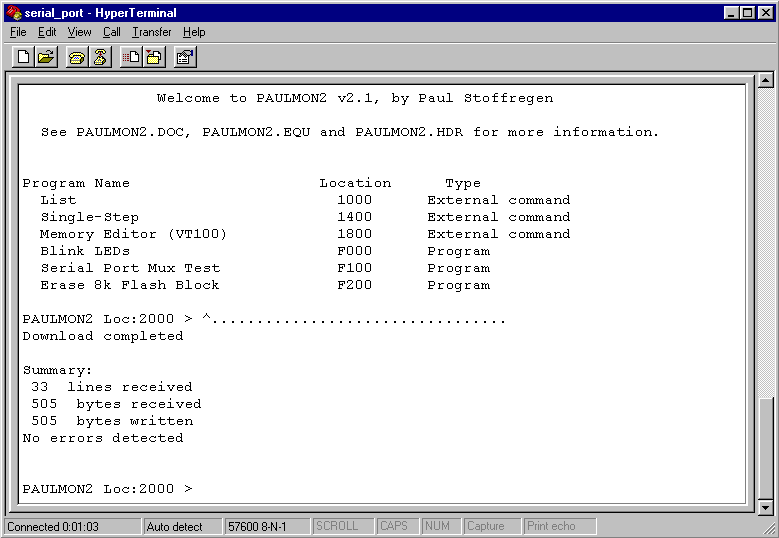
Once you've opened the file, Hyperterminal will begin sending it. A carrot "^" character will appear, which is in indication from PAULMON2 that is saw the colon ":" character that begins an intel-hex download. At PAULMON2 receives each line of the file, it will print a dot to show the progress of the download. When the transfer is finished, PAULMON2 will print a summary of the download, and it will alert you to any errors in the reception of the data. After downloading EX1_2.OBJ, your Hyperterminal window should appear similar to figure 10.
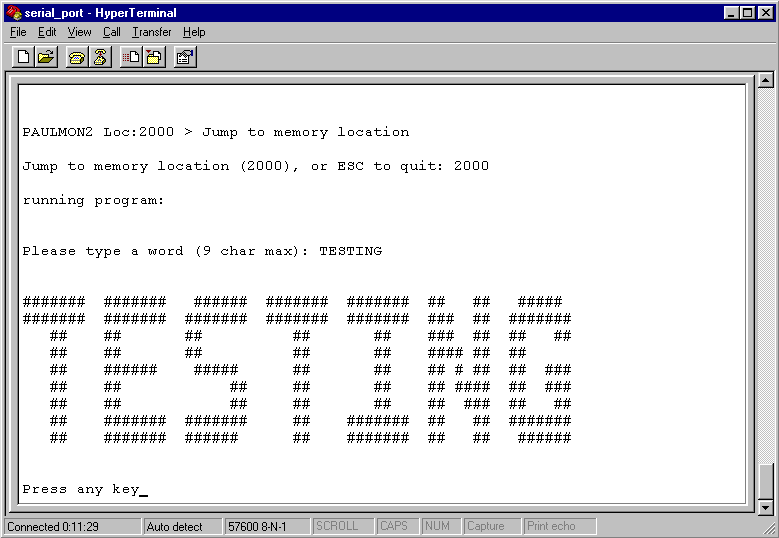
The intel hex data format encodes the address where the bytes are to be stored within its data stream. Most PAULMON2 functions operate based in the "Loc:" address shown in the prompt, but the intel-hex download will always place the data at the location specified in the file. Here is a detailed description of the intel-hex data format. In this example program, the data happens to begin at location 0x2000. Some programs have a 64 byte header which is recognized by PAULMON2 and allow them to be shown in the menus and run from the "run" command. This example, however, does not have a header. To run the example without a header, use the "Jump" command by pressing "J". PAULMON2 will ask you for the address where it will jump to run the program. You can type 2000, as shown in figure 11, or just press enter if the default is 2000.
The example program will ask you to type a word, and then it will print it in large block letters. Perhaps this isn't the most exciting program you could imagine, but the point has been to learn to use Hyperterminal to download and run a program. Now you're ready to create something more interesting to download to the 8051 development board.
|


 Linux Tip: Linux will allow another program to send data to
the serial port, even while it is open and in use by your terminal
emulation program (minicom, seyon, etc). This can be handy for sending intel-hex to the
8051 development board. Just type a command in a terminal, such as
"
Linux Tip: Linux will allow another program to send data to
the serial port, even while it is open and in use by your terminal
emulation program (minicom, seyon, etc). This can be handy for sending intel-hex to the
8051 development board. Just type a command in a terminal, such as
"