Tutorial 4: Analog Input
Many important types of signals vary continuously, such a temperature. You can measure such signals with the analog inputs.Materials Required
- Teensy 4.0 with Pins
- Tutorial Parts Kit
- Solderless Breadboard
- USB Cable
- Wire Stripping Tool (#22 size)
- Computer with USB
- Multimeter or Voltmeter
Connecting a Potentiometer
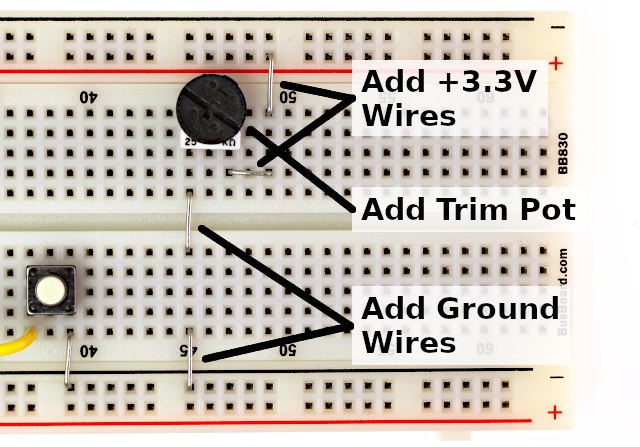
A potentiometer (or "pot") is a resistor with a third pin attached to a mechanical adjustment, so it can slide to any position. You can connect the outside 2 pins to +3.3 volt power and ground. When you turn the pot, the middle pin will have a voltage that corresponds to the position.
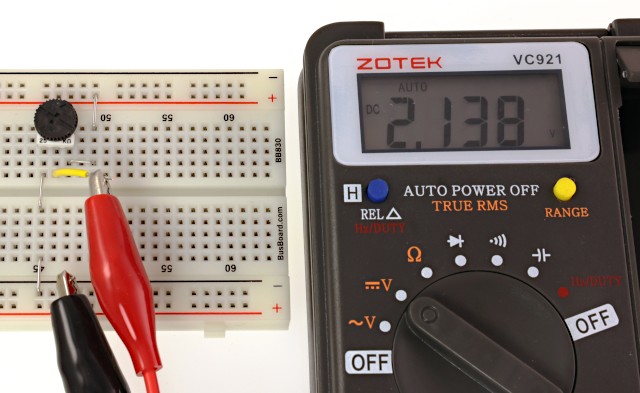
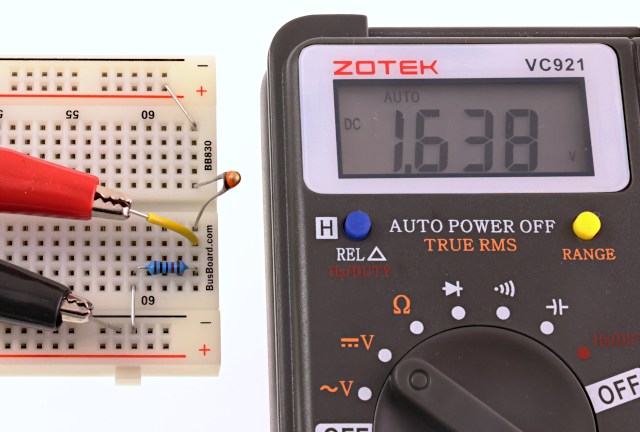
You can check the voltage from the pot by connecting a voltmeter, with the red lead to the center pin on the pot and the black lead to ground. Testing your hardware before writing software can save time and frustration. Turn the knob and watch the voltage change.
If the leads wiggle loose, you can bend a longer U-shaped wire and plug it into 2 holes, which will be much stronger when you clip a lead onto it.
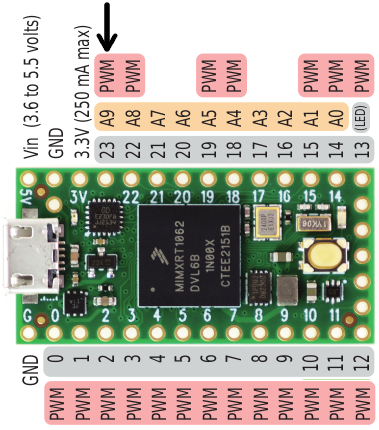
The Teensy 4.0 has 10 analog input pins, labeled A0 to A9.
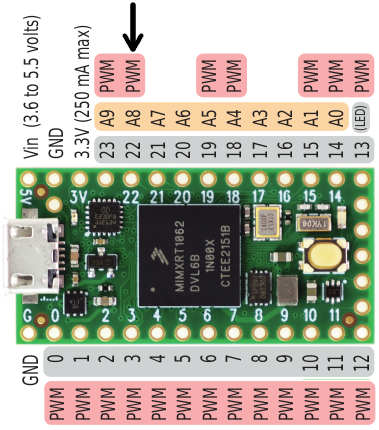
For this tutorial, connect the pot's voltage to analog pin A8.
Using analogRead
You can test the analog input with this very simple program.
void setup()
{
  Serial.begin(38400);
}

int val;

void loop()
{
  val = analogRead(A8);
  Serial.print("analog A8 is: ");
  Serial.println(val);
  delay(250);
}
The "analogRead" function reads the voltage on an analog pin, which is assigned to a variable "val". Text and the variable are printed to the Serial Monitor using Serial.print and Serial.println.
Here is what you should see when slowly turning the knob counter clockwise.
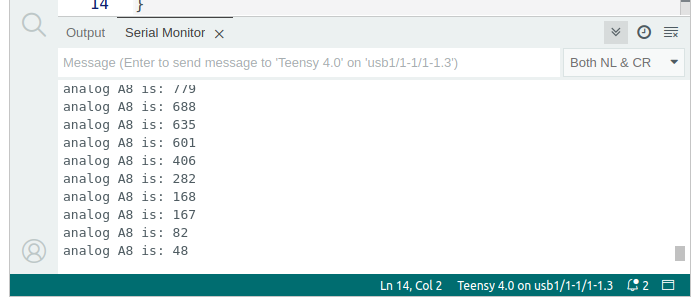
When the analog input is at 3.3V volts, you should get 1023 and when it is at 0 volts, you should get 0.
User Controlled LED Color
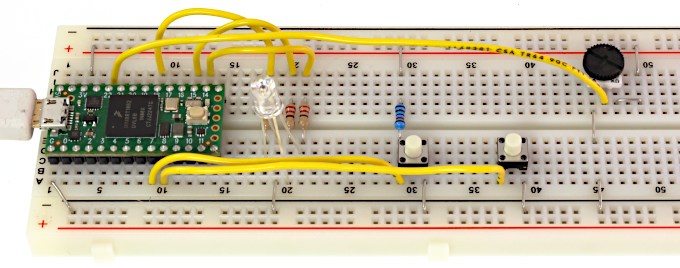
You can use the pot as user input. Here is an example that uses the pot to control the LED color.
int redPin =  14;
int greenPin =  18;
int bluePin =  15;

void setup()   {
  pinMode(redPin, OUTPUT);
  pinMode(greenPin, OUTPUT);
  pinMode(bluePin, OUTPUT);
}

int redIntensity = 0;

void loop()
{
  // read the pot position
  redIntensity = analogRead(A8) / 4;

  // set all 3 pins to the desired intensity
  analogWrite(redPin, redIntensity);
  analogWrite(greenPin, 255 - redIntensity);
  analogWrite(bluePin, 0);

  // remain at this color, but not for very long
  delay(10);
}
This is similar to the LED color fade from Tutorial 2. However, instead of changing the red intensity automatically, analogRead(A8) is used to measure the pot's position. Because analogRead(A8) returns a number between 0 to 1023, it is divided by 4 so it will be within the 0 to 255 ranges that analogWrite requires.
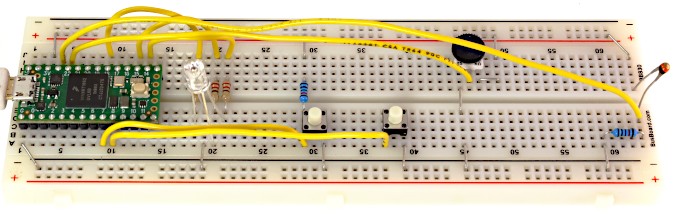
Connecting a Temperature Sensor
A thermistor is a resistor that changes with temperature. You can connect it together with another resistor that does not change, to create a voltage.
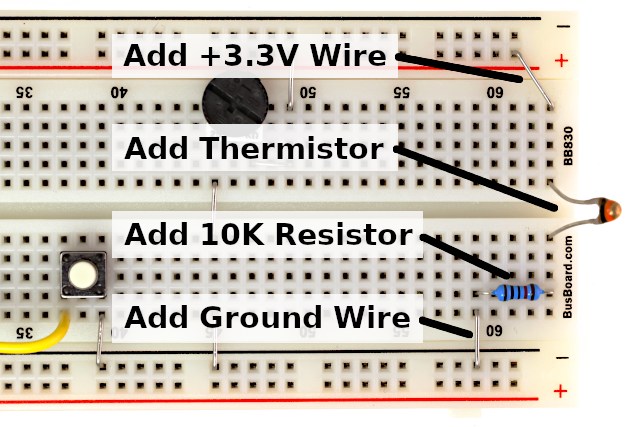
In this example, the thermistor is a Vishay NTCLE100E3103 which is 10K at 25 degrees Celsius and decreases in resistance as the temperature increases. At room temperature, the voltage should be close to 1.65 volts. As always, you can check the circuit before connecting it to your Teensy. If you touch the thermistor with your finger, you should see the voltage change.
When you are confident the thermistor is working, connect it to an analog input pin. In this example, it is connected to analog input A9.
Simple Temperature Programs
Just like the pot, you can use a simple program to read the analog input and print the value. As the temperature changes, you should see the number change in the Serial Monitor.
void setup()
{
  Serial.begin(38400);
}

int val;

void loop()
{
  val = analogRead(A9);
  Serial.print("analog A9 is: ");
  Serial.println(val);
  delay(1000);
}
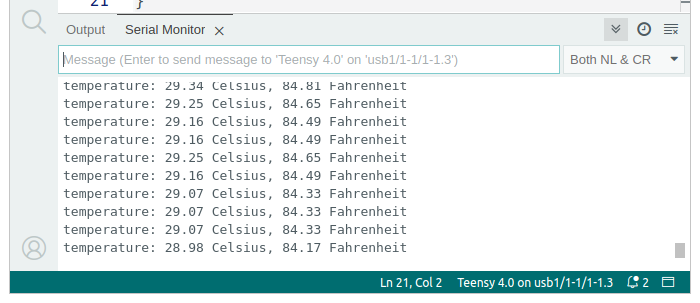
Displaying the number from analogRead isn't very meaningful. Here is an example that converts the number to meaningful temperature numbers.
void setup()
{
  Serial.begin(38400);
}

float code;
float celsius;
float fahrenheit;

void loop()
{
  code = analogRead(A9);
  celsius = 25 + (code - 512) / 11.3;
  fahrenheit = celsius * 1.8 + 32;
  Serial.print("temperature: ");
  Serial.print(celsius);
  Serial.print(" Celsius, ");
  Serial.print(fahrenheit);
  Serial.println(" Fahrenheit");
  delay(1000);
}
In previous examples, variables were created with "int" type, which limits the variable to holding integers. Since temperatures are real numbers with digits past the decimal point, you need to use "float" type variables.
When you run this program, you should see this in the Serial Monitor window.
More Accurate Temperature Calculation
You might wonder about the equation in the previous example which converts the code from analogRead into the Celsius temperature. The truth is, it is only accurate close to room temperature.This table shows the voltage and code that will be read at various temperatures. The last column shows the average number of codes per degree in each range. Near 25 degrees, the change is about 11.3 codes per degree. The equation above simply computes the difference between the reading and 25 degrees, then divides by 11.3 codes per degree. Obviously, for temperatures substantially different from 25 degrees, this becomes very inaccurate.
| Temp, C | Ohms | Voltage | Code | Code/Deg |
|---|---|---|---|---|
| -25 | 129287 | 0.24 | 73 | 3.64 |
| -20 | 96358 | 0.31 | 96 | 4.55 |
| -15 | 72500 | 0.40 | 124 | 5.56 |
| -10 | 55046 | 0.51 | 157 | 6.65 |
| -5 | 42157 | 0.63 | 196 | 7.77 |
| 0 | 32554 | 0.77 | 240 | 8.85 |
| 5 | 25339 | 0.93 | 289 | 9.82 |
| 10 | 19872 | 1.10 | 342 | 10.60 |
| 15 | 15698 | 1.29 | 398 | 11.12 |
| 20 | 12488 | 1.47 | 455 | 11.36 |
| 25 | 10000 | 1.65 | 512 | 11.32 |
| 30 | 8059 | 1.83 | 566 | 11.00 |
| 35 | 6535 | 1.99 | 619 | 10.44 |
| 40 | 5330 | 2.15 | 667 | 9.73 |
| 45 | 4372 | 2.30 | 712 | 8.90 |
| 50 | 3605 | 2.43 | 752 | 8.03 |
| 55 | 2989 | 2.54 | 788 | 7.13 |
| 60 | 2490 | 2.64 | 819 | 6.29 |
| 65 | 2084 | 2.73 | 847 | 5.50 |
| 70 | 1753 | 2.81 | 870 | 4.77 |
| 75 | 1481 | 2.88 | 891 | 4.12 |
| 80 | 1256 | 2.93 | 909 | 3.56 |
| 85 | 1070 | 2.98 | 924 | 3.05 |
| 90 | 915.4 | 3.02 | 937 | 2.62 |
| 95 | 786.0 | 3.06 | 948 | 2.25 |
The temperature and ohms data for this sensor can be found in the sensor's datasheet on page 84 (10th page of the PDF file).
In each 5 degree range, the equation is actually different. A simple approach is to simply use a the correct equation in each range. Here is one possible way.
void setup()
{
  Serial.begin(38400);
}

int code;
float celsius;
float fahrenheit;

void loop()
{
  code = analogRead(A9);
  if (code <= 289) {
    celsius = 5 + (code - 289) / 9.82;
  }
  if (code > 289 && code <= 342) {
    celsius = 10 + (code - 342) / 10.60;
  }
  if (code > 342 && code <= 398) {
    celsius = 15 + (code - 398) / 11.12;
  }
  if (code > 398 && code <= 455) {
    celsius = 20 + (code - 455) / 11.36;
  }
  if (code > 455 && code <= 512) {
    celsius = 25 + (code - 512) / 11.32;
  }
  if (code > 512 && code <= 566) {
    celsius = 30 + (code - 566) / 11.00;
  }
  if (code > 566 && code <= 619) {
    celsius = 35 + (code - 619) / 10.44;
  }
  if (code > 619 && code <= 667) {
    celsius = 40 + (code - 667) / 9.73;
  }
  if (code > 667) {
    celsius = 45 + (code - 712) / 8.90;
  }
  fahrenheit = celsius * 1.8 + 32;
  Serial.print("temperature: ");
  Serial.print(celsius);
  Serial.print(" Celsius, ");
  Serial.print(fahrenheit);
  Serial.println(" Fahrenheit");
  delay(1000);
}
There are many other very sophisticated ways to converting measurement to accurate temperature measurements. The sensor data itself is subject to manufacturing tolerance. For very accurate measurements, you can calibrate the particular sensor you are using by carefully measuring it at precise temperatures, instead of depending on the numbers from the table. But for many simple uses, even the simple equation is often good enough.
Of course, you can use the temperature data in various ways, such as turning on an LED, or perhaps a solid state relay connected to an air conditioner!